HOW
TO: OIL CHANGE
chinoaudio
projectz compilation
It's time for an oil change! Conducting
an oil change is perhaps one of the simplest maintenance jobs you can perform.
Its ease is not to be confused with its importance; oil is the life blood
of your car. Your vehicle's engine will fail within a year if you
neglect to change the oil. Below is a brief overview of the kind
of work you should be expect when performing an oil change. The information
below is not sufficient in teaching you how to do an oil change.
You will need additional help from someone with previous experience.
Only minor knowledge of hand tools is required to perform an oil change.
An oil change can not be performed without the
following:
-Wrench fitting the size of the oil drain plug.
-Two jackstands rated to support the weight of
the vehicle.
-Hyrdaulic jack rated to support the weight of
the vehicle.
-Several quarts of oil in the weight (viscocity)
required by the manufacturer.
-Oil filter.
-Some sort of used oil collector/container.
-Car that needs an oil change. =)
Your car should be on level
ground with the parking brake tightened to its maximum. 1)
Place the jack underneath the frame of your vehicle. Make sure the 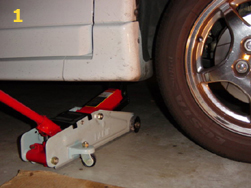
 pressure
release valve is tightened on your hydraulic jack before lifting.
Refer to the owners manual for proper jack placement. Hint: its
the same place where you would lift the vehicle to change your tire.
Lift the vehicle, making sure the vehicle frame is properly settled on
the jack. Make a good judgement of the height. You want to
be able to fit comfortably underneath the vehicle. Place a jackstand
underneath the vehicle frame or subframe on the side of which you are lifting.
The jackstand height should be slightly lower than the lifted height of
the vehicle, meaning, you should have to lower the vehicle a few inches
it makes contact with the jack. It is imperative that the jacks be
place on the frame or supporting parts connected to the subframe.
These are the only parts of your vehicle that can support the weight of
the car. All other parts will readily bend and contort. I have
seen people puncture holes through their oil drain pan by attempting to
support the weight of the vehicle on it. Repeat this procedure on
the other side.
pressure
release valve is tightened on your hydraulic jack before lifting.
Refer to the owners manual for proper jack placement. Hint: its
the same place where you would lift the vehicle to change your tire.
Lift the vehicle, making sure the vehicle frame is properly settled on
the jack. Make a good judgement of the height. You want to
be able to fit comfortably underneath the vehicle. Place a jackstand
underneath the vehicle frame or subframe on the side of which you are lifting.
The jackstand height should be slightly lower than the lifted height of
the vehicle, meaning, you should have to lower the vehicle a few inches
it makes contact with the jack. It is imperative that the jacks be
place on the frame or supporting parts connected to the subframe.
These are the only parts of your vehicle that can support the weight of
the car. All other parts will readily bend and contort. I have
seen people puncture holes through their oil drain pan by attempting to
support the weight of the vehicle on it. Repeat this procedure on
the other side.


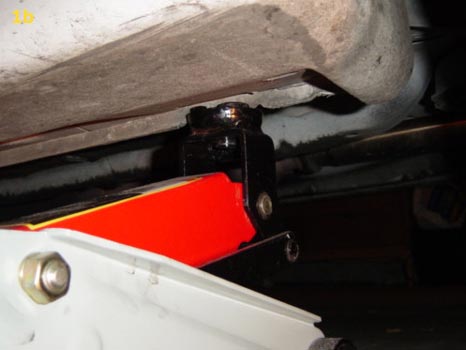
 2)
Now the car is "lifted." Test the integrity of the support by shaking
the car. Note: it should not shake any more than it would if it
was on its tires (it should probably not shake at all). Sometimes
the car has not properly settled onto the jackstands and may jolt a bit
before settling in place. Do not be alarmed. Retest by shaking
again. After everything is secure you may work underneath the car.
Place the used oil collector underneath the drain plug located on the oil
pan. Find a wrench that fits the oil drain plug. 3)
Loosen the plug until you can finish unscrewing it with your hand.
Unscrew the plug fully. 4) The used oil will drain upon removal
of the plug. Make sure its collecting into a container and not spilling
on the ground. Used oil is a possible carcinogen and a definite environmental
safety hazard. Allow oil to drain completely; this may take a few
minutes.
2)
Now the car is "lifted." Test the integrity of the support by shaking
the car. Note: it should not shake any more than it would if it
was on its tires (it should probably not shake at all). Sometimes
the car has not properly settled onto the jackstands and may jolt a bit
before settling in place. Do not be alarmed. Retest by shaking
again. After everything is secure you may work underneath the car.
Place the used oil collector underneath the drain plug located on the oil
pan. Find a wrench that fits the oil drain plug. 3)
Loosen the plug until you can finish unscrewing it with your hand.
Unscrew the plug fully. 4) The used oil will drain upon removal
of the plug. Make sure its collecting into a container and not spilling
on the ground. Used oil is a possible carcinogen and a definite environmental
safety hazard. Allow oil to drain completely; this may take a few
minutes.

 Now
your oil is drained, but there is still used oil residue in the engine.
Get out from underneath the car and open your engine hood. 5)
Located and unscrew the oil fill cap and flush this residue out by adding
a half to full quart of new oil. 6) You will see the clean
oil draining from the bottom. After this is done, replace the oil
drain plug and hand tighten with your wrench.
Now
your oil is drained, but there is still used oil residue in the engine.
Get out from underneath the car and open your engine hood. 5)
Located and unscrew the oil fill cap and flush this residue out by adding
a half to full quart of new oil. 6) You will see the clean
oil draining from the bottom. After this is done, replace the oil
drain plug and hand tighten with your wrench.
*I PULLED OUT THE NO. 7 PIC BECAUSE IT WAS
IRRELEVANT

8) Now locate the oil filter. In
some cars the oil filter can be conveniently unscrewed from the top with
no draining required. For the rest of us unlucky ones, it will be
underneath the engine. Move your oil collector underneath the filter.
Loosen it with your hands. 9) Allow the oil to drain into
the pan for a few moments before unscrewing it completely. Be advised,
there will most likely be some oil left in the filter as well, so observe
care in handling it. 10) After the oil has drained from this
location as well (shouldn't take long) lubricate the rubber o-ring on the
new replacement filter and hand tighten back onto the engine. Tighten
only until it is snug. The o-ring will allow the filter to turn a
bit both ways. You should not tighten it to the point where you can't
turn it clockwise anymore.


Now all work underneath the car is completed.
You can lower the car back down by reversing the process in the first step.
Your oil filler cap should still be unscrewed from when you flushed the
oil out earlier. 11) Add the proper amount of oil using a
funnel. Hand tighten the cap back into place. Your car is now
ready to be driven again. Enjoy abusing it for another 3,000miles
or pampering it on your daily commute for 7,500miles before expecting another
oil change.

 Recommendations: Add some sort of motor flush (K&W, Gunk, etc.)
into the engine just before performing an oil change. Follow the
instructions on the back label of the container. This will help flush
out thick sludge and deposits that might not otherwise come out with your
oil change. Invest in some good oil if you're driving the car hard.
Fully synthetic motor oils work well to lubricate the engine in extreme
driving conditions. Synthetic motor oils cost about 4x more than
regular oil so mom's picking up the kids from soccer practice probably
won't need it. However, dads and sons who think their new ride is
a race car, might want to look into it. Take the time to clean out
your injectors with injector cleaner during oil change. Deposits
from your gasoline continually reduce the efficiency of your injectors
by clogging them. You may want to use a complete fuel system cleaner
every few oil changes. Washing your hands with some sort of heavy
duty hand soap will get the dirty oil off your hand with ease.
Recommendations: Add some sort of motor flush (K&W, Gunk, etc.)
into the engine just before performing an oil change. Follow the
instructions on the back label of the container. This will help flush
out thick sludge and deposits that might not otherwise come out with your
oil change. Invest in some good oil if you're driving the car hard.
Fully synthetic motor oils work well to lubricate the engine in extreme
driving conditions. Synthetic motor oils cost about 4x more than
regular oil so mom's picking up the kids from soccer practice probably
won't need it. However, dads and sons who think their new ride is
a race car, might want to look into it. Take the time to clean out
your injectors with injector cleaner during oil change. Deposits
from your gasoline continually reduce the efficiency of your injectors
by clogging them. You may want to use a complete fuel system cleaner
every few oil changes. Washing your hands with some sort of heavy
duty hand soap will get the dirty oil off your hand with ease.
Below are the price differences between an oil
change your mom would do, and one I would do:
Cheap:
5 quarts of generic store brand oil = $5.50
1 generic store brand oil filter = $3.00
Total parts price = $8.50
Expensive:
5 quarts of Mobil 1 Fully Synthetic motor oil
= $22.50
1 Mobil 1 High Efficiency oil filter = $13.00
K&W Motor Flush = $2.00
VP Racing Fuels, fuel system cleaner = $22.00
Total parts price = $59.50
To make up for the additional cost, sell massive
amounts of shoes, and you're on you way!
written by Arthur Iinuma