| This
is a simple technique to create a glowing sepia image. It works best with
grey scale images with a lot of contrast but these alterations can be applied
to any image from the "colours" menu to improve the result of the sepia
glow. The techniques you'll be using are:
- copy, - paste, - Gaussian blur and - the colourize function. |
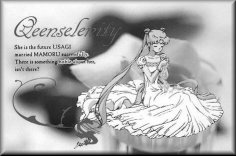
| Step
1:
First open your image and make a copy of it by clicking "copy" and then "paste" from the "edit" menu. Here is the image I will be starting with. |
 |
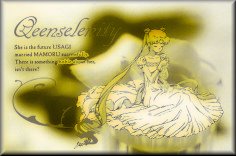
| Step
2:
Using the image you just created, click "image - blur - Gaussian blur" and use 5.00 as the radius setting. Then click "colours - colourize" and use: - Hue: 30 - Saturation: 255 The following image will be produced. This is the image which will create the sepia glow effect. |
 |
| Step
3:
Activate your first image and click "colours - grey scale". Now copy the image and paste it as a new layer over the blurred and colourized image. At this stage, you should not be able to see the blurred image. |
 |
| Step
4:
Now it's time to blend the 2 layers. Select "layers - properties". Change the settings to: - Blend Mode: Darken - Opacity: 80 This is the final image, blending the images to create a sepia glow. |
 |
