Capturing with Paint Shop Pro
Okay, here goes ! There's a card game I like (Double Deck Solitaire) that has
cool back and forward arrow buttons. So, to explain the capture function I'll
capture and then isolate the buttons. You may want to print this to keep up
with me.
Once inside PSP, click on capture
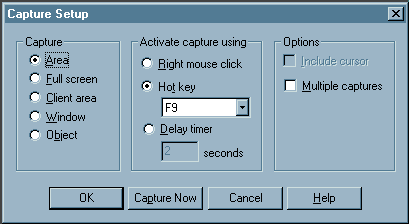
These settings are pretty much self explanatory, I included the image so you could
see my settings for future references in this tutorial.
NOTE:PSP cannot be used to capture an image inside itself. I use SnapShot to do this.
Once you have your settings where you want them click OK.
Now select capture > start. This will minimize PSP taking you to your desktop
screen, assuming you have no other programs running. Go ahead and open the program
you want to capture from. When you have the screen you want, press your hot key(s),
in my case F9. Now you should have cross hairs on the screen. Position the cross hairs
just outside one corner of the object to be captured. Click and release the
left mouse button. Drag the cursor to just outside the opposite corner and click
the left mouse button again. You should now be in PSP with the image opened.

View > zoom in > about 5:1 (more zoom for smaller captures).
Select the rectangle tool 
selection type > rectangle
feather > 0
Draw a rectangle around the image.Select edit > copy.
Select edit > paste > as new image. (I had to do this twice, once for each image)
.


You can close the original capture, saving it if you'd like.
Now you can change colors in the image, then reduce it to 256 colors and save
as a gif file and it's ready for your web page.
NOTE:To change the colors you may have to convert the image to 16.7 colors.


back