First Layer-Blue, Second Layer-Yellow, Third Layer-Green.
Nail holes are 1"
apart. If you want to make a smaller pattern, make nail holes 1/2" apart,
or you can make any size you want. You can also choose your own color of
string. I paint my board a glossey Black, here you can chose your own color
of paint.
Board size is about 1/2"X25"X18"Plywood.
After you mark off your
nail holes drill all holes with a 1/64 drill bit or smaller if you can
find one. Make sure the holes you drill are smaller then the nails you
use, or the nails will be to loose. If the nails come through the back
of your board, hit them back in flatt with the board.
Most schools will
not use a drill. They will use a hammer to put the nails in the board.
It will work but it is more harder to keep the nails straight. All string
is strung counter clock wise.
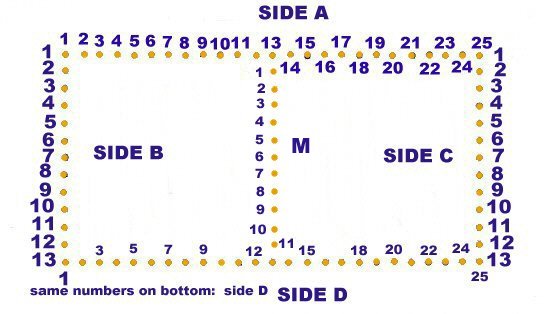
LAYER #1:
Tie at nail #1 side A, go to nail
#13 side A, back to nail #2 side B, continue as follows nail 12 side A,
nail 3 side B:
11-A --- 4B --- 10A --- 5B ---
9A --- 6B --- 8A --- 7B --- 7A --- 8B ---
6A --- 9B --- 5A --- 10B --- 4A
--- 11B--- 3A --- 12B --- 2A --- 13B ---
1A --- tie off at nail 1A --- add
glue.
Tie on nail #1 SIDE C:
Do the same string pattern on the
other half of SIDE A and SIDE C.
Tie on nail #1 SIDE C:
13A --- 2C --- 14A --- 3C --- 15A
--- 4C --- 16A --- 5C --- 17A --- 6C --
18A --- 7C --- 19A --- 8C
--- 20A --- 9C --- 21A --- 10C --- 22A ---
11C --- 23A --- 12C --- 24A ---
13C --- 25A. Tie off on nail #25 --- add glue.
LAYER #2:counter clock wise.
Tie on nail #25 SIDE A. We are
going to string the middle nails SIDE M:
Go to nail 1M --- 24A --- 2M ---
23A --- 3M --- 22A --- 4M --- 21A ---
5M --- 20A --- 6M --- 19A --- 7M
--- 18A --- 8M --- 17A --- 9M ---
16A --- 10M --- 15A --- 11M ---
14A --- 13D --- 13A --- Tie off on nail
13A. Add glue.
Do the same string pattern on the
other half of SIDE A and SIDE B.
Tie on nail #1 SIDE A --- go to
nail 1M --- 2A --- 2M --- 3A --- 3M ---
4A --- 4M --- 5A --- 5M --- 6A
--- 6M --- 7A --- 7M --- 8A --- 8M ---
9A --- 9M --- 10A --- 10M --- 11A
--- 11M --- 12A --- 12D --- 13A ---
Tie off on nail #13A SIDE A. add
glue.
LAYER #3:
Tie on nail #1 SIDE A: counter
clock wise.
Go to nail #12 SIDE D. Continue
as follows: 2A --- 11D --- 3A --- 10D -
- 4A --- 9D --- 5A --- 8D --- 6A
--- 7D --- 7A --- 6D --- 8A --- 5D ---
9A --- 4D --- 10A --- 3D --- 11A
--- 2D --- 12A --- 1D --- 13A. Tie off
on nail 13A SIDE A. add glue.
Do the same string pattern on the
other half of SIDE A and Side D.
Tie to nail #25 SIDE A go to nail
13 SIDE D. Continue as follows,
24A --- 14D --- 23A --- 15D ---
22A --- 16D --- 21A --- 17D --- 20A ---
18D --- 19A --- 19D --- 18A ---
20D --- 17A --- 21D --- 16A --- 22D ---
15A --- 23D --- 14A --- 24D ---
13A. Tie off on nail 13A Side A. add glue
|