|
|
|
|
 |
From Fabric Dolls ->Paper Dolls
-> Polymer Clay Dolls -> ShrinkIt Dolls
|
|
| |
|
It all started when I came across sites with doll patterns
on the Internet. I have been creating sculpted dolls when
the cabbage patch dolls were in and am always curious as to
what it the 'in' doll right now. One doll pattern caught my
attention. It was called 'dolly hugs' at http://www.cely.com/dollyhugs.html
. I saved the pattern to my hard drive and started to play
around with it.
|
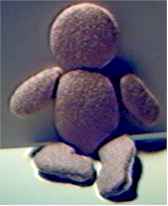
Mini Doll
- My first experiment was the black mini doll.
- I printed the design reduced to about 60% of its
original size (about 5 inches).
- I used an old black T-shirt for fabric and sewed
and stuffed the doll.
- It is ok, but I wasn't impressed. So, on I went
with my experimentation.
Cardboard Covered Doll
- For this doll I changed the pattern to have the
arms point downward. I printed it again at 60% reduction.
I printed it twice on cardboard stock and cut out
the individual pieces: arms, legs, body and head.
- Then I took some flesh colored fabric I had and
cut it out about 1/4 inch larger all around than the
pattern piece. I ran a running stitch around the edge
of the fabric and then cut 2 layers of thin quilt
batting to the pattern size.
- Now I placed the quilt batting on top of the cardboard
piece and covered that with the fabric and then pulled
the thread tight and tied it in a knot.
- Each piece is now covered on the front with fabric.
- As the next step I cut 5 small strips of fabric
that I sewed to the inside of two of the four arm
and leg pieces and between the 2 head pieces. This
would give the dolls some mobility.
- Then I glued the matching pieces together. It didn't
look very sturdy, so I just sewed them together.
- Well, the doll kind of looks unique, but that's
about it.
|

Mini doll
 cardboard covered doll
|
|
Paper Dolls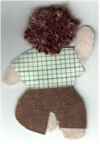 
The next logical step was to move to paper dolls. Well
these are paper dolls with a twist.
Body of Doll
- I made another change to the pattern and moved one
arm up and left the other one facing down. Just to
give me variety. Then I printed the pattern onto cardboard
reduced to 40% of the original size (about 3½
inches) and cut it out so that I could trace it
- The body of the dolls is two layers of fabric with
two layers of washed' babywipes in-between and then
glued together with the glue gun.
Doll Clothes

- I printed the clothes pattern on white paper and
roughly cut out the shape. Then
- Put it through my cold laminating machine or use
double sided adhesive sheets.
- Placed the fabric on to the sticky side of the pattern
and cut it out. I did this twice but mirrored the
second one.
- Ran a bead of glue down the center of the body front
and glued the clothes piece on and repeated the same
for the back.
- Then I ran a bead of glue along the edge of the
clothes and the pressed the two pieces together.
- With dimensional fabric paint I painted the eyes
and mouth.
- Curly or wavy wool made the hair.
|
|
Polymer Clay Dolls
As I was already experimenting with the dolls, I thought
I give polymer clay a try.

- I printed out the pattern reduce to 25% ofthe original
size and cut it out.
- After conditioning the polymer clay I rolled out
about 1/8 of an inch, placed the pattern on top of
it and cut it out with a craft knife.
- Next I placed the colored clay for the clothes between
two popsicle sticks and rolled it to that thickness.
- I traced around the body pattern giving it a little
extra and cut it out and placed it onto the body.
For the skirt part of the dress I just cut a straight
piece and kinds of pleated it to make it wavy.
- 2 black seed beads pressed into the head made the
eyes and a small hole the mouth.
- I also discovered that the head kind of lacked dimension.
So I cut a circle slightly smaller than the head and
placed it behind the body part head and molded it.
- I baked the pieces according to the instructions
on the clay.
- I think they are quite cute.
|
|
'ShrinkIt Plastic' Dolls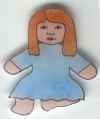

After my success with the polymer clay, I just had
to give 'shrink-it' plastic a try.
- I trace the pattern reduced to 40% of the original
size onto 'shrink-it' plastic with a permanent marker.
- The boy I colored with marking pens, the girl with
colored pencils.
- I shrank them according to the directions on the
package. They were 3½ inches when I started
and shrank to about 1½ inches finished size.
|
|
|
|

|
|
www.mcuniverse.com
Site and graphics created and maintained by Marlies
Cohen
© 97-2000 All Rights Reserved.
Page created December 4,
2000
Page updated:
Friday, June 1, 2001

|
|
|