|
|
|
|
 |
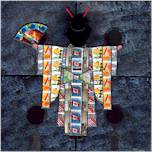
The Geisha
|
|
| |
|
In March 2000 I came across a tutorial for a geisha in a
graphics program. I really liked the picture and went on to
create my own
version. Of course, that was not the end of it.
|
|
I sat down and drew the image on graph paper and then traced
each part onto tissue paper.
Now I sorted my used stamp collection to be used as the 'fabric'
for the kimono of the geisha. So if you look closely you can
see 'US' and 'Swiss' and 'Canadian' stamps.
Once the glue was dry, I cut each piece out along the traced
lines on the back.
In the next step I glued each piece onto another piece of
tissue paper so that it now looked like the graphic.
To give the whole thing some dimension I glued the geisha
onto black fun foam and then cut it out. For the hair I glued
a piece of fun foam onto the tissue figure, glued 2 red painted
tooth picks onto that and then a smaller circle of fun foam
covered with black craft paper on top of that for the bun.
Next I sewed 4 5¼inch floppy disks together as 'canvas', sponge
painted them and then glued on the geisha.
Well, I think it is a very unique creation.
|
The Stamp Geisha

Outline
for you to use
|
|
| |
April
2000
 Cutting Board
Geisha 1
Cutting Board
Geisha 1 |
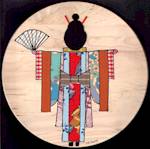
Geisha Version 2
After creating the Stamp Geisha I have been contemplating
working a quilted one. Well, it didn't quite turn out that
way, but very close.
I cut out the pattern pieces and attached them to a round
wooden cutting board that I had bought at a Dollar Store.
I put peel and stick adhesive (comes in double sticky sheets)
on the back of the fabric pieces and than removed the backing
and exposed the second sticky side and positioned it on the
cutting board.
The black dot above the geisha's hair is the whole in the
cutting board to hang it up.
When all was done, I outlined the different pieces with fabric
paint.
|
|
| |
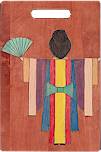
Geisha Version 3
Here again I used a cutting board.
Only this time I traced my design on the board, outlined
it with a woodburning tool and then colored it with acryclic
craft paint diluted with glazing medium and water to make
it transparent. Then coated it with varnish.
|
April
2000
 Cutting Board
Geisha 2
Cutting Board
Geisha 2 |
|
|

|
|
www.mcuniverse.com
Site and graphics created and maintained by Marlies
Cohen
© 97-2000 All Rights Reserved.
Page created April 5, 2000
Page updated:
Friday, June 1, 2001

|
|


