|
|
Materials
- styrofoam for head and wings
- frozen juice lid
- tin foil
- fabric
- wool for hair
- acrylic paint
- fabric paint
- ribbon to hang up angel
|
|
Preparation
- Cut a circle of quilt batting the size of the juice lid
and a circle of fabric about ¾-1inch larger than the juice
lid. Snip the extra fabric around the juice lid and then
glue each tab to the back of the juice lid. Make sure to
pull it quite taught.
- Cut 2 hearts out of styrofoam and cover them with wrinkled
tin foil. Gluing the foil down firmly. You can reuse clean
used foil.
- Cut 2 2inch circles from styrofoam. The second circle
has a ½inch portion cut out on the bottom to fit snuggly
around the juice lid. Use juice lid as template. Glue the
2 pieces together and paint with acrylic paint in flesh
color of your choice.
- Take 12x6inch piece of fabric and hem sides and bottom
either by sewing or glueing to the back. Run a running stitch
on the top (unhemmed side of rectangle). Gather tightly
and knot thread.
|

The back view of the angel shows how it is
put together.
Click on picture for full size view |
Assembly
- Attach head to fabric covered juice lid with glue so
that the topmost circle is partly on the lid and the second
circle is resting just against the lid.
- Take the two foil covered hearts and glue them to the
back of the lid so that the two points of the hearts touch
in the center of the lid. The top of the hearts are about
level with the head.
- Now glue the dress on the back of the lid below the hearts/wings.
- Cut wool to the length you like and glue to the top of
the angel.
- Glue a piece of bead cord around top of head for a halo
- Now use fabric paint and paint the eyes and the arms
on the lid. In the center of the arms paint hands or attach
some little ornament or heart or flower. (It is best to
paint the features last, otherwise you are more likely to
smudge the paint while still working).
- Thread ribbon through wing tips to create a hanger for
the angel.
|

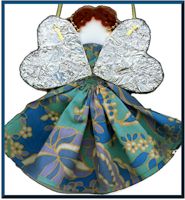
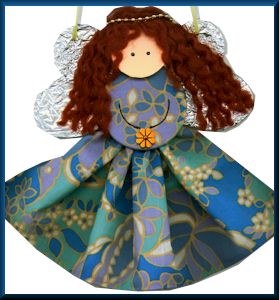
front view of angel
Click on picture for full size view |