What's New Craft Ideas & Tips Graphic Design Numerology Biorhythm Runes
Marlies Mal Native Interests Awards & WebRings Books Favorite Sites

Mini Picture Album


My daughter took some pictures with her new camera and somehow the film was not loaded properly and there were black edges. So I had the idea of creating a picture album with just small 2 inch square pictures.

I went looking on the Internet for ideas, but didn't find what I was looking for. I got some idea as to the dimensions, but that was all. So here is my creation.

Template for Pages

I used MS Word to create the templates as it gave me the option to print a design or graphic right on the pages. The template creates two album pages by folding the template in half. The pages are printed on regular white paper.

height 0.5" fold to inside of page
height 0.7" height 0.7"
width
1.075"
width &
height
1.6'
width
0.7"
width
0.7"
width &
height
1.6"
width
1.075"
height 0.7" height 0.7"
Height 0.5 inch fold to inside of page
  • I created a blank table with 6 columns and 5 rows. The table is 6.75 inches wide and 4 inches tall.
  • The first column is 1.075 inches wide (this is the one to attach the binding),
  • the next column is for the picture to show through and it is 1.6 inches wide, the next column is 0.7 inches wide (this is the front of the page
  • now for the back of the page the column is 0.7 inches wide,
  • the next column is 1.6 inches wide (for the picture to show through)
  • and the last one is again 1.075 inches wide.
  • I give the dimensions so that the album could also be created with wrapping paper or fabric.

MS Word Table View 
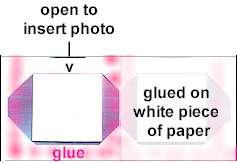
This is how the template looks in the MS Word file. The table borders in black will print, but the ones in white will not print.
The color graphic extends over the table so that I can easily grab it (double click) and change the colors. Here is the MS Word file saved in rtf format.

I printed 2 pages so that I ended up with 4 small pages and 8 openings for pictures.


Template for Cover and Back

  • Cut two pieces of card board 3.375" wide by 3" tall. These will be covered by the cover template.
  • Cover template is 4 inches square. 0.5 of an inch is folded to the inside of card board piece.
  • Print 2 copies of cover templates page.
Cover/Back Template

Pages Assembly

  • Cut out each printed template from the page.
  • Score black lines. I scored them from the front because it was easier to see.
  • Cut red lines with exacto knife.
  • fold the triangular flaps to the back side and cut them to about 0.5 inch.

View from Back

Reverse side

  • This is how it looks now.
  • Now fold the scored top and bottom pieces over the flap pieces and glue down.
  • The next step is to cut a piece of paper that will be inserted in between the pages behind the photos. Cut the pieces 3.375x3 inches. You only need one piece of paper for each template page.
  • Now put glue in a U shape on the back of one half of the page (pink on the diagram). The opening of for the picture is 1.6 inches square, but you will cut your photos 2 inches square, so leave some extra space without glue around the window. The top is open so that the photo can be inserted and changed. Now cover glue with white piece of paper. The right side of the diagram shows the paper in place.
  • Repeat for second half of page.
  • Cut photos 2 inches square and put inside pages. I made myself a frame with a 2 inch opening to see how the photo would look. That way I could just trace around the opening and then cut the photos.

Cover/Back Assembly

  • Cut out the 2 cover templates from one page.
  • Score the line that points to the spine. On the cover it will be the left black line and on the back it will be the right black line. Fold to the inside.
  • On the card board piece put a mark at the 3 inch point from the outside edge. That should leave about 0.375" for the spine.
  • Put glue on the folded back piece and place on the 3 inch mark with the color facing you and the fold underneath.
  • If you want to pad the top and back place a piecee of tissue paper in-between the card board piece and the printed cover and cut to size.
  • Turn piece over and fold printed cover to backside of card board.
  • Mitre corners and glue down.
  • Now cut out the templates from the second page you printed. Cut it about 1/8 of an inch smaller than the cover on 3 sides.
  • Glue to the inside of cover and back.
  • Embellish as you wish.
inside view of cover
click on image for a better look

Putting it all together


Front and Back view
open back and front covers of mini album

Open Mini Album
open inside pages mini album

  • As I have a docubind machine I used it to put the album together.
  • I punched holes in the cover and back and all the pages and the bound them.

If you don't have the means I have to bind the album try these options:

  • punch holes and sew mini album together.
  • or make front and back from one piece of cardboard 6.375x3 inches. You will have a spine that is 0.375". On each page fold 0.375" at the edge and glue accordion style together. Glue first and last page to respectively cover and back and only then cover up the inside of the cover/back.

Click Here!


www.mcuniverse.com
Site and graphics created and maintained by Marlies Cohen
© 97-2000 All Rights Reserved.

Page created: November 27, 2000
Page updated: Wednesday, March 21, 2001