|
Marlies' Creative Universe

|
In the fall of 2001 I got involved with polymer clay. So when it was
time to make Christmas gifts I had the idea of using CDs as canvas and
polymer clay as the paint. The 2 cats is my first attempt.
- I printed out the design and cut it out.
- Then I used the cut out pieces as templates and placed them on top
of the rolled out polymer clay and cut around it with an exacto knife
- Next I put the pieces back together, made sure they made good contact
with each other
- and texturized parts of the design
- Backed it at the recommended temperature for the clay and let it cool
off
- Coated it with waterbased Flecto Varathane varnish and backed it again
at 250°F for about 15 minutes.
|
Click on the thumbnails for a better look

2 cats in polymer clay on CD |
| |
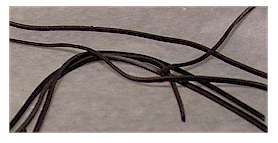 My
next experiment came when I purchased a pasta machine to condition the
clay. As it is a a regular pasta machine it has also the option to cut
the pasta into different widths. So I decided to cut the clay into small
strips and use that as my paint. My
next experiment came when I purchased a pasta machine to condition the
clay. As it is a a regular pasta machine it has also the option to cut
the pasta into different widths. So I decided to cut the clay into small
strips and use that as my paint.
- So first I printed out the design, this time it is a picture that
my son made for his girlfriend last Valentine's Day, and glued it to
the CD.
- Next I conditioned the clay and rolled it out at setting 3 otherwise
it was to thin and broke to easily.
- Then I rolled it through the narrow pasta cutting setting and ended
up with the strips above
- Now came the painting part by applying individual strips next to each
other and cutting them to size with an exacto knife. Depending on how
I smoothed out the individual strips the look of the design changed.
- Once I was done I backed the whole thing for the recommended time
and then coated it with varnish and backed it a second time.
I think it turned out quite ok and my son and his girlfriend are very
pleased with their gift.
|

picture glued to CD and some clay applied

Valentine Polymer Clay Painting on CD
|
| |
My next experiement was creating a quilt design on the CD. I had received
some polymer clay for Christmas and was anxious to try it out.
- I found a quilt pattern I liked and played around with the colors
in my graphics program and once I liked it I printed it out as a guide.
- I conditioned the clay, rolled it out with the pasta machine and then
used popsicle sticks as template to cut straight pieces. It hadn't occurred
to me then that I could use the wider cutting setting of the pasta machine.
- I marked the center of the CD and started to lay out my design according
to my printed pattern. Once the CD was covered it drew some fake stitching
on the clay and then baked it, let it cool and then varnished it and
backed it again.
I like the result.
- I did the same thing for my 2nd CD quilt experimenting again with
a different way of doing it. I cut a 3/4 inch square from card board
as my template and the layed out the quilt on the CD. This time I covered
the CD first with tacky glue. I have no idea if this will make a difference
with the adherence of the clay in the long run, I just wanted to make
sure that it stuck to it.
To Page 2 of Painting with
Polymer Clay
|
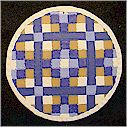
1st quilt created
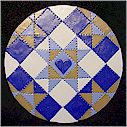
2nd quilt created
|