• Home • Crafts • Graphics • Marlies • Mal • Links
• Numerology • Runes • Biorhythm • Native • Fotos • Tutor
Craft Index

Bedroom - Room Box

Marlies' Creative Universe

My newfound interest in miniatures lead me to create a room box from old video tapes. I decided to recreate my daughter's bedroom.

Materials

  • 3 worn-out video tapes
  • popsicle sticks
  • drywall compound
  • duct tape
  • double sided carpet tape
  • saw, file and sandpaper
  • cardboard
  • small piece of styrofoam 1/2-inch thick
  • fabric
  • paper
  • plastic stir sticks
  • acrylic paint
  • varnish
  • glue gun
Click on the thumbnails to better a better look


My daugther's bedroom room box
My Daughter's Bedroom
Room Box

view of desk
View of Desk


Instructions

  • The Room from Video Tapes
    Cover each video tape with duct tape. The best way to do this is to cover the thickness of the tape in one continuous strip around the whole tape. Make a cut at each of the 4 corners on each side and push down the tape onto the face part of the tape. Then cover the face parts of the tape with 2 strips of tape just a tad shorter than the full width.
  • Now attach the tapes to each other with double sided carpet tape and then cover the seams with duct tape.
  • I had a box of durabond drywall compound left over from a job and decided to use that for the walls. I mixed it according to the directions on the box and applied it with a scraper. It didn't look very good, so I just waited a bit for it to harden and then used my hand moistened with water to smooth it out. This gave it an uneven an rustic look. I let it dry for a few hours. This gave me the time to create my furniture.
view of underside of room box
View of underside of
room box
 
  • The Bed
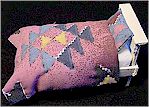
    I had to make the bed to fit the dimensions of the room/video tape width. I used popsicle sticks with the ends cut of. I sawed them off and then used sand paper to smooth out the ends and then glued the pieces together.
  • Next I cut out a piece of styrofoam for the mattress to fit into the frame and covered it with fabric that I attached with with the glue gun to the back side.
  • Then I found some fabric that looked like a quilt and sewed a quilt by inserting some batting. In hindsight I should have left out the batting. I stitched around the design to make it look like a real quilt.
  • Then I also made a small pillow.
  • Next I painted the bedframe white and then varnished it.
  • I glued all the pieces to the bedframe including the quilt and pillow.
  • The Desk, Computer and Chair
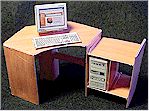
    I measured my daughter's real desk and then used my graphics program to recreate the individual pieces. I found some woodlook graphic and used that to make the pieces look like wood. To give the desk stability I doubled up each piece.
  • I printed them out on card board paper and cut them out and glued the desk together and then coated it with varnish.
  • The Computer is from a pattern I found at Jim's Printable Minis . I had to print out the computer at about 75% of the 1/12-inch scale model to fit the room's dimensions.
  • The Chair is from a pattern I found in one of my craft books. This time I cut the pattern out of plain cardboard and covered it with the wood pattern that I had printed out on plain paper and then varnished. This seems to work and look better than printing the pattern directly onto the card board.
  • The legs are matches covered with my fake wood veneer.


posicle stick bed
Popsicle Stick Bed


card board computer desk an dcomputer
Cardboard Desk & Computer


cardboard and matchstick chair
Cardboard and Matchstick
Chair


  • The Outside Walls
    Here it came in handy to have the drywall compound covered with the varnish. The brown paint became transparent and reacted almost like a wash that I could wipe of and create a very natural look.
  • The Window
    I made a window with some strips of balsa wood I found lying around.
  • Printed a stained glass design on a transparency sheet, placed a sheet of white paper behind it. (I could have probably painted the design on white paper and varnished it). Then I glued it the the back of the frame and then glued the frame onto the wall.
  • The Inside Walls
    I sealed the drywall compound first with a coat of varnish.
  • Then painted the walls on the inside with a few coats of blue. I should have left the walls uncoated, the blue would have covered them better.
  • It is important to paint the walls before installing the floor so there are no paint drips on the floor.
  • The Floor
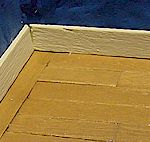
    I wanted realistic looking floor and used popsicle sticks glued to the video tape to create it.
  • I cut the ends off the popsicle sticks and cut them into 3 different lengths and then arranged them like a real wood floor.
  • Then I used watered down acrylic paint that I wiped off immediately to stain the floor and gave it a couple coats of varnish. By sanding between varnishing I removed also some of the paint and gave it a worn look.
  • The Baseboards
    are just popsicle sticks painted white.


outside walls and window
Outside Walls and Window


popsicle stick floor
Popsicle Stick Floor


  • The Posters
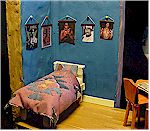
    I took the pictures my daughter had collected on her computer and shrank them to fit the room size in a graphics program and printed them on plain white paper. I cut them out and varnished them. (I should have varnished them first and then cut out, would have been easier).
  • Next I cut a plastic stir stick in half. Now I had a poster hanger. I could slide the cut out poster into the slit in the newly created poster hanger.
  • Then I used a needle and threaded a piece of thread through the poster hanger tube and tied a knot that I then slid into the tube to hide it.
  • I glue some seed bead to the wall. Hung the posters up on them and put a dab on glue on the back of the posters to make them stay put.

Now all I had to do was to glue the furniture into place and my room box was finished.


bed and posters
Bed & Posters


www.mcuniverse.com
Site and graphics created and maintained by Marlies Cohen
mcu@mcuniverse.com
© 97-2002 All Rights Reserved.

Page created: Monday, January 14, 2002

Click Here!


Lady Bug front Lady Bug - ovehead view Lady Bug - rear view Lady Bug - straight on