Ring of Thori Tactics
Greetings friends!
Not to disappoint you, but this is not what I consider a full tactics article. It is intended to demonstrate some very effective uses for the Fiery Ring of Thori. It recently came to my attention that some Dwarf generals were neglecting this item; I can only conclude this is because they are unaware of how useful it is. I hope that the following illustrations on two possible tactics with it prove to be good examples of its use. I know that both tactics have been used to great affect in the battles of the War Host.
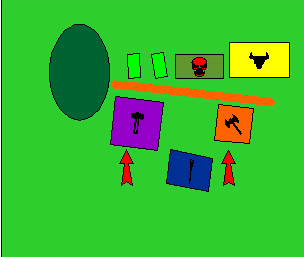
We start with a diagram of a typical deployment. For the sake of simplicity we'll assume our opponent is Chaos.
This is a fairly typical deployment for the Dwarves with 2 Crossbow units forming the walls of a modified castle. The unit with the Ring would be the dark blue crossbow unit screening the unit of Slayers and elites (the orange and purple units). This deployment is deliberately designed to encourage the opponent to engage the blue crossbow unit. Assuming that our opponent reacts as we want, they will advance more or less straight forward.
Deployment and Turn 1

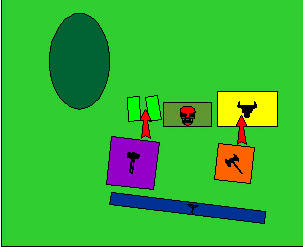
Turn 2
Once the enemy advances sufficiently close that a charge is likely, the Dwarf general has a choice to make. If he wishes to pre-emptively charge the enemy then he must sacrifice a turn of fire from the crossbows, and any possible stand and shoot reaction from them. If he wishes to cause as many casualties as possible with missile fire, then he is almost assured of being charged. Since we are primarily interested with what to do with the Ring we'll concentrate on that part of the battlefield. We'll refer to the two possibilities as Tactic One and Tactic Two.
We have two options on when the Ring is activated. It can be activated at the beginning of the turn before movement or it can be be activated immediately after the shooting phase. If the general wants to pre-empt the charge then the ring should be activated before movement. If he wants to maximize shooting casualties it should be activated immediately after the shooting phase.
Turn 2 Tactic One |
Turn 3 Tactic Two |
Tactic One is designed to pre-empt the charge. The Ring is activated before movement. The crossbow unit reforms into a block; freeing the Slayers and elites to advance right up to the the flame wall. The flame wall will go away at the beginning of the next Dwarf turn.
Tactic Two is designed to maximize shooting. The Ring is activated after shooting in turn 2. The flame wall goes away at the beginning of Dwarf turn 3, at which time the crossbowmen can shoot again. Then when the crossbowmen are charged they can either flee, or if bearing a Rune of Slowness (to cause the charge to fail) they can stand-and-shoot. In our example we assume that they flee and allow the Slayers and elites to absorb the charge or possibly counter-charge if the enemy fails to reach them. I don't reccommend this unless the crossbowmen are causing lots of casualties.
Turn 3 Tactic One |
Turn 4 Tactic Two |
Tactic One.
This tactic becomes very straightforward at this point. The elites and Slayers charge while the crossbowmen advance to prevent either unit from being flanked.
Tactic Two.
Here the Dwarves can charge if the previous charge failed. Otherwise they are in melee with the enemy. Hopefully if the crossbowmen have done their job there won't be much left to fight.
Conclusion
These two tactics are by no means the limit of the usefulness of the Ring, but they are two good examples of what the Ring can do.