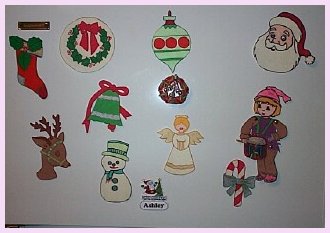
CRAFTS
Cameo Pictures
These are made with transferring patternsonto something like felt,then painting with cameo paints.


beads
red bow
small presents
and other xmas stuff
1/glue beads around wreath,add presents
flowers,angels,and whatever else you choose
2/Glue your bow on
3/Hang on hanger for outside door

1 strand mini lights
garland
small xmas decorations
1/Take bristol board and shape into cone,
bristol board can be cut smaller,which
looks better smaller than the whole bristol board
2/Once that is done use masking tape to secure
the bristol board to keep its cone shape.
3/Place mimi lights add masking tape to secure
Add one light to top of cone.
4/Glue your garland around next
5/Then add your decorations.

beads(choice of color)
flowers
christmas lace I used pop tab for hanger
1/Add your hanger to back of hat
2/Glue lace around hat
3/Then glue your choice of beads to hat
4/Then add your xmas decorations
5/Can be used for bathroom or bedroom,
just change the decorations.
ribbon
cardboard
stars or christmas shapes
1/Cut a circle in cardboard,then smaller one in middle
2/This will be your shape for wreath
3/Cut a strip of cardboard,at least 4-inches wide,
Wrap the yarn around,maybe 4 times.
4/Cut v's in the sides of cardboard on the sides,
yarn wrapped around the other two.Slip apiece
of yarn under the wraps,use v's then tear out cardboard.
Tie tight,trim then fluff it.
5/Glue onto cardboard then add your decorations.

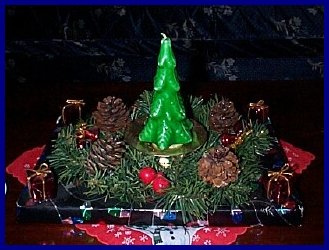
candle pick
greenery and other xmas decorations
Candle
Wrapping paper(your choice of color)
1/Wrap your styrofoam piece with paper
2/Glue or pick your candle holder in place
3/Glue your decorations on
4/Your choice where to add decorations
5/Add your candle
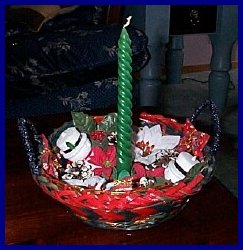
Candle holder
small Christmas ornaments
candle
1/Glue candle holder in middle of basket
2/Then glue your decorations anyplace you want
3/Add your candle
old cds
light cardboard
candles
small xmas decorations(optional)
1/Cut cardboard into small circles,
alittle smaller than cd.
2/Glue cardboard onto cd,then glue on doilie
3/Glue candle onto the middle of cd,then
if desired add on xmas decorations.

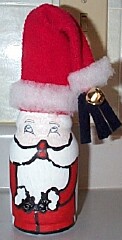
white paint
pencil
flesh paint
red paint
red felt or other material
bell,and cotton balls
1/sand the bottle,wipe,then paint at least 2-3
coats of white,dry in between coats.
2/Draw santa face with pencil,then paint.
3/Add hat then sew bell on,and add cotton.

Made Out Of Desk Protector
My sister made these for me
Materials:desk protector sheets
Tulip paints
patterns from net,or coloring books
1/Trace pattern with marker,then paint,
then cut out your picture.

Broomstick Doll
Materials:small broom2 different color lace
small straw hat
small roses
ribbon to match lace
beads to match
1/Cut lengths of lace for skirt,
glue in back of broom.
2/Add second lace,glue in back.
Keep adding lace until you reach to the broom handle
3/Glue on one color of lace for the handle
4/Cut about 1-inch of lace,glue to the
side of broom,add roses inside of lace.
5/Cut the hat in half,glue lace and beads
around hat.Then glue the hat onto handle.
6/Cut about 1-inch of ribbon,glue to back for hanger.
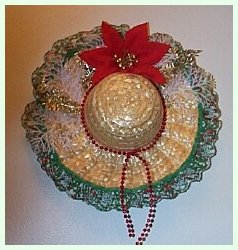
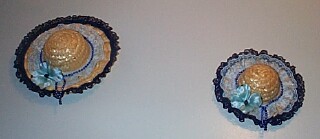
Straw Hat
Materials:straw hatbeads
lace
pop tab or ribbon
1/Glue lace to the rim of hat
Then glue the beads on
Glue pop tab or ribbon
to the back for a hanger
Or you can add flowers
PICTURES FOLLOWS BELOW
The rest of the crafts have no pictures.
Wallpaper Fan
Materials:1 piece of wallpaper(8"x36")
flat lace(1 1/8")wide(36")length
satin flowers and leaves
2 lengths of curling ribbon(39")each
1 chenille stem(6")
1 piece of bristol board(1"x9")
ball point pen,hole punch,tacky glue
1/Make a measuring tool from bristol board(1"x9")
Use ball point pen to draw lines(1")apart on the
back of the entire piece of wallpaper.Press
hard to score the paper and it will be easier
to fold later.
2/Glue one piece of curling ribbon along one of
the long edges of the wallpaper.Glue the flat lace
to the same edge,applying glue to the back of the
wallpaper so the lace shows from the back.
3/When dry,fold the wallpaper back and forth
into a fan.Finish the two end folds by
folding back and gluing down.
4/Punch holes along the opposite long edge
of the wallpaper,one hole per fold.Insert
chenille stem into holes.Gather all the folds.
Twist the chenille stem well.
5/Glue flowers and leaves to the gathered corner.
Use scissors to curl the curling ribbon.
Attach the ribbon curls to the chenille stem.
Button Bouquet
Materials:1 screw type bottle cap(from liquor
or pop bottle)
1 styrofoam ball(1")
ribbon(1/8")wide(8")long
1 1/2 green chenille stems or
tinselstem(18")total length
9 buttons without shanks,
in bright colors(1/2")diameter
german statice to fill spaces,between flowers
tacky glue and scissors
1/Tie the ribbon into a bow no larger than
25mm(1")wide.Glue the bow to the side of bottle.
2/Place a generous dab of glue inside the
bottle cap.Flatten with your thumb until
it is even with the rim of the bottle cap.
3/Cut the chenille stems into nine pieces that
measure 50mm(2").To make each button flower,
glue one end of a chenille stem to the back
of one of the buttons.Allow the wire part
of the chenille stem to slightly poke through
one of the holes.(not to far)Make nine flowers
Allow to dry.
4/Push each flower stem into the styrofoam.
Add dried flowers between the button flowers.
5/Arrange your bouquet by bending the flower
stems.You may wish to trim one or two of
the stems of the flowers.
Sachet
Materials:5x5 inch square of mauve felt
5x5 inch square of white flat lace
potpourri
13 inch length of white gathered lace,
1/2 inch wide
12 inch length of 4mm string pearls
2 inch length of white rattail cord
gold charm(angel etc.)
1/Using a heart pattern,trace and cut one felt
and one flat lace heart.Glue the two hearts
together along the edges,leaving the bottom
point of the heart unglued.Gently stuff the
heart with potpourri,and then glue the point closed.
2/Glue the gathered lace along the outer edge
of the felt side of the heart,starting at the
top center,be sure to cover the glue line that
attaches the flat lace to the felt.
3/To make a hanger,fold the rattail cord in
half to form a loop,and glue the ends
to the felt side of the heart.
4/Glue the gold charm in the middle
of the lace side of the heart.
Beaded Wreath
Materials:7 cartwheel beads(sunburst beads)18mm(3/4")
14 faceted beads 10mm(3/8")
1 tinselstem 30cm(12")
1 liberty bell 18mm(3/4")
ribbon 7mm(1/4")wide 20cm(8")length
ruler and scissors
1/Thread two round beads,and one cartwheel bead
onto the tinselstem.Repeat this pattern until
all 14 beads and 7 cartwheels have been applied.
2/Measure the tinselstem ends.Slide the beads
over until the tinselstem ends measure 4cm
( 1 1/2")and 9cm (3 1/2").Twist( twice)the tinselstem
ends together as tightly as possible.After
twisting the tinselstem ends should measure
3cm(1 1/8") and 8cm(3")
3/Attach the bell to the 3cm(1 1/8")end by
slipping the tinselstem through the hole
of the bell.Bend the tinselstem and give it
a double twist.Tie a knot in the ribbon above
the bell and make a bow.Trim the ends of the
ribbon by cutting them at an angle.Glue in place.
4/Curve the 8cm(3")tinselstem end into a hook
shape and hang on your tree.
Paper Lace Hanging
Materials:paper lace(2 3/4")wide,(12")long
1 piece of bamboo skewer(4")
ribbon(1/8)wide,(30")long
heavy ribbon(1 3/8")wide,(6")long
3 mini bouquets(3/4")artificial
flowers(hydrangeas)
3 small bunch baby's breath
Or other dried flowers
tacky glue,scissors,ruler
1/Wrap the end of the paper lace ribbon
around the bamboo skewer.Use glue to
secure.Cut a (6")piece of the narrow ribbon
to make a hanger.Tie to each end of the
bamboo skewer.Place a dab of glue on each knot.
2/Cut the wide ribbon into 3-5cm(2")pieces.
Roll each around your little finger.Glue
into a cylindrical shape.Glue the three
cylinders,spaced evenly,on the paper lace.
This will become vases for the flowers.
3/Cut 3-20cm(8")pieces of narrow ribbon.Make
three tiny bows.Glue the bows to the front
of the ribbon vases.
4/Insert bouquets and baby's breath flowers
into each vase.Put a dab of glue inside
each vase to secure.
Lace Heart
Materials:1 wooden heart
lace ruffle(3/4)width(12")long
fused pearls,4mm width,(10")length
3 ribbon roses(1/2")
3 leaf sequins(1/2")
ribbon,3mm(1/8")wide(8")long
Acrylic paint,paintbrush,tacky glue
Small piece of plastic to work on.
1/Place the heart on the plastic.Paint the edge
and one side of the heart.Set aside to dry.
When dry,turn over and paint the other side.
2/Glue the ruffle all around the heart.When
applying the ruffle to the two curves at the
top of the heart,add a few extra folds to the
ruffle to help it lie properly.
3/Glue the fused pearls along the flat edge
of the ruffle,all around the heart.
4/Cut the stems off ribbon roses,leaving
a short stem on each.Glue the three ribbon
roses and leaf seguins to the center of heart.
5/Add a ribbon hanger by gluing both ends
of ribbon to the back of the heart.
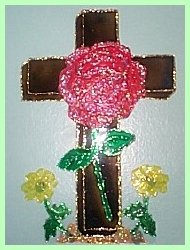
Cross
Materials:1 chenille stem(3")
1 chenille stem(4")
35 cartwheel beads(sunburst)(1/2")
ribbon(1/8")length as desired
tacky craft glue
1/Criss cross the two chenille stems together
at the midpoint,making one complete twist
only.The long stem is used horizontally
and the short one vertically.
2/Apply 14 cartwheel beads to one of the
longer stems.This stem will become the bottom
leg of the cross.Apply 7 cartwheel beads
to each of the other three stems.
3/Make a loop at the end of the top leg
of the cross by bending the chenille stem
into a small circle.Dab with glue to keep
the circle from opening.Allow to dry.
4/Make a hanger,of any length,by inserting
the cord into the loop and tying the ends in a knot.
5/Bend the ends of the chenille stems at the end
of each leg.Dab glue on each.Dab glue on the
center of the cross,front and back.
Cinnamon Stick Centerpiece
Materials:27-16"-long cinnamon sticks
Floral Tape
Tacky Glue or Glue Gun
Assorted dried flowers
Small Pinecones
2"-wide and 1/4"-wide velvet ribbon
1"-wide and 3/4"-wide grosgrain ribbon
1/Wrap four 16"-long cinnamon sticks together with,
floral tape,don't cut off tape
2/Add rest of 16"-long cinnamon sticks by holding,
a few sticks at a time against original sticks,
and winding tape around the whole bundle,cut off tape.
Be sure to keep the bottom of the bundle flat,
so that the centerpiece won't roll when
it's placed on the table.
3/Insert flowers by dipping the stem ends into
the glue before placing among cinnamon sticks.
Glue pinecones among the flowers.
4/Wrap 2"-wide velvet ribbon around the bundle
and tie in a bow.Add a small bow of 1"-wide
grograin ribbon on top of velvet bow.Use
whatever color ribbons to complement your
table setting.Glue a few small flowers and cones
to the portion of your bow.
Decoupage Plate
Materials:6"-8" diameter clear glass plate
Rolled giftwrap in desired print
White glue(Elmer's)
Gold or Silver paper doily
2-3 sponge brushes
Wallpaper seamroller(Optional) Acrylic paint in color desired,
And in black (Optional)
Water based clear varnish
1/Wash plate in warm water.Dry with lint free towel.
2/Cut out design motif from giftwrap.Holding the
plate in front of you,arrang the cutouts on the
back of the plate,with design facing you.
3/With finger,smear glue on the right side of the
cutout and place the cutout on the back of the plate,
in desired arrangement,pressing firmly.
Work from foreground to background of design,overlapping cutouts.
4/Cut medallions from paper doily and glue them,
right side facing the back of the plate,
around the edge of the back of the plate and
to any empty areas.Press firmly into place.
5/Place the damp cloth over the back of the plate.
Using the wallpaper seam roller and working
from the center of the plate toward the edge,
roll out any air bubbles,trapped between the glass,
plate and the cutouts and doily.Let glue dry.
6/Using a clean,dry sponge brush,paint the back
of the plate with two coats of acrylic paint
in desired color,letting the paint dry between coats.
After the paint has dried completely,paint a coat
of black acrylic paint on the back of plate,if desired.
7/Seal the back of the plate with two coats of clear
varnish,letting the varnish dry thoroughly between coats.
8/Sand the edges of the plate with very fine sand paper
to remove any roughness left by the glue and paint.
Decorative Hat
Materials:12" straw hat with 3 1/2"-wide brim
Dried Flowers:such as baby's breath,
german statice,pearly everlasting,
golden yarrow,etc.
Asparagus fern and other greenery
3 yards 1"-wide teal grosgrain ribbon
Or desired color of ribbon
Scissors,glue gun or white glue,
such as elmer's,and floral wire
1/Cut stems of dried flowers1"-1 1/2"inch length
Using glue gun,glue statice to brim of hat
around crown,leaving a 2" space for a bow.
2/Add 6-8 clusters of golden yarrow,spacing evenly
around brim.Glue remaining flowers evenly around ,
brim,starting with larger flower clusters and,
ending with smaller ones.Place flowers so that
colors and shapes are evenly spaced.Fill in with
white baby's breath,asparagus fern and other greenery.
3/Cut 30" from length of grosgrain ribbon,set aside
From remaining ribbon,make a 6-loop bow,securing
with floral wire at midpoint of ribbon.Glue bow
to hat in space reserved.
Posie Pops
To make each flower,hot glue 5 starlight candies
together so that wrapper twists point out.
Hot glue a candy in center.For stem paint a craft
stick,acrylic green.Apply 2 coats of satin finish.
Hotglue stem to wrong side of flower.Tie a green
satin ribbon bow around stem.
Potatoe Necklace
Materials Needed: 2-3 potatoes
Paring knife
18-inch of length stiff 18-gauge wire,
(stem wire works well)
Metallic paints or acrylic paints
Medium paintbrush
Gloss spray finish
Pearls or metallic beads
Dental floss
Ruler,Scissors,Large needle
Peel the potatoes and cut into 1/4-inch,
to 1/2-inch cubes,depending on the size of bead you want
Cubes will shrink when dried
Cut about 36-84 cubes.But cut a few extra,
to be sure of any broken ones.Thread the potatoe,
cubes onto a piece of wire,pushing wire through,
the centre of each cube and allowing about
1/2 inch of breathing space between cubes
Let cubes dry until bone dry,1 day or more.
Allow 3-4 days for larger cubes,turning cubes,
once or twice as they dry.The color will darken,
and the cubes will be hard.Paint each cube with ,
desired color,while cubes are still on wires.Let dry.
Remove cubes from wires.Thread needle with a 60-inch ,
piece of dental floss and bring through the center,
hole of each ,alternating with one or more of the,
faceted,pearl or matallic beads in between.
When necklace measures 26 inches or longer,tie
the ends of the dental floss together with two
square knots close to the last cubes or beads added.
Draw the knots back through the cubes by rethreading
the ends and bringing each end back through half
of the cubes to meet at the center of the necklace.
Again tie the ends of floss together with two,
square knots,cutting ends close.Pull each knot into,
the center of a cube to hide it.
Do not dry cubes in microwave or oven.
Clown Magnet
Materials: Flat wood clothespin
Acrylic paint,your chose of colors
Medium paintbrush
2-5mm movable eyes
Pom poms-2-3/4 inch yellow or yellow glitter, And 1- 1/4-inch red
Tacky white glue,toothpick,and magnet
Paint top portion (head)of clothespin with white,
and bottom portion(body)with yellow.Let dry.
To make dots,dip handle end of brush lightly into,
light blue paint.Press paint dipped handle onto,
yellow portion of clothespin.Keep repeating until,
body front and sides of the clown all have dots.
Use toothpick to add a small amount of glue to
the back of each eye and press into place on head.
Pepeat to add the red pom pom on nose.
For hair,apply glue to one side of each yellow
pom pom and press one to each side
of the clowns head.Glue magnet to back of clown.
Add your own colors,to make different clowns.
Heart Bulletin Board
Materials:corrugated carboard
pencil
scissors
white craft glue
real felt or fabric such as denim
shells,buttons,silk flowers,yarn,beads
hammer and 2-3 nails
1/Draw a shape for bulletin board on cardboard.
Shape as anything you want.
2/Cut out the shape,trace it on more cardboard,
and cut out the second one.
3/Glue the two cutouts together.Smooth them all,
over with your hands.
4/Use a pencil to trace the shape onto a piece
of felt or fabric.If felt or fabric is dark,
use a piece of chalk or dry sliver of soap
to trace it.Cut it out.
5/Spread a thin layer of glue all over the
cardboard and smooth the felt over it.
6/Decorate around the edges of bulletin board.
Glue shells,yarn,ribbon,silk flowers,
pictures,magazine pictures,or whatever else you have.
7/Nail to the wall.
Decoupage Vase
Materials:glass or plastic bottle
paper or fabric for cutout
scissors
white craft glue
paintbrush
acrylic varnish or sealer
1/Remove labels from bottle,make sure it's clean and dry
2/Cut picture out from wallpaper,wrapping paper,
fabric,magazine,or card.
3/Glue cutout onto the bottle.Make sure all edges,
are glued down.Press out any air bubbles.
4/Remove any extra glue around the edges,
with a wet cloth,or scratch off if dried.
Allow cutout to dry.
5/Brush over the cutout with sealer,acrylic varnish
or watered down glue.Allow the vash to dry.
Apply another coat of sealer.
6/Arrang fresh silk flowers in the vase.
Instead of using a bottle,use a plain vase or
a salad dressing bottle.
Fabric Flowers
Materials:strip of fabric(about 2 1/4 inches x 3 feet)
scissors
pins
needle,thread to match your fabric
ruler
1/Trim off the corners of the fabric strip and,
fold the strip in half lengthwise,with the wrong
sides together.Pin along the open edges.
2Thread two arm lengths of thread into the needle.
Double the thread and knot the ends.Make a long
running stitch along the unfinished edges of the
fabric.Remove the pins as you sew.
3/If you begin to run out of thread,pull on the
thread so that the fabric gathers.When you reach the
end,pull some more on the thread and gather the
fabric until the strip is about 12 inches long.
4/Make a few stitches in one spot on the end,
of the strip to hold the gathers in place.
Do not cut the thread.Spread the gathers evenly
along the strip of fabric.
5/Start at the end where you began the running stitch.
Roll the gathered fabric so that the unfinished,
edges are even.Keep rollong until you reach the
end where your needle and thread are hanging.
6/Push the needle and thread across the bottom
of the flower,going through as many layers
as you can.Criss cross back and forth through
the layers until you run out of thread.Finish
off by stitching a few times on the same spot,
before you cut the thread.
7/Turn the flowers over and gently pull the gathers
apart.If they are all attached at the bottom,
your finished.If some of the gathers pull up,
thread your needle again and do more stitching.
8/You can sew your flower to a fabric or straw hat,
baseball cap,or on wreaths.
Potpourri Pomander
Materials:paper clip
medium size styrofoam ball
potpourri
plate
white craft glue
ribbon
1/Unbend the paperclip so that one end
is straight and the other is a hook.
2/Poke it into the styrofoam ball so that
the top of the hook is sticking out.You
might need to use wire cutters to cut off,
the straight end of the paperclip,if it
sticks out the other side of the ball.
3/Scoop some potpourri onto the plate.Crush
or tear some of it in your fingers so,
there is a variety of sizes.
4/Hold the styrofoam ball by the hook
and spread glue on part of it.
5/Holding the ball by the hook,slowly and
firmly roll the glue area around in the
potpourri.Leave the ball on the potpourri
plate and let it dry for a couple of hours.
6/Gradually apply glue and potpourri to the
rest of the ball.It may take awhile to
cover it comepletely.
7/Tie a long ribbon onto the paper clip hook,
if you want to hang it up.Or tie a short piece
of ribbon into a bow on the hook.
Make a potpourri sachet.Place a small scoop
of potpourri in the center of a doily or a circle
of craft netting,also a circle of cotton fabric.
Tie it with a ribbon.
Bath Mitt
Materials:terry cloth or bath towel
measuring tape
scissors and pins
needle and thread
embroidery floss(optional)
1/Cut a piece of cloth about 7 inches x 15 inches
2/With the good side of the cloth down,fold one
short side over once and then once again.
Pin this narrow hem in place.Do the same
for the other short side.
3/Thread two arm lengths of thread into the needle.
Double the thread and knot the ends.Flip the cloth
over and backstitch along the pinned sides.
Remove the pins.Knot and trim the thread ends.
4/Fold the cloth in half with the good sides together.
Pin the side seams together.Thread the needle again.
Double and knot the thread.
5/Poke the needle into the cloth from underneath,
about 1/4 inch from the hemmed end and 1/2 inch,
from the side edge.Bring the needle around the,
end and poke it in about 1/4 inch to the left
of where you first went in,again from underneath.
6/Backstitch the side seam,removing the pins,
as you go.As you finish,make a couple of small
stitches in the same spot,knot the thread and
trim it.Stitch the other side seam.
7/Turn the bath mitt right side out.
Stuffed Felt Decorations
Materials:cookie cutters or thin cardboard
felt,fabric marker
scissors and straight pins
embroidery needle and floss
polyester fiber stuffing
1/Trace a cookie cutter shape twice onto felt.
Or trace from thin cardboard.
2/Cut out the shapes inside the lines,so
you don't have any fabric marker on your shape.
3/Pin the two shapes together all around.Use
the blanket stitch to sew most of the way around
your shape.Remove the pins as you sew.
4/Stuff the shape a little and finish it
by stitching it closed.
5/If your shape needs a face or other features,
embroider them on.Can also be done before
you pin and stitch the shapes together.
6/You can add sequins,beads,buttons,lace,
or ribbons to your felt shapes.
Decorated Basket
Materials:fruit basket or plain basket
measuring tape
printed cotton or cotton polyester fabric
scissors or shears
white craft glue
about 20 paper clips
5 feet of wide ribbon to match fabric
1/The amount of fabric you need depends on the size
of your basket.Measure the outside of your basket,
going up the end,across the bottom and down the
other end.Add 2 inch to this measurement.
Thats how long your fabric should be.
2/For the width,measure the outside of the basket
from the base of one handle,down the side,across
the bottom and up to the handle.Add 2 inch to
this measurement.
3/Cut two pieces of fabric the size you've measured,
and round off the corners.Use pinking shears if
you have them,or use scissors and run a thin line
of glue around the edges to prevent fraying.
4/Place one piece of fabric good side down and
set the basket in the center of it.Run a line
of glue around the inside top edge of the basket.
5/Fold the fabric up over the top edge so it is
in the glue.Paper clip it in place.Make small
pleats at the corners and fold the fabric
under at the handles.Let the glue dry.
6/Remove the paper clips.Take the other piece
of fabric and place it,good side up,inside the basket.
7/You'll notice that some fabric is bunched up
around each side at the handle.Cut your ribbon
in half and tie it into a bow around the fabric,
at the base of the handle on each side.This will
hold the liner in place,and add a lovely finishing touch.
8/Spot glue the liner in place all around the basket.
Use the paperclips to hold the liner down,
until the glue is dry.
Wind ribbon or lace around the handle.Or sew a lace
ruffle around the liner before you place in basket.
Felt Bag
Materials:2 felt squares
pins and large darning needle
yarn,scissors and ribbon
1/Pin the two felt squares together on
three sides,leaving the top open.
2/Thread the yarn into the needle and knot
the yarn.Starting from the inside of the top
corner,pull the needle through one layer
of felt to the front so the knot won't show.
3/Bring the needle to the back and poke through
both layers of felt to the front of the bag.
Use the running stitch,to sew around the
three sides.Remove the pins as you sew.
4/When you reach the end,make a few extra stitches
on top of the last one and poke the needle
through one layer to the inside of the bag.
Knot the yarn and cut it.
5/Fold down the top of the bag about 2 inch.
Make four evenly spaced cuts through both
layers along this folded edge.Unfold.
6/Starting at the center of the bag,weave the
ribbon through the slits.Be sure to leave
enough ribbon on each end to tie the bag closed.
Use fabric instesd of felt,and pinking shears.
Fabric Wreath
Materials:wire clothes hanger
scissors or pinking shears
fabric
ruler and masking tape
1/Bend a wire hanger into a circle.
2/Cut a strip of fabric(1 inch x 20 inch).
Tape it near the end of the wire and wind it
so that it covers the end of the hook and the tape.
3/Wind the fabric down the straight part of the
hook and tape or tie it at the start of the circle.
4/Tear or cut fabric into strips about(7 inch x 2 1/4 inch.
You will need about 90 strips.
5/Tie the strips onto the circle.Tie them tightly
once,they don't need to be knotted.
6/Slide the fabric strips around the wire until
they are packed on tightly.Fluff them and
trim off any loose threads.
Decorate your wreath with ribbon,or fabric bows,
ornaments or silk leaves.Add alittle bird,fruit etc.
Victorian Yarn Doll
Materials:Sturdy piece of cardboard,
10 inch x 6 inch
yarn and scissors
ruler
beads,roly eyes,felt
ribbon and embroidery floss
1/Wind yarn around the cardboard about,
20 times for thick yarn or 50 times
for regular yarn.
2/Gently slide the yarn off the cardboard.
3/To make hair,cut a 20-in piece of yarn
and knot it a little down from the top.
Let the ends hang down the back.
4/Knot another 20-in piece of yarn below
the hair to form the head.Again let the
ends hang down the back.
5/Cut all the loop ends on the bottom of the doll.
6/Seperate some of the strands of yarn from
the sides of the doll to make arms.Tie
them in an overhand knot and trim off
the extra yarn.
7/Tie the waist with a piece of yarn and let
the ends hang down the back.
8/Leave the remaining yarn loose to make
a skirt or seperate it into two parts
to make legs.Tie them at the feet.Trim
off any uneven strands of yarn.
Tie the hands together in front and tuck
in some silk flowers.
Hanky Doll
Materials:hankerchief (16-inch)
polyester fiber fill
rubber band
white craft glue
gathered lace
ribbon
1/Lay the hankerchief flat on the table,
good side down.
2/Put some stuffing about the size of your
fist a hand width down from the top.
3/Use the rubber band to fasten the stuffing
in the hankerchief.
4/Tie knots in the top two corners of the
hankerchief to make arms.
5/Apply glue in a circle around your dolls face.
6/Place the lace over the glue to make a bonnet.
Hold it until the glue begins to dry.
7/Tie the ribbon around the dolls neck
to cover the rubber band.
8/Traditionally,a doll like this does not
have a face,but give yours one,if you like.
HOME
