
A source of light
is essential for campers, especially at night. The pressure lamp
is 1 main source of light in the NPCC campsite. Therefore, it is
neccessary for cadets and instructors to familiarize themselves
with the basic knowledge of lighting pressure lamps.
- Safety
Precautions
- Ensure
that no spirit or kerosene is placed near to the
pressure lamp when lighting.
- No
kerosene should be stored in the kerosene
container when the pressure lamp is under storage
for a long time.
- Do not
leave the pressure lamp in the open when they are
still hot.
- Do not
store pressure lamps when they are still hot.
- Do not
touch the mixer flame assembly directly after
distinguishing the pressure lamp as it is
extremely hot.
- Discontinue
pumping air into the pressure lamp once the
needle in the pressure gauge is near the red line
on the pressure meter.
- No
lighted pressure lamp is allowed in the tents.
- Do not
use methylated spirit to clean the glass chimney
even though it is easier to remove the soot with
it. Use newspaper to clean the glass chimney
instead.
- Do not
touch the mantle once it is burning.
- Never
pour kerosene into the kerosene container through
the pump opening.

- Pre-lighting
Checks
- Check
whether the pressure lamp is in good working
condition. Do this by first tightening the air
screw and then by pumping in air. Release the air
screw to check whether pressure has build up in
the kerosene container.
- If the
pressure gauge shows no change or a decrease in
the air pressure, unscrew the pressure gauge to
check whether the rubber seal is in good working
condition. If the rubber seal is worn out or
missing, replace a new one.
- Remove
the mixer flame assembly to check that the
cleansing needle is not worn out. This can be
achieved by turning the regulator upwards so that
you can feel the presence of the cleansing needle
with your fingers.
- Lighting
Procedure
Stage
1
- Free
the ventilator cap by loosening the 2 side nuts
attached to the handle of the pressure lamp.
Stage 2
- Remove
the ventilator cap and lift out the mixer flame
assembly.
Stage 3
- Unscrew
and remove the pressure gauge, then till the
kerosene container with kerosene using a funnel.
(Do not loosen the rubber seal in the pressure
gauge.)
Stage 4
- Pour
in the kerosene until the kerosene container is
between half to three-quarters full.
- Screw
back the pressure gauge tightly.
- Remember
to tighten the air screw as well.
Stage 5
- Tie
the mantle to the burner socket. (Ensure that the
burner socket is firmly fixed to the mixer flame
assembly.)
- Excess
string from the mantle may be cut away.
Stage 6
- Replace
the mixer flame assembly
Stage 7
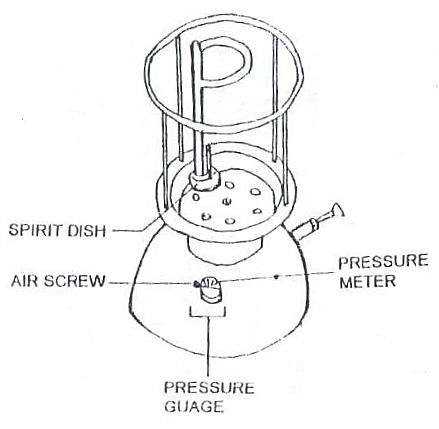
- Fill
the spirit dish with methylated spirit through a
small opening beside the regulator.
Stage 8
- Light
the methylated spirit with the regulator pointing
upwards.
- Wait
for the mantle to be heated up.
- When
there is sufficient heat, you will see a red glow
in the mantle.
Stage 9
- Start
pumping in between 50-60 strokes.
- Turn
the regulator until the mantle brightens.
- At
intervals of 3 to 4 hours, increase the pressure
to substain the glow of the lamp.
Distinguishing
Procedure
Loosen
the air screw slightly to release pressure in the
kerosene container. The pressure lamp will distinguish
after there is no more pressure in the kerosene container
to supply the mixer flame assembly with kerosene.
- Care and
Maintenance
- Never
place the base of the mixer flame assembly
directly on the ground to avoid damaging the
burner socket.
- Turn
the regulator downwards when replacing the mixer
flame assembly to avoid damaging the cleansing
needle.
- Ensure
that the glass chimney does not come in contact
with water when it is still hot to prevent the
glass chimney from cracking.
- Use
the proper tool of the right size when
dismantling or assembling the pressure lamp. A
spanner with a larger gauge when required will
damage the hexagonal shape of the joints.
- Filter
all kerosene before pouring them into the
kerosene container. Dirty kerosene will choke the
channels of the pressure lamp.
- Check
the washers periodically to ensure that they are
firmly embedded in their positions.
- Replace
the leather washer in the air pump if it has been
worn off.
Simple Repairs to
the Pressure Lamp
Blockage of
kerosene passage - Dismantle the passage tube and use an air jet
to blow off the dirt or to a slight extent. Light the lamp and
turn the regulator quickly to the left and right. The cleansing
needle will force the dirt out of the nipple.
Needle too short -
unable to block the nipple - Dismantle the kerosene passage and
remove the cleansing rod. Adjust the nut at the base of the
cleansing rod respectively.
Leakage
- Determine the leaking part. Dismantle the lamp except for the
kerosene passage. Turn the regulator upwards to block out the
nipple and tighten all remaining parts. Start pumping until the
sign of kerosene shows. If the leakage comes from a joint,
tighten it. You may need some soldering plaster if the screw
threads are worn off.
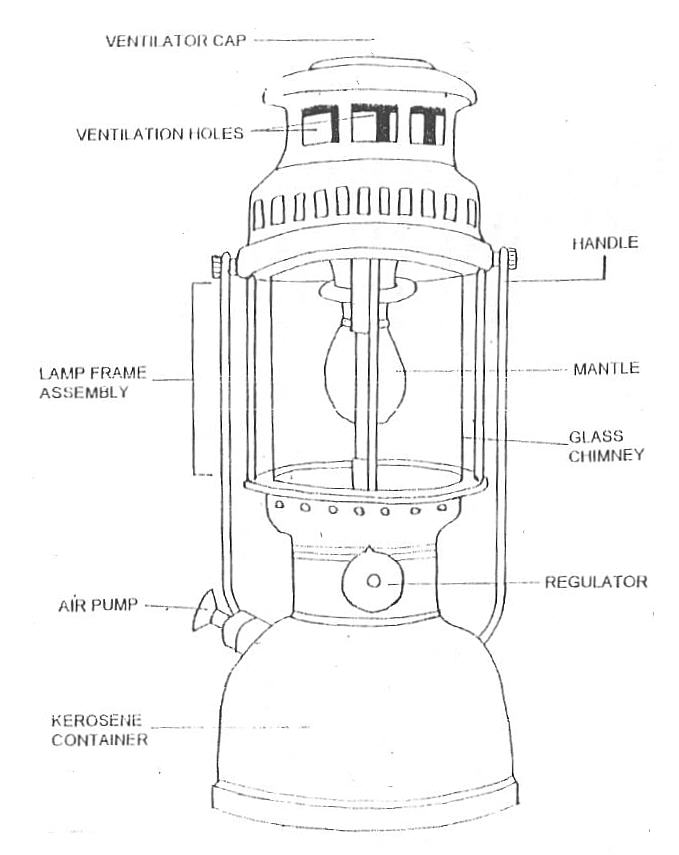
Parts of the
Pressure Lamp


BACK TO
HOMEPAGE