Ceiling Shelves
(2 November 1998)
Shelves are the best way to display cans, but when the walls are full some collectors will
use also the ceiling.
To do so, special ceiling shelves are required: they can be easily made to fit any collector's
need.
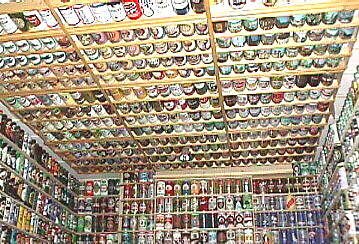
To see a picture of what they look like when filled with cans, click on the camera icon: 
Main concept
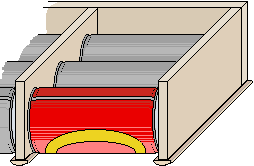
cross-section showing how the cans rest |
Ceiling shelves are not very different from the ones used for the wall.
The only difference is that a thin wooden band is fixed to the lower rim of each
shelf, so that the cans will be held horizontally, only resting on their top and bottom edges: in this way
over 90% of the body's surface will still be visible from below.
|
Each row has a specific size which enables cans to fit more or less precisely, and to slide
sideways, so that they can be inserted from both ends and shifted into place.
Because of the shelves' considerable weight when filled up with cans, it is necessary to build
individual panels, each of which will hold 3 to 6 rows of cans. According to the length of the shelves,
up to 30 cans may be displayed in each row. More panels can be built, one adjoining the other, so that the final effect will be as if the
ceiling was covered with one same structure.
Obviously, each row will hold only one size of cans (i.e. all 330 ml cans, or all 350 ml,
or all 500 ml, etc.), but you can build different rows for different sizes, either in the
same panel or in different panels. |
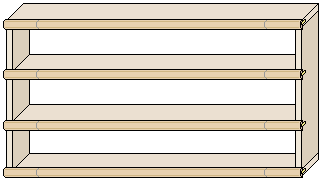
front view of the panel (as seen from below) |
Getting Started
Before beginning the actual work, it is very important to plan which cans will be hung on the
ceiling. Once the shelves are made for a specific size of can, it will not be possible to
change them: a row made for 330 ml cans will be no good for 500 ml cans, and vice-versa. So,
be sure about your needs.
For each panel, the following parts will be assembled:
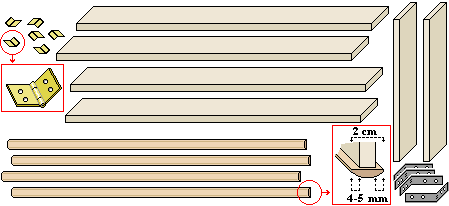
all the panel's parts, before being assembled |
- a number of small wooden planks (the shelves), equals to the number of rows plus
one: i.e. for three rows, four planks are needed;
- the same number of thin wooden bands of the same length, whose width must be about 1 cm. (½ inch) bigger
than the planks' rim (see picture for proportions);
- two side planks, used to close the panels on their sides;
- tiny hinges, about 2-2.5 cm (1 inch) in size: you will need two of them for each
plank;
- optionally, four small L-shaped iron brackets
|
| Plywood (unexpensive and easy to cut) can be used for building these shelves;
dimensions will be as follows: |
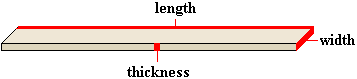
the planks's dimensions |
- THICKNESS: it should be not too small, as the planks could bend, nor too big, as the
whole structure would be very heavy; a good average size is 1-1.5 cm (about ½ inch);
- WIDTH: this depends on whether the panel will be closed on its back or left open
(a detail discussed below), but in any case it will range between 5 and 10 cm
(2 to 4 inches);
- LENGTH: it has to match the collector's room: usually this size will be slightly smaller
than the ceiling's width.
For the side planks, width and thickness will be the same as above, but their
length must be very carefully calculated by summing the size of each row (i.e. the size of
one can) and the thickness of all the shelves.
The back of the panel can be left open, or it can be closed (see picture); both versions
have positive and negative aspects:
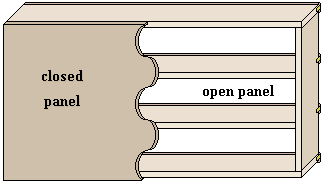
rear view of the panel (facing the ceiling) |
- an open panel will be lighter, and quicker to build, but cans tend to get covered with
dust on their upper surface (the surface not seen from below); this problem can be solved
by simply laying a plastic sheet between the cans and the ceiling.
- a closed panel will prevent cans from being covered with dust, but it will also be
rather heavier (although you can use very thin wood to close the panel on the back).
In the case of a closed panel, the shelf's depth must be slightly bigger than the can's
diameter (6.5 cm, or 2 ½ inches): an average size can be 9-10 cm
(3½-4 inches).
In open panels, the shelf depth may be slightly smaller than the can's diameter (but in no case less
than 5 cm, or 2 inches).
|
Building the panel
Start assembling the side planks and the outermost shelves, so to make a rectangular frame. You
can keep the four pieces together with glue and thin nails; optionally, you can also place an
L-shaped iron bracket on each corner of the structure, to make it even more steady.
| Then the inner shelves can be added: this must be done very precisely, by using a few cans
of the same size so to fix each shelf in the right position. Cans should be free to slide
sideways, but with very little slack: if the rows are too tight, the cans will not
slide into place, but if they are too loose the cans might fall down. |

actual cans are a good reference for sizing each row |
Once all shelves have been assembled, the thin wooden bands will have to be fixed on the rim of
each shelf: it is better to glue them before fixing them with a few nails (the nails must be VERY
thin, or the bands might crack).

fixing the doors
to the panel |
For a better result, before adding the bands, cut off an 8-10 cm (3-4 inches) piece from
each of their ends: you will later use these fragments as small doors. Then glue and
nail the long central part on the edge of each shelf and, at last, assemble the small doors
by using the tiny hinges, as shown in the picture. They can be simply glued, as they do not
have to hold a big weight. When opened, these doors will let in one can at a time
from each end of the row. Once the cans are in place, doors must be kept shut with a piece of
transparent cellotape.
It is also possible to omit the making of doors: in this case, each time a can has to be inserted
it is sufficient to slightly flex the band sideways (remember to use thin flexible bands, and not
to glue and nail their last 20 cm on each end); but after some time, this technique might cause
the bands to remain permanently curved, or even to break, and it is surely a less effective
technique than the "doors" system. |
Hanging the panel to the ceiling
The panel must be hung BEFORE filling it with cans.
There are two ways for doing this:
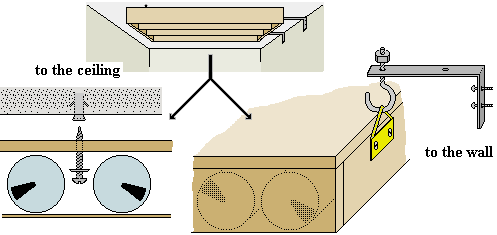
two ways of mounting the panel |
- if the ceiling is strong enough, you can fix (or hang) the panel directly on the ceiling
with screws (or hangers);
- if the ceiling has a friable plaster layer, the previous technique might not be safe
enough, and the structure might even fall down; in this case, it is better to hang the panel from the
uppermost part of the wall, as shown in the picture, by using iron brackets and hangers
screwed or nailed to the panel's sides: from below, it will look as if the structure
hangs from the ceiling.
|
A few considerations
Ceiling shelves provide a very unusual and attractive view, and will hold a lot of cans
too, but they always need a ladder to be reached, and to insert a specimen in a specific
position you might need to pull out all cans from one row, and then to put them back again.
Therefore, the ideal cans to display on the ceiling are complete sets, or specimens
which do not require to be moved very often.
When these shelves are either fixed or hung correctly, they will remain perfectly steady.
Always check that the small doors on each row remain tightly shut: should the cellotape fail
to keep the door closed, one or more cans might fall down, damaging both the specimen and any
other object below. As soon as a door loosens, replace the cellotape without any delay.
 back to the Beercanopćdia index · or ·
back to the Beer Index
back to the Beercanopćdia index · or ·
back to the Beer Index