 |
RainBow
Dragon Ring Forum Home Page |
|
|
RainBow
Dragon Ring Forum Home Page |
|
Created by The OverSeer
When I designed the index page for the RDRF HP, I wanted it to be unique. I found an image of a Crystal Ball several months ago on a web site. It was very different than the one you see on the index page but that was the beginning for the RDRF HP index graphic.
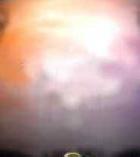
I used Paint Shop Pro and Photo Impact to completely re-do the entire crystal ball. I do not have the original anymore so I cannot show you what I started with. But here is what I started with when I began designing the final image for the RDRF HP. (small version of course in jpg non-transparent format)
The original was much larger. Also, I must give credit where credit is due. GrannyDragon helped me immensely with the color scheme and she set the transparency for me on the final image of the Krystal Ball. That saved me tons of time and she has a much better eye for color schemes than I do.
The next step was to remove the button images and section the Krystal Ball image into individual pieces like a jig saw puzzle. I had to do this because it would have taken huge amounts of space and time to have 9 separate images of the Krystal Ball. The only thing that was going to change was going to be the part in the center. So I had to figure out how to accomplish that.
Here's the blank Button. I'll show you that instead of all 9 of the others. (jpg format to save space)
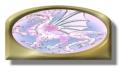 |
I used PSP 6.0 to warp Lady Camelot's RDR image into an elliptical shape and softened the colors so that the 3-D text for the buttons would show up nicely. I used Photo Impact 3.0 to create the button border around the image. All of these functions are built in features of both graphics programs and can be done very easily. Just look in the text menus on both. |
Next I created the 3-D text images to go inside the blank buttons. I used Font FX version 2.0 which I downloaded from http://www.erain.com For about 50 or 60 bucks, you can own your very own copy of that software. Version 2.5 is out now and I have it. It's expensive but if you want to create 3-D text images, it can't be beat.
The Krystal Ball had to be sectioned and fit perfectly within table cells so that one could not notice that it was not a single image. For that, I used the paint program that we all have on our windows 95 or 98 computers. On your start menu, go to accessories and then find paint. Don't sell that program short. I use it all the time. That lil fella will layer, resize, cut, blend and overlay images like nothing I have ever seen. PSP's flagship release version 6.0 lays awake at night and dreams of bein able to do some of the simple things that lil paint program can accomplish.
And this is what I had after I closed down that cheap lil microslop paint program that everybody deems as being worthless.
|
|
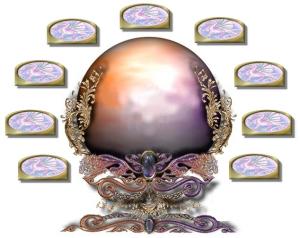
There it is, all nicely exploded so you can see how it was chopped up. The only image that is going to swap is going to be the center one. The other ones stay put all nice and snug in their individual table cells.
Believe it or not, this was the hardest part of this whole project. Those images had to be sectioned perfectly so that they would fit perfectly. A single pixel mistake made the whole thing look awful. I know this well. Surely there is nobody out there that believes for one heartbeat that I got this right the first time, or the second, or the third either. I gave up two or three times, stomped off in disgust, watched TV, raided the fridge, anything to get that off my mind for a bit and cool off. After taking in a few re-runs of star trek and a whole bunch of leftover cold chicken, I finally got it right.
Whew.... Now it's time for the code. This is what ya'll been waitin for anyway, so grab yer seats and hang on. It's time for a crash course in JavaScript. First off, JavaScript is an object based scripting language. In a nutshell, you take an image in your web page that you want to to do kewl things with, well, that's an object. Now JavaScript has to know which object you want it to work with so you give your pet object a name. After you get that object named, all ya gotta do is use JavaScript to tell your browser what you want done. Simple as that.
Doesn't that aggravate you when someone says that? They all do. Nobody who writes this stuff wants anyone to believe that they had any trouble with it. Well, I must be the dumbest JavaScript writer on earth cause it's a pain in the butt, it always has been and it always will be. I hate it. But if I'm going to make my creations stand out, then I have to belly up to the keyboard and figure it out.
Thankfully for you who are setting thru this, you will never have to re-invent the wheel. I already did it in this case. And I'm about to show you how to do it as comprehensively as I know how.
First off, I had 9 images to work with. The code will handle as many as you care to put in. I named the center image of the Krystal Ball like this.
<img src="indeximages/krysballcenter2.jpg" alt="krysballcenter.jpg (3720 bytes)" width="140" height="157" name="screen">Note at the end of the tag where it says name="screen" This is the object I want to work with, now it has a name. It'd be a really good idea to remember that name exactly as it was typed. JavaScript is really fussy with case and spelling errors.
Next we have the actual code. I will show you mine, then I will show you one that is generic so you can copy it and use it for yourself.
| <script
language="JavaScript">
<!-- if (document.images) { // If the image object exists // Preload images off = new Array(14) on = new Array(14) screenon = new Array(14) on[1] = new Image(); on[1].src = "indeximages/rdrf.jpg"; on[2] = new Image(); on[2].src = "indeximages/authors.jpg"; on[3] = new Image(); on[3].src = "indeximages/webrings.jpg"; on[4] = new Image(); on[4].src = "indeximages/graphix.jpg"; on[5] = new Image(); on[5].src = "indeximages/links.jpg"; on[6] = new Image(); on[6].src = "indeximages/members.jpg"; on[7] = new Image(); on[7].src = "indeximages/games.jpg"; on[8] = new Image(); on[8].src = "indeximages/new.jpg"; on[9] = new Image(); on[9].src = "indeximages/fontz.jpg";
screenon[1] = new Image(); screenon[1].src = "indeximages/RDRFcenter.jpg"; screenon[2] = new Image(); screenon[2].src = "indeximages/authorscenter.jpg"; screenon[3] = new Image(); screenon[3].src = "indeximages/webringcenter.jpg"; screenon[4] = new Image(); screenon[4].src = "indeximages/grafixcenter.jpg"; screenon[5] = new Image(); screenon[5].src = "indeximages/linkscenter.jpg"; screenon[6] = new Image(); screenon[6].src = "indeximages/memberscenter.jpg"; screenon[7] = new Image(); screenon[7].src = "indeximages/gamescenter.jpg"; screenon[8] = new Image(); screenon[8].src = "indeximages/newcenter.jpg"; screenon[9] = new Image(); screenon[9].src = "indeximages/fontcenter.jpg";
off[1] = new Image(); off[1].src = "indeximages/rdrf.jpg"; off[2] = new Image(); off[2].src = "indeximages/authors.jpg"; off[3] = new Image(); off[3].src = "indeximages/webrings.jpg"; off[4] = new Image(); off[4].src = "indeximages/graphix.jpg"; off[5] = new Image(); off[5].src = "indeximages/links.jpg"; off[6] = new Image(); off[6].src = "indeximages/members.jpg"; off[7] = new Image(); off[7].src = "indeximages/games.jpg"; off[8] = new Image(); off[8].src = "indeximages/new.jpg"; off[9] = new Image(); off[9].src = "indeximages/fontz.jpg";
} function buttonOn(buttonName,num) { if (document.images) { // If the image object exists // Change images on the page document[buttonName].src = on[num].src; document.screen.src = screenon[num].src; } } function buttonOff(buttonName,num) { if (document.images) { // If the image object exists // Change images on the page document[buttonName].src = off[num].src; document.screen.src = "indeximages/krysballcenter2.jpg"; } } // --> < /script> |
This where you put the names of your image files. Note that I had them in a different directory. Use the name of the directory / then file name. This script will also swap the images of the buttons too. This part of the script will display your alternate images. Note that it says ON beside every line
Remember you named the center image "SCREEN" Note the words screenon before every line. Note the file names on the second line of every one. Note that there are 9 of them. If you want more or less, simply delete or add them. This is the part of the script that swaps the center image when you pass your cursor over the buttons
Here's the Off section. When you remove your mouse cursor from the button, it will return to it's former glory. If you had an alternate images in the "ON" section at the top, the button would return to it's original state as well. Note that my file names in this section are identical to the ones at the top. I could have made the buttons swap when the mouse goes over them but chose not to. I didn't want to take forever to load the page and I figgered the center image was kewl enough. If you want to make the buttons swap at the same time the center image swaps, simply put your alternate image files into the ON section at the top of this script.
|
OK, Here's a generic code all ready for you to alter for your particular application.
| <script language="JavaScript"> <!-- if (document.images) { // If the image object exists // Preload images off = new Array(14) on = new Array(14) screenon = new Array(14) on[1] = new Image(); on[1].src = " onMouseover Button Image URL goes here";on[2] = new Image(); on[2].src = " onMouseover Button Image URL goes here";
screenon[1] = new Image(); screenon[1].src = " #1 onMouseover Center Image URL goes here";screenon[2] = new Image(); screenon[2].src = " #2 onMouseover Center Image URL goes here";
off[1] = new Image(); off[1].src = " onMouseOff button image goes here";off[2] = new Image(); off[2].src = " onMouseOff button image goes here";} function buttonOn(buttonName,num) { if (document.images) { // If the image object exists // Change images on the page document[buttonName].src = on[num].src; document.screen.src = screenon[num].src; } } function buttonOff(buttonName,num) { if (document.images) { // If the image object exists // Change images on the page document[buttonName].src = off[num].src; document.screen.src = " On MouseOff Center image URL goes here";} } // --> < /script> |
We are almost there. I know it is confusing. I didn't think I'd ever get it debugged, but I did. Next we have to put a little code into your <A HREF tags> for the individual buttons. Remember that JavaScript is an object based language. Do NOT forget to name the images. Your mouseover event script goes into the <A HREF> tag. An <A HREF> tag is not the object. It's a command. The object you must name is the image. And you do that inside the <IMG SRC> tag.
So, remember that you must edit both the command and the object tag for this event. If you don't, JavaScript errors will annoy you to death when you try to load your masterpiece. Been there, Done that. Get ready, It's going to happen.
Now here is the Tag from the RDRF HP for event "1.
<a href="http://www0.delphi.com/RainbowDragon/" onMouseOver="window.status='Visit the RainBow Dragon Ring Forum Meet new friends or leave a message for an old friend'; buttonOn('button1',1); return true" onMouseOut="window.status='Welcome to the Home Site of the RainBow Dragon Ring Forum'; buttonOff('button1',1); return true" ;border="0"><img name="button1" src="indeximages/rdrf.jpg" border="0" width="100" height="53"></a>OK. First off, this is exactly the way it looks in this web site. Notice the window status commands. That puts a description of where the link goes onto the status bar on your browser. We're gonna get rid of that to avoid confusion.
<a href="http://www0.delphi.com/RainbowDragon/" onMouseOver="window.status=' '; buttonOn('button1',1); return true" onMouseOut="window.status=' ' buttonOff('button1',1); return true" ;border="0"><img name="button1" src="indeximages/rdrf.jpg" border="0" width="100" height="53"></a>
OK. The extra stuff is gone. I left the window status command in just in case you want to use it. If you leave it blank, it merely does nothing. Now, notice the A HREF tag has the onmouseover and onmouseout command within it. Each command is bracketed with Quotation marks and separated with a space. Same as any other command inside the tag. The difference is that a single mouseover event can have a number of commands within the event and the syntax is different for those. Several examples of that are found in the above code.
That code is for the first button. The second would have all the "1's" in the HREF tags replaced with a "2" That way when you run your mouse over object #2, it will refer to the second one in the list of the code at the top of the screen. Remember OBJECT BASED.
Last and Finally. You must name the image object. The first one is "button1" and so forth and so on. Remember to name the object inside the image tag. (shown below) The names must correspond with the event handlers in your JavaScript Code.
<img name="button1" src="indeximages/rdrf.jpg" border="0" width="100" height="53">
OK. I think that's it. Fix yourself up some images and go at it. Remember patience and perseverence. Don't let some script writing computer geek who doesn't even live in our plane of existence tell you that it is easy. Cause it isn't. But if you hang in there and figure it out, you have mastered a script that is capable of so much more than what you see on the index page of this web site.
Good Luck


|