|
It's a
good idea to cover your work area with newspaper or waxed paper--dried wax
can be difficult to remove from some surfaces. And don't plan on pouring wax
over your kitchen sink--if you spill the wax, it'll stop up the drain.
Be aware that wax is flammable at high temperatures. Wax while it is heating
should never be left unattended. Note: It
should also never be heated to the point that it sputters or smokes.
If it should catch fire, cover it with a lid and turn off the stove. Never
pour water on a wax fire.
Prepare a
mold
Professionals use precise, expensive molds made from very durable materials,
but you don't have to. You can create a mold with a variety of disposable
food or beverage containers that you can reuse and give a new usefulness.
Some guidelines:
-
Make sure
the mold has a mouth that's wider than the base so your candle can slide
out easily.
-
Oil the inside of the mold
with vegetable oil. This will allow for easy removal--you don't want to
have to gouge out your newly wrought creation.
-
Don't use soup cans--they
have ridges that will prevent the removal the finished candle.
Set up
your double boiler
Wax
should never be heated directly in a pot; instead always heat wax indirectly
with a double boiler. Since wax can be difficult to remove from pots,
you'll probably want to improvise a double boiler with a coffee can in a pot
of water.
-
Put a medium-sized pot
on the stove, filled with a couple of inches of water, on high heat.
-
Place
a clean coffee can in the water while it is heating.
-
There should always be some water in the
pot, but not so much that it
floats the can around. Eventually the combined weight of the can and the
wax will be heavy enough to keep the can from bouncing around in the
water.
Melt the
paraffin (Wax)
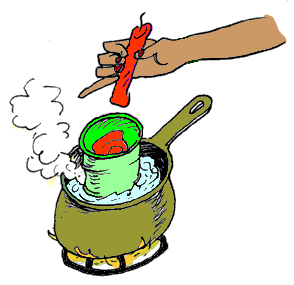 While your water is warming up, you can
start placing the wax in the coffee can. If you prefer, you may use old
candles, or a combination or paraffin and old candles. While your water is warming up, you can
start placing the wax in the coffee can. If you prefer, you may use old
candles, or a combination or paraffin and old candles.
-
Measure the wax:
figure 1/4 pound of wax per orange juice container.
-
Cut up the paraffin into small chunks,
and place it in the can. If
you're using old candles, choose colors that will mix well. You'll also
want to remove any charred wick ends.
-
Stir
with an old spoon or Popsicle stick. If there are any old candles in the
mix, take a fork and pull out any old wicks that have been freed from the
old candles.
Color the
wax (Optional)
Crayons are the best way to color candles. One candle per 1/4 pound of wax
provides a deep, rich color. Mix different colored crayons and see what you
can come up with. Combining half of a white crayon in with half of a colored
crayon makes a softer color. Nice effect!
-
Break crayons into small pieces.
-
When the wax is nearly melted, drop the crayons into the coffee can.
-
Stir to mix color thoroughly.
Make your
own wicks
- Cut
thick cotton string about three inches longer than your mold will require.
-
When your wax is melted, dip cotton string in wax.
-
Hang your wicks from a clothesline or place them on waxed paper, being
sure to lay them out in a straight line so you'll have nice straight wicks
when you need them later.
-
Scent your wicks: If you are making your own wicks, you have the option of
scenting the wicks rather than the candles. Before dipping wicks in wax,
soak the wicks in a fragrance or perfume
Pour the
wax
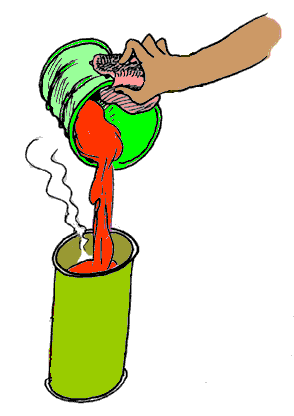
Remove
the can from the boiling water. You'll want to use a pot holder or a kitchen
cloth for this. Let the wax cool for a minute or two before being poured
into the mold.
-
Tilt the mold slightly, towards the can. This will improve the chances of
neat, spill-free transfer.
-
Pour wax slowly into the mold. Leave a little space at the top edge--it'll
make candle removal easier.
Insert
the wick
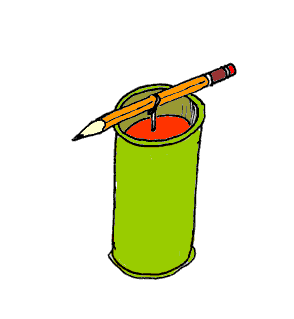
You'll need a pencil to lay across the mouth of the mold in order to hold
the wick in place while the wax hardens.
-
Measure the wick.
Take the wicks and lay them along the length of the mold. Add an extra 3/4
inch of string for the protruding section of wick, plus an extra inch or
two to wrap around the pencil.
-
Insert the wick
into the center of the mold. Notice the amount of wick that remains
outside the mould. If you have an extra five inches, the wick hasn't
reached the base of the candle.
-
Wrap
the end of the wick around the pencil. This holds the wick in the center
of the wax while it cools.
Most
candles need at least a day before you remove them from the mold. Even
though your candle may look hardened, the wax inside is probably still not
solid. Don't rush the cooling process, or your fine efforts will be undone.
Remove
the candle from the mold
Be
patient while removing your candle, or it might be damaged by your
hastiness.
-
For paper molds
such as a toilet paper core or a milk carton, simply tear the paper away
from the candle.
-
For molds of other materials,
try turning the mold upside down and tapping the bottom of the mold.
-
If the candle doesn't slide out,
carefully insert a knife between the candle and the mold. Jiggle the knife
into that space, prying very slightly (just a little bit) against the side
of the mold. If it still won't slip out, insert the knife into the
opposite side of the mold and do some more jiggling.
-
If your candle still won't budge,
immerse the mold in very hot water for a
few seconds. This will slightly melt the outside of the candle and it
should slide out.
Insert wick, method 2
Some
molds require that the wick be inserted after the wax is hardened and
removed from the mold, such sand mold candle a gelatin mold candle.
-
Remove
the candle from the mold.
-
Heat an ice pick or a length of straight,
thick wire--a straightened wire
hanger might work well here--over an open flame from a stove or...a
candle. If you're using a wire, be sure to wrap the end with a cloth or
hold it with a pot holder so you don't get burned.
-
Insert the heated pick or wire
through the body of the candle. If it cools and stops melting the candle,
simply reheat it and continue melting through the candle.
-
Insert the wick
into the hole you've just created.
-
Pour a small amount of melted wax
on the top of the candle to secure the wick if it seems loose. Once the
candle is lit, any gaps between the wick and the body of the candle will
be filled in with melting wax.
Back
|
