| Stereogram Tutorial |
| This tutorial will show you a simple way to make stereograms with blender. There are many kinds of stereograms out there, but these are much simpler to make, and they're also made to make your work realistic and unconfined to your 2D screen. |
 |
 |
 |
 |
 |
| 1. How it works: Study the two pictures below (If you don't know how to look at the pictures below, go to the bottom of the page for instructions). Notice that when the stick brothers are farther apart, the closer they seem to pop out. The closer they are to each other, the farther back they seem (Keep this in mind). Your brain actually takes the two pictures and "blends" them into one 3D picture like it does in real life. |
| 2. Take any Blender file that you have made and look at it in camera view. Render it at no more than 240 pixels in width (unless you can really cross your eyes!). After it's rendered, save the picture to disk. |
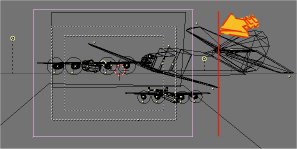
| 3. Here's where the "magic" comes. In camera view, press 5 on the keypad (ortho mode). Then select your camera and move it to the left like it is shown below (the arrow shows where the camera used to be). Make sure not to move the camera too little or too far left from the original camera position. Also remember to move the camera "straight" left. Now render that picture and save it to disk. |
| 4. Now fire up your favorite paint program and open both of the renderings you just made. Make a new file that will be able to fit both the renderings (in my case below, 242 x 95). Copy and paste the first rendered image to the left side and the second to the right. This is important because it will show up backwards when you cross your eyes if you don't. |
| 5. Put a reference dot on the top of each picture like shown above. I personally don't use them, but it might help you a bit with your eye control. Even though you are limited with the width of the picture to a certain extent, you can make the picture as tall as you want. Try making animations also with the same principles to make cool stuff. |
| I get this response all the time. I've even tried teaching people personally for quite a few minutes and have failed, so I can't guarantee anything. My guess is that you look like this and with a headache: |
| *&%%$*& I CAN'T GET IT!!!!!!! |
 |
| This is the best way of learning how to do it (try starting with the smaller pic below) : 1. Sit confortably about 1 armlength or shorter from the screen. 2. Place your index finger in the middle of the picture. 3. Now slowly move your finger towards you, making shure that you are focusing on your finger (still keep your eyes on the picture, but don't go out of focus from your finger). Keep moving your finger back until you see the two dots on the top of the picture becoming one. 4. If you went past halfway or so (in moving your finger back) move it back to about halfway. If you do this right it should work. Tip: Do not tip your head in an angle while you do this. Always keep your head level with the horizon. |
 |
| Extra Note: To all the hardcore blenderheads who like to make everything 100% with blender (no paint program). You could clone your scene and make it so that the camera sees all of it. That would also work. Happy Blending! |
| Disclaimer: I am not responsible for the many headaches caused, and could be caused in the future relating to all the stuff on this page. 8') |
 |