The simplest way to think of a Mask is it's like a stencil. Suppose you created a simple stencil with cardboard. If you had a piece of cardboard and cut a circle in the cardboard. Now, if you took that cardboard and held it over another piece of cardboard and then took a can of spray paint and sprayed through the cardboard onto the bottom piece of cardboard then it would create a painted circle onto that bottom piece of cardboard. Masking is actually masking off an area and the following is another way of describing the masking of an area:
Here's a quick and easy tutorial on creating simple masks. This simplistic tutorial should convey the Basics of Masks, How to Create Masks, Save Masks, Load Masks, and Delete Masks.
1.) Open up Paint Shop Pro and Set Foreground to Black and Background to White.
2.) Click on File then click New from the menu and set Height to 400 and Width to 400 16.7 million colors and click OK.
3.) Now left click with your mouse and drag the cursor to create a black circle (size doesn't matter) and let go of mouse button.
4.) Click on Masks form main menu and then click New and then From Image and that will bring up a Add Mask from Image dialogue box, click OK.
(That creates a circle mask in memory but you don't have anything that you can re-use again so lets save our mask.)
5.) Click Masks from main menu and then click Save and a dialgue box will pop and ask for a new name for your mask and it will
attach a .msk extension to that name. So if you call your mask say circle it is saved as circle.msk and click Save Button.
NOTE: If you uninstall Paint Shop Pro the masks are not deleted they will remain in the directory and you can copy those files to
a diskette or another machine if you want to let someone borrow your mask or use it on another machine!
Let's use our New Mask.
6.) Click File and the New from main menu and then click OK (we'll use the same 400x400 size as before.)
7.) Click on Masks and Load and a dialogue box will open and you will see the circle.msk file we just created and that's your mask. You can
either double click your file or single click it and then click Open and that will open a blank window or so it seems.
8.) Go to the color palette and choose a color other than what is displayed in you new picture. Click on any painting tool and start to
Draw, Airbrush, Flood Fill etc... and you will see that the only areas that are getting colored are the areas that are NOT masked which
is the area surrounding your circle.
Lets use the Invert Mask option.
Now suppose you wanted to paint a circle such as when creating a sphere. This is where the Invert Mask option comes into play. Invert simply
means to reverse (lets call it what it is) the mask.
9.) Click Masks from main menu and then click Invert and then start coloring away with your painting tools again and you'll see that you can
only paint inside the circle now because the outside of the circle is masked now.
Let's use Filters, Effects, & Tools in combination with the Mask.
10.) Click on Image from the main menu and then choose Special Filter and then choose Add Noise and OK.
11.) Click on Image from the main menu and then choose Special Filter and then choose Emboss and OK.
12.) Click on Image from the main menu and then choose Normal Filter and then choose Blur More and OK.
13.) Click on Colors from the main menu and then click on Adjust and then Brightness and Contast and then increase %Brightness to 50% and OK.
So you can see the endless possibilities with masks used in conjunction with other Tools, Effects, and Filters so lets move on.
Lets use the Delete Mask option now.
14.) Click Masks and then click Delete and then start painting with your paint tool and you will
notice that you can paint over the entire picture now because there is no more mask to block out the paint.
15.) Click on Masks then click Load and then double click your circle.msk again and then start painting again and you will see that you can only paint
on the outside of the circle again.
Lets Edit the Original circle.msk file.
16.) OK, lets open a new file. Click on File and then click New and use the same settings we used before and click OK.
17.) Click on Masks and then click Load and then double click your circle.msk file and open it. (You will notice that it brings up an empty
white image with nothing in there or so it seems. The circle mask is there you just can not see it because there no color or paint.
You can do 2 things to see your mask at this point:
17a.) If you want to apply a base color through the mask then you can simply choose your color and using the Flood Fill tool click in
the image and you will see all the exposed (non-masked areas) change to that color, thus letting you see your mask.
17b.) If you want to work on your image be still see your mask then you can click on View from main menu and then click Through Mask, thus
letting you see your mask which is the preferrable way of viewing your mask and the un-masked areas of your work.
Lets use the View Through Mask option.
18.) Click on View and then click Through Mask (assuming your choosing to use the View Through Mask method.) You should now see
your circle mask on your screen, the masked area is represented as black circle. If we wanted to we could paint around the circle but we
are going to Edit the Mask instead this time.
19.) Click on Masks from main menu and then click Edit and then we are going to choose the Line tool set to Width=50 and Draw a Line
horizontal line through the center of your circle it will resemble a top view of a screw. You have just edited your mask but, it is just in memory
so we have to Save it.
20.) Click on Masks and then click Save and you can Save it as the Same Name as your old mask and overwrite your current mask or
choose a New Name and create a second mask.
Lets use the Mask from Image option.
The Mask from Image option allows you to create a mask from an existing image such as stock photography, clip art, or from text. Creating a Mask from Image
using Text is very, very useful in creating some really cool text special effects in Paint Shop Pro. Let's try a simple example and you will be able to see what I
mean.
1.) Click on File and then click New and choose the same settings we have been using and choose OK.
2.) Now click on the Text Tool and Choose large font for your text and type out some text say the word TEXT.
3.) Now click on Masks then click on New and then From Image and then a dialogue box will open click OK.
NOTE: When that box from step 3 appears it will give you a chance to Invert the Image which will actually create a text stencil in this example.)
4.) You have just created a Mask from Image but, it is just in memory right now so we have to Save it.
5.) Click on Masks from main menu and then click Save and call it text so it will be called text.msk.
6.) Lets test this now. Click File and then New and then keep settings and click OK.
7.) Now click on Masks and Load and then double click the TEXT.MSK file.
8.) Click on the Flood Fill tool and then click in the image and it will change all the un-masked areas to that color. If you remember
we could also click on View and then choose Through Mask and also see the area that will painted. The masked area is always Black.
Lets use the Mask from Selection option.
1.) Lets start fresh again. Click File then click New and then use same settings so click OK.
2.) Click on the Text Tool and use the same font and text as above so click OK. That will create a the same word as before with the marquee or marching ants around the letters or the text.
3.) Now click on Masks and then New and then click From Selection. That will create a mask from the text in the window in memory, so now we have to Save it.
4.) Click on Masks and then Click Save and give your file a name, so call it select and that will create a file called select.msk and click OK.
5.) Now Click on View and then click Through Mask. This will show you your mask in black and the un-masked area will be the area inside the letters.
The area inside the letters can be painted and modified or you can use the Invert option and then the text will be masked and you can paint the background without affecting the text.
| 6.) Lets have some fun with the text mask we have so far in Step 5. Choose you Airbrush Tool and choose Blue as your Foreground Color and spray the top half of the text mask with blue. Fade the Blue
from top middle of text. Now choose Red as your Foreground Color and spray the bottom half of the text mask with Red and Fade the Red from dark to light from bottom to top-the bottom being dark red and
the middle being almost white. This should create a Red White and Blue text. See the example.
|
|
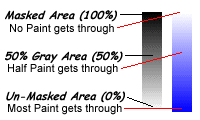
What makes Masks even Cooler
Yes, if you can believe it Masks are even cooler than think thus far.
I stated before that Masks are like stencils except for one aspect which is the what we are going to talk about here.
Masks are different than Stencils because masks make use of the different shades of gray between black and white. When you
create a mask, the masked areas are represented as Black and the un-masked areas are White. When you use Masks inside
Paint Shop Pro you can also make use of the different rages of grays in between Black and White.
Now if you think of it logically, If you created a mask with a dark gray then that would allow only a minimum amount of paint through to your paint surface. If on the other hand you created a mask with a light gray color then that mask would allow a really good amount of paint through. Black lets no paint through to the paint surface and White lets the maximum amount of paint through to the paint surface. Now when using grays you have a wide range of shades to choose from. For demonstration purposes we are going to use 50% gray or halfway between Black and White, thus if you create a mask with 50% gray then 50% of the paint will be applied to the paint surface.