Animating the Deer

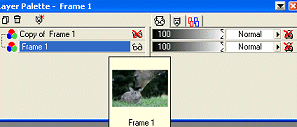
22) In the grey area of the images,
right click in the area with the numbers
as we just did with the bunny.
*Bunny Step 9
This time go to frame 1.
23) Once again choose "File" and
"Export Frames to Paint Shop Pro.
Your image is back in PSP.
24) As we did with the bunny, select the "Freehand tool".
Same settings as before.
There isn't really chest room on the deer photo,
so we will put the breathing in the face area.
You will be surprised with how real this looks!
With the image open in PSP, using the Freehand tool
make a kind of oval around the cheek of the deer.

25) With the selection active, duplicate the layer.
Once again, hi-light one layer turning
the other off using the glasses.
Repeat as we did for the bunny
using the "Punch" tool.
*Effects; Geometric; Punch.
Set the punch effect on one layer at 7.
26) Now repeat with the other layer setting at 17.
*Bunny step 14-19.
27) Be sure to uncheck the boxes.
28) From the top toolbar choose: Selections; Select None.
29) Now click the red x to close the image.
30) Again, you will be asked if you want to
update to Animation Shop.
Click "Yes".
Full Animation
36) The "Animation frame properties
will already be set to 60.
This speed gives a realistic look.
31) Now you can view your animaiton as a whole.
From the grey area with the numbers,
choose "View Animation".
Both bunny and deer should be breathing!

If you are satisfied with the look
you can now save as "gif".
Choose "File" and "Save As".
Animation Shop will now take you through
the process of saving your animation!
Additional Notes
If you are not happy with your result,
repeat Step 21 instructions
for editing.
|
|
|
|