Earl Stahl PT-19
Working from a plan published nearly 50 years ago I have set out to build something I can be proud of. It breaks new ground for me in a couple of ways. It is my first Earl Stahl design, and it is also my first legitimate Old Timer.
I originally set out to build the plane for a contest meant only for planes built from Stahl plans. Well I got started late, did a bang up job of framing the plane up and then promptly stopped work. The plane has sat as a skeleton (on display) in my home ever since.
I'm sure anyone who checks my site periodically will be stunned to see that it is actually being completed. A few details have hung me up, but one at a time I have worked through them. The markings on the tail bothered me for a long time. I thought about getting into printing tissue on my computer, but I still haven't bothered with that. I finally just jumped in and went to work. First I cut some strips out of red tissue. Then I taped a piece of white tissue down over the plan sheet (which shows the spacing of the red and white stripes). Half of the white tissue was over the rudder and the other half was just over the plan sheet. I then used UHU glue stick to put the red stripes over the white tisse. Next I cut the red and white striped piece vertically up the middle so that I had two identical pieces. That way I had one for each side of the rudder, and by keeping them oriented correctly any errors in stripe width and spacing would not be evident because they would meet perfectly at the back seam. Next I glued a piece of yellow tissue so that it overlapped by perhaps 1/8" inch. Finally, I cut a piece of dark blue tissue that I've been saving for my Bearcat and glued it over the overlapping seam. I then had a fully done set of markings and all I had to do was cover the tail and line up both sides (which was easy).
The wing was easy to cover. The only trick was allowing for the wire main gear legs that were already installed. I simply cut the piece big enough and figured out where the wire had to poke through.
There remained several details with the fuselage that had to be completed before I could cover it. Rear peg, nose block and some areas that would need balsa "fill" before the covering would be even remotely smooth. One at a time I got those items done. My biggest hang up was the nose block. I worked from three views supplied by modeler Richard Kopitzke to lay out the holes. I then cut them with my dremel tool while the block was still flat. Using some photographs I got from my uncle, I worked out the shape with my sanding block. I then painted the inside of the holes black and covered it with wet japanese tissue.
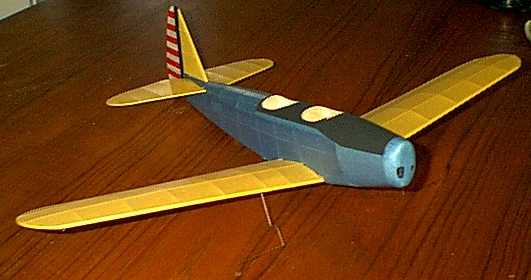
The rest of the fuselage took five pieces of tissue to cover (it's curvier than it looks...). After my usual "hose the crap out of it and hold it in front of a heater" water shrinking method it looked pretty good. Going back to the three views I made a template out of drafting film that would allow me to make a pair of mirror image pieces of masking tape that followed the outline of the black area on top. More masking and then a quick shot of flat black paint, pulling the tape off as soon as the paint began to "flash".
Before it's first flight it still needs:
Nose bearing and prop assembly (the hole is already there, it's just not visible). I have some of those tiny magnets from Radio Shack to help retain the nose block.
Wheels. My search for the perfect pair has come up with some that will only look slightly out of place. I have some small heat shrink tubing to dress up the gear wire. I still need to fabricate some upper fairings.
Final assembly and a couple of coats of clear acrylic.
Fairings for the wing roots and the underside of the wing. My last hang up...
Roll cage, windshields and horizontal stabilizer fairings will wait until it flies.