HOBBYCRAFT 1:48 BOEING P-26C PEASHOOTER

Reviewer: Arthur Janikowski (arthurj@iweb.net.au)
The Boeing P-26 started out as the XP-936, a small but feisty-looking monoplane fighter that first flew in March of 1932. Nicknamed "Peashooter" by its pilots, the aircraft was the link between the strutted and braced biplanes of the twenties and thirties and the later all-metal monoplanes (with apologies to the DeHavilland Mosquito etc) that fought World War II. It was also the last US Army Air Corps open-cockpit, fixed-undercarriage fighter to be accepted for service.Parts: The parts come in a light grey colour, quite finely engraved with no flash. Surface detailing is excellent, and the interior is, in my opinion, better than the 1/32 scale Hasegawa kit. This is especially true of the seat, which bears a much closer resemblance to the real one than does the Hasegawa kit’s.
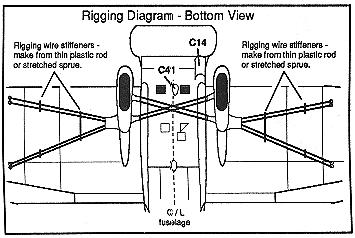
Instructions: Here, on the other hand, the Hasegawa kit’s instructions are far superior. Hobbycraft provide a fold-up sheet showing four assembly stages with detail drawings contained within three of them. Some of these detail drawings will make more sense if you have the kit parts in front of you for comparison. The rigging diagrams are good but I recommend you study them with a photo of the real thing in front of you. The engine diagrams provide enough info for positioning of parts, but say nothing about colours.
In fact, there are no colour call-outs on any of the interior or exterior parts at all, apart from the overall colour schemes given for the two aircraft versions of the kit. These colours are named (very basically, eg "red", "blue" etc) in five languages, but at least they do give approximate FS595a numbers, and the front of the instruction sheet calls out some paints from the Floquil, Humbrol and Testors Modelmaster ranges for the basic colours of blue, yellow and red.
Construction: Most of the construction was fairly straightforward, given the nature of the aircraft (ie fixed spatted undercarriage, open cockpit, exposed cowled engine, lots of rigging to be done). I started with the interior, giving it an overall aluminium colour with black pedals and instrument panel and other details, and adding colours to some of the knobs and levers after checking my references. The backrest was painted Tan, the headrest was brown leather, and I added seatbelts that I painted light tan. The entry door was left off at this time because I wanted to display it open; the knob on the inside of the door was painted black.
Engine parts were painted in what I interpreted as the appropriate colours after studying various photos in my references. Interior of the cowling was aluminium and the prop was polished aluminium with a steel centre-section. The cowling is split into top and bottom halves and must be glued together after the engine is trapped in between. I carefully sanded the inside areas where they were to meet so that there was no noticeable lip at the join, then painted the insides, trapped the engine, glued the halves together, test-fitted the assembly against the fuselage, held it all in my hands while it dried, had a double scotch and went to bed.
The engine/cowling assembly was probably the most difficult stage of the construction. Somewhat less difficult was assembling the undercarriage legs and spats, because you have to paint the wheels first and then trap them between each set of leg halves. Before this, make sure you drill out the holes for the underside rigging, because most of it is impossible to do after assembly. Unlike the engine/cowling, where you can easily see the inside of the cowling and therefore the periphery of the engine, the wheel spats are quite a close fit so nothing can be seen of the interior, apart from the edges of the wheel hubs.
The exhaust stubs are fiddly and must be studied and compared against reference photos, but there were no real dramas in the rest of the construction sequence. From memory (I built this kit just after it was first released several years ago), I was quite delighted at the fit of all the parts and amazed at how quickly it all seemed to go together.
But then came the (drum roll please) rigging. There are no correct or incorrect ways of rigging, there are just varying degrees of difficulty and a lot of personal preference. For this model I used heat-stretched sprue, and the same for the radio antennae. Looking at close-up photos of the real aircraft I could easily see that there were different thicknesses of rigging wire, so I made up some lengths of different thickness and carefully graded them into thick, thin and medium. Basically, the thick bits went on top of the wings, the medium bits went under the wings and between the legs, and the thin bits were used for radio antennae. The method of application I use is to measure the distance to be rigged with calipers or dividers, then cut slightly overlong lengths, put a tiny dob of glue on each end, and insert into pre-drilled holes. (The advantage of using heat-stretched sprue is that it is plastic, and will therefore take your usual favourite plastic glue.) The rigging can then be tensioned by holding a heat source, eg a hot thick metal wire, next to the plastic wire after the glue has fully set and watch the sagging wire boing into rigidity. Of course, you also have to glue on the rigging spacers, and for this I simply cut lengths of plastic rod, painted them black and super-glued them onto the outside of the wires. If you like you could try drilling very tiny holes into the spacers and threading the rigging wires through them before attaching the ends into the pre-drilled holes, but if you want to do this my advice is take an aspirin and lie down; you’ll feel much better later.
The process that will leave you with a craving for double scotches is drilling all the holes for the rigging wires. The top wing and fuselage are easy, so do those first to build up your confidence. The wing bottom is also easy, but the 16 (that’s sixteen) holes in the undercarriage legs will separate the men/women from the boys/girls. Trying to describe this in writing is like demonstrating how to tie a shoelace without using your hands, so I won’t do it. Study the instruction diagrams and compare them with photos of the original.
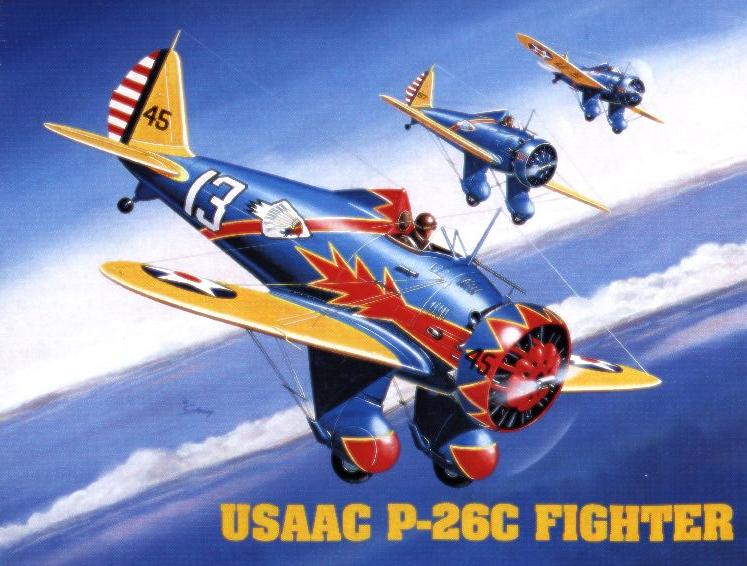
Versions: The kit decals give a choice of two aircraft, both from the 94th Pursuit Squadron, USAAC. The first is the version on the box lid, with the red flash on the fuselage sides, red stripe with Indian head insignia on the fuselage sides, red triangular flashes on the cowling and rollover protector, and red flashes on the wheel spats. The second is a plainer-looking aircraft without the fancy flashes and scallops, just the fuselage band and Indian head. Call me crazy, but who would do the plain-jane version when you could use the much more colourful markings over the very same basic colour scheme?
The fancy version has appeared in a number of drawings and paintings in various publications, but I can not recall ever seeing a clear photograph of the real thing. Hobbycraft’s instructions tell you to put the front red scallops with their bases facing forward and the sharp bits facing the rear, but other references show the sharp bits to the front, ie the reverse direction. Have a look at the pictures with this review and you’ll see what I mean. Either way is easy using the decals; simply position them the other way around if you wish. It’s possible that either way could be correct — Hobbycraft says the aircraft was a P-26C flying in 1938 with a True Blue fuselage, but the Squadron/Signal painting by Don Greer shows a P-26A in 1935-36 with an Olive Drab fuselage. I gave up and painted mine in True Blue (fuselage, cowling and legs), Chrome Yellow (wings and tail) and Glossy Insignia Red (face-plate) using XtraColour paints.
Decals: As mentioned earlier, I built my model just after it came out, so AeroMaster had not yet released their decals. The kit decals were used and were surprisingly good. Colour opacity was good except for the white sections of the Indian head and the large number 13 on the fuselage sides, where you can just see the fuselage stripe underneath (but you have to look for it). The fuselage stripes are slightly over-length, presumably to allow for positioning, so be prepared to trim them to size. The red flashes on the wheel spats didn’t look like they would go over the compound curves, so I cut a section out of the centre of each, applied them, then painted in the missing sections of colour with Insignia Red after they were completely dry. Overall, I was quite impressed by the kit decals, given the crappy stuff we used to get in the early Hobbycraft releases.
Overall: The kit was easy enough to let me appreciate how well it went together, and difficult enough (especially the rigging) to leave me with a feeling of satisfaction at a job well done at the end. The final model certainly looks like a Peashooter and checks out well against published drawings, while taking up about the same shelf-space as a 1/72 scale P-47 Thunderbolt. I would certainly recommend this kit to anyone with a little patience and a love of 1930s aircraft.
REFERENCES:
Boeing P-26 Peashooter (Aero Publications, Volume 22)
Boeing P-26 Variants (AeroFax Minigraph, #8)
Boeing P-26 Mini In-Action (Squadron/Signal Publications, #1602)
Out Of The Blue (photo-article on the P-26 in Airpower magazine, January 1991
issue)

Underside rigging diagram from Hobbycraft’s instruction sheet. This
is the
most difficult part of the entire construction sequence.
Back to home
Kit Review Index: 1/72
1/48

Section of Don Greer’s painting on the back cover of
Squadron/Signal’s mini
in-action book on the P-26. Note the differences between this and
Hobbycraft’s box-top painting.