Conversion - HELLER 1:72 P-39N AIRACOBRA
Reviewer: Caz Dalton (cazmodel@mindspring.com)
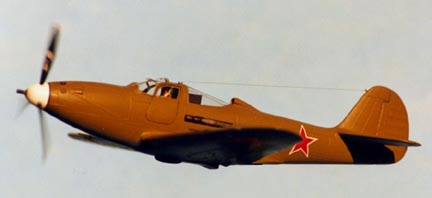
“ОРЕЛ ОТ ЛЕНИНГPАД”
BELL P-39N
"AIRACOBRA"
17 IAP (FIGHTER AVIATION REGIMENT)
LENINGRAD, USSR - SPRING 1945
MAJOR V. F. SIROTIN

Model Subject:
Bell P-39N "Airacobra"Kit Used: HELLER, kit no. 271.
History of the aircraft modeled:
The Bell P-39 was unusual (if not unique) in having its mid-mounted engine driving a tractor propeller by way of an extension shaft. The prototype was flown on April 6, 1939 with a 1,1150 hp Allison V-1710-17 12-cylinder liquid-cooled engine. Armament initially was 1 37-mm cannon firing through the propeller shaft; two-.50 caliber fuselage mounted machine guns, and two .30 caliber machine guns in the wings. By the introduction of the P-39D model, the 37-mm cannon had given way to a 20-mm cannon and two more .30 caliber machine guns had been added to the wings. The final production model P-39Q replaced the four-.30 caliber machine guns with two .50 caliber guns. A total of 9,558 "Airacobras" were produced, of which 4,905 were P-39Qs. By far the Nation who used the P-39 in combat the most was the Soviet Union, who used 4,952 of them (in addition to 2,400 of its cousin P-63) to great success in battle cooperation duties. The Soviet's second leading ace of the Great Patriotic War, Major Aleksandr I. Pokryshkin, scored the majority of his 59 victories in the P-39N and P-39Q. My model represents the P-39N flown by Major V. f. Sirotin, commander if 17 IAP (Fighter Aviation Regiment) of the Soviet Air Army's Northern Fleet at Leningrad. He finished the war flying P-63 "Kingcobras". The plague's title is transcribed as "OREL OT LENINGRAD" and means "EAGLE OF LENINGRAD"
Additions, modifications, etc.:
Interior:
For its time HELLER gave one a pretty good interior, with some even having the sidewalls molded. I considered them state-of -the-art models in the 1970's, before the Japanese model manufacturers set a new standard in the 1980s. I still enjoy building the HELLER kits and every month or so venture up to the skeletons-in-the-attic and pull one down. The only thing I added to this interior was the pilot and a scratch-built control stick, because the kit piece got mingled into that haven that small parts often go. The interior was painted Interior Green with various controls, radio box, and instrument panel finished in Flat Black. Reheat models instruments decals and placards were used for the instrument gauges and sidewall controls. I had not planned to use the radio box, because most Soviet P-39s, though equipped with an aerial, did not carry a radio. I installed it because Major Sirotin was a Regiment Commander and they were usually the only ones issued radios. I also made a protective Plexiglas armor plate from .30 clear sheet styrene. The kit's gunsight was used, but I had to add a small piece of beading wire to attach it, so that I could position it to the contour of the windshield.
Exterior:
The model was for a P-39Q, so I had to sand away and fill any differences found in the N-model. I drilled holes in the wings for the installation of hypodermic needle machine guns. The cartridge ejection slots were drilled and cut with an X-Acto #11 blade. Fuselage gun ports were drilled out and sections of 25-gauge hypodermic needle were installed for the guns. The kit's spinner had the cannon port molded on, so I cut it off and drilled the spinner to except a cannon in the final assembly made from drilled out styrene rod. I did not like the two-piece spinner, so I cut the propeller blades from their hub and cemented the propeller hub and two spinner pieces together. I set the spinner up in a Moto-tool and sanded the spinner while running the tool on low speed, until I had removed the join lines. Propeller blades were later cemented back in the final assembly. Exhaust ports were drilled out. The air intake, wing intakes, and all undersurface cooling slots were given bulkheads, so as to not have any see through. The air intake was given a scratch-built splitter plate from sheet styrene. The canopy, which was always HELLER's downfall, had some serious fit problems where the rear and forward canopy sections met the fuselage center section. Quite a bit of filler and judicious sanding had to be done before I was satisfied. Other then this area, the rest of the kit was a pleasure to construct. Great fit and ease of masking for painting made the finish of the kit a breeze.
Painting and decaling:
The canopy was masked with Bare-metal foil and given a coat of Interior Green before priming the entire model with Polly Scale Neutral Gray. Undersurfaces were masked and upper surfaces given a coat of Polly Scale Olive Drab. After touching up the model was given two coat of Polly Scale Clear Gloss. The propeller blades were painted gloss after they were first painted Flat Black, masked, and the tips painted yellow. The spinner was painted White Primer and given a coat of gloss to smooth the finish. I love doing Soviet aircraft, because so few decals have to be used. The National Insignia are from SuperScale sheet for Soviet Stars in 1/72 scale. Sirotin's eagle emblem and the victories stars are from MINICRAFT's recently released kit of the P-39N/Q. The white borders on the door surrounding the victory stars are done from white trim film. The upper wings received a circle cut from olive drab trim film to indicate where the Soviets painted over the upper wing star and border, as was their general tradition. They were overpainted with olive drab paint supplied to them from good old Uncle Sam (along with neutral gray), because a Bell staff interpreter incorrectly translated the Russian red star outlined in white for red star border in a white circle. Stalin, being the bastard he was, demanded that Roosevelt supply him with paint to correct the error. Later P-39s were delivered with the proper stars, but still kept the upper wing stars intact. Most regiments overpainted the stars, but on some photos they are present, so reference is required to be correct. Serial numbers on the vertical tail were usually overpainted and sometimes a white outlined red star would be painted there. Some regiments used a diagonal colored stripe on the vertical tail or rudder and some like the 17 IAP had no markings whatsoever. Again reference is a must to be correct. Thanks Dana Bell for the time he took at the IPMS Region 3 convention to discuss this matter with me. After all decals had dried, I cleaned the model with cotton swabs and an old cotton cloth. Recessed control surfaces received a wash of India ink. The exhausts were dry-brushed lightly with Pactra Rust and stains done with powdered pastels. The model lastly received an overspray of Polly Scale Clear Flat, which was rubbed out after two days to give it a slight sheen. After removing the masking from the canopy and cleaning up these areas, the clear sections were given a coat of FUTURE. Wing and tail navigation lights were first painted bright silver, followed by clear red or clear green as required. The aerial wiring was done with smoke-colored invisible thread.

Back to home
Kit Review Index: 1/72
1/48