ACADEMY 1:72 BOEING B-29 "BOCKS CAR"
Reviewer: Myself (braithy@bigpond.com)
During the Second World War most combatants became concerned about the continued availability of strategic materials such as aluminium, and planned combat aircraft round non-strategic materials. One such American warplane was a lightweight fighter designed by Bell as the Tri-4. This was a neat low-wing monoplane based on a wooden structure and intended to be powered by a supercharged version of the Ranger V-770 inline. The design was modified as the D-6 to meet the requirements of the US Army Air Force, which orded six XP-77 prototypes. The officially inspired changes added weight that made it impossible for the original performance and agility factors to be met. The program suffered delays and a considerable rise in cost, so only two aircraft were completed with unsupercharged engines. The first of these flew in April 1944 (April fools day to be exact, of which historians say was not unfitting!), and evaluation testing revealed a number of shortcomings, not least of which was inflight vibration problems caused by its rigid engine mounting. The second prototype crashed in October that year and the program was cancelled two months later.
Firstly, one must acknowledge Special Hobby's dabble in this subject and allowing us modellers the chance to build weird and often unheard of aicraft. However, having said that, and viewing this as a limited injection mold subject, it's not one to be tackled by an inexperienced modelmaker, and even I had to think once or twice about giving it a 'flight-test' of my own into the nearest wall. But perserverance did pay off and an attractive model is the potential outcome.
Packaged in a smallish box the kit contains one sprue of 23 light grey injection mold parts, very finely engraved panel lines, a minimal amount of surface detail and a small bit of flash encumbering the parts (nothing that can't easily be cleaned up). There are five very nicely detailed resin parts (cockpit and engine) and a one-piece clear vacform canopy. An A4 sheet folded to make an A5 booklet forms the instructions with only 3 (but adequate) assembly steps. Colours are quoted from the Humbrol range for individual parts as well as external scheme.
Construction starts with the resin cockpit, consisting of tub (includes pedals, front&rear bulkhead, sidepanel detail), seat (correctly molded with seat belt detail), stick and nicely detailed instrument panel. The instructions call for an Interior Green wash (H151) but since this enamel is no longer in the Humbrol range I simply used H78 'Cockpit Green'. When the fuselage halves are joined together there is an intentional gap/intake in the nose underneath the propellor, where the engine can be seen - it's worth the effort then to do up a nice looking engine. I gave the nose interior a dark grey wash, and since the engine is provided as a resin piece, painted this up in a combination of light grey, aluminium and black parts and placed inside. This looks really good. Since the aircraft features a tricycle landing gear some weight needs to be placed in the nose, and bear in mind that the cockpit sits a long way back in the fuselage as well being resin so these factors will contribute heavily toward it being a tailsitter. With combination of resin engine and some small lead bearings and a long (albeit slender) nose you should be able to cram in sufficient weight - no amount is specified, so I used 30g.
Before joining the fuselage halves together you need to attach the exhaust plates from the inside - let's just call them 'gills' because that is what they resemble the most! :) This is the first major hurdle (if you have successfully been able to glue in the engine and cockpit which caused me no real dramas) because the holes are too small to fit the 'gills' through. I have ample reference material and some very good photos of the XP-77 so was able to see some of the kit's shortcomings. I had to carefully use a flat file to increase the size of the hole in order to attach the gills, plus filler to clean it up afterwards. Photos of both prototypes show that these do not actually protrude outside the aircraft, they finish in line with the fuselage. The instructions tend to indicate they protrude out, but if you look at the three view colour scheme sketch on the back page you will see that it doesn't.
After overcoming this the next task was to join the fuselage halves. These did not want to go together and I spent time getting these to line up correctly (in the end it was still slightly off-line). A bit of filler is required in some parts where a gap has been revealed, mainly forward of the cockpit and underneath the nose. Since the join lines were quite visible these had to be sanded back for a smooth look.
Next came the wings, which is a one-piece mold that sits in an allocated area underneath the fuselage. Again this proved to be a bit of a challenge and was easily coaxed off-centre if you were not paying full attention. In fact the area needs to be filed first to get rid of any bits jutting out in the fuselage and to assist getting a reasonably decent fit. The wings also needed to be sanded around the edges and cleaned up because some flash and mold imperfections were noticeable. More filler was required as gaps were evident at all the join marks but the attention in the end was worth it, because it looked pretty nice. Curiously the tailplanes were easy to affix in spite of there not being any alignment pins - a small rectangle is outlined in the plastic for correct positioning - and I just threw these on quickly. The two propellor blades are (simply?) attached to either side of the spinner - which sounds easier than it is. You have to get the positioning just right, and sand the edges a touch to help with a quick grasp onto the spinner. Very small indents indicate their positioning, but they're pretty hard to see and don't offer much assistance.
The vacform canopy was a real stumbling block and this was where I almost had had enough - Flight testing in the back yard would be commencing very shortly if I wasn't successful. The frame lines are hard to see on the plastic which made for an exact cutout difficult. In my opinion it is not shaped correctly to conform with this kit anyway, to use an analogy which best befits this situation - it really was like trying to put a round peg in a square hole!! To make matters worse, even when attempting to dry-fit it didn't look correct when compared to reference photos. The aircraft has basically a bubble canopy but the kit reproduces one which looks more similar to the set in/backed design. Anyhow, with a lot of peserverence and cutting a little more than necessary I finally was able to get it to sit properly. A fair bit of putty was then applied very carefully in the gaps and then sanded (masking off the canopy). Once painted, you couldn't distinguish the problems that the canopy caused, so it was worth the effort.
The canopy can be displayed open providing you cut from the appropriate frame. In all the reference shots I have, I don't have one with an open canopy and while I have a fair idea of how the canopy should be positioned open I decided it was best not to. This was a shame because all the work inside is not very clear through the (only slightly) clouded canopy.
Addendum (Bill Powers) : regarding open canopy: On the TV programs WINGS there was a short feataure on the XP-77. The canopy did not slide back but rotated and disappeared behind the seat, much as the tail gunners canopy would rotate. The hinges were on either side behind the seat.
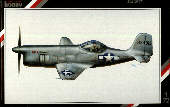
Since only two prototypes were built, these are the only two catered for by the kit. The only difference between the two versions is serial numbers - 334915 & 334916. I have side-on perfect shots of both (b&w), the former as static and the latter in-flight, so was able to use these to finish off my model. Instructions called for Humbrol 56 (aluminum) overall finish, I opted to prime the model then give it two coats of Humbrol Matt Aluminium MetalCote. This looked very nice. The Propagatem decals supplied were thin but went onto the surface easily. According to the instructions the 16 version has pilot's name just forward of the canopy and "Bell Aircraft" decal just above the gills. The close up photo in-flight reveals that these were not on the aircraft and I would recommend leaving these off, because the aircraft crashed (unless it was recovered and these items placed on in a museum display) - this is the same for the 15 although may have changed later if it's displayed somewhere in a museum. However, I ended up placing the Bell Aircraft signature just above the gills for presentation sake on my 15 version.
Overall, this kit presents quite a few challenges and obviously I was not very impressed with the canopy problems. It's a very small model that would aptly be described as 'pocket-sized' - just under 10 cm in length and 12 cm span (which is accurate to scale as real life was just under 23 ft in length). However, I am quite pleased with the end result, it looks quite nice and adds a talking point to the display shelf. Recommended for the experienced modeller only.
Back to home