Origami Pages
The Swan
page 1
Not related to origami:
My Madagascan Giant Hissing Roach Page
This is written so parents can read the instructions while kids fold...
but don't read aloud! Just use the written instructions to give some pointers if necessary. Pictures are sometimes enough by themselves.
Origami for Beginners: The Swan

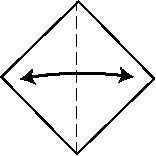
Step 1. Make a KITE BASE
.
FOLD, then UNFOLD
TIPS:Look at the picture; hold your paper exactly the same way.
Always look for the dashed line...it shows where the next fold happens.
Then look at the arrows...they show what movement will happen.
An arrow head at BOTH ends means FOLD and then UNFOLD.Think about this for a minute. You are learning a new SYMBOL LANGUAGE!
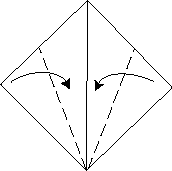
Step 2. Finishing the Kite Base
Fold lower edges to CENTER crease.
TIPS:Check the dashed lines. Where do you think they will be on your paper?
What do the arrows hint at?Look at the NEXT picture to see what you are aiming for...
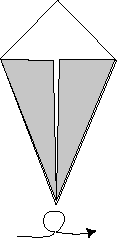
Step 3. Congratulations! This is the KITE BASE.
TIPS:
Your paper should look like this. Notice how the illustration tries to tell you that the back of the paper (which is gray) now shows. If you folded your paper really well you won't have a gap between the edges in the middle. DON"T OVERLAP those edges!!!! (That sometimes will wreck your work by locking stuff together so it rips!)
The pictures sometimes show a gap to make it easier to see what is happening
This goofy little symbol means something. Look at the next picture to see if that helps you guess...
Step 4.
TIPS:
Did you guess the symbol meant TURN THE PAPER OVER?
What clues should you be looking at now?
...the dashed lines..
...the arrows....See if you understood the symbols. Fold your paper then go to the next page.
Select the swan to turn the page.. you are almost done!
This page designed and maintained by Emma Craib:
suggestions and comments
welcome.This was one of my first web projects years ago. Try my newer origami Flash movie which shows the samurai helmet and two other models based on it.


