How to Shrink GIF Files Using Adobe
Photoshop™
Image files created by scanners, structured drawing programs
and Photshop itself tend to contain many more colors than
necessary. The use of additional colors increases the size of
images and contributes to the amount of time we wait for pages to
load from the Web. There are a number of programs that will
reduce the number of colors automatically, but most tend to cause
moderate to severe loss of image quality. It is possible to
reduce the number of colors in an image manually using Photoshop,
which results in little of no apparent loss of image quality.
Here is how it is done.
- First, you should to convert your image to a
"web-safe" indexed color format. If you are
already dealing with a GIF image, you need to convert it
to RGB Color (Figure 1), followed by conversion back to
an indexed color format (Figure 2). Select
"Web" under the Palette option, with the
"Dither" option set to "None." If
this does not produce an acceptable picture, select
"Diffusion" as your dither method. This will
result in a larger image, but will produce more apparent
colors. The resulting image will contain 216 colors, many
of which are not actually used in your image. To reduce
the colors to those that your image uses, select RGB
Color mode, followed by Indexed Color mode using an
"Exact" palette. Leave the color depth settings
as they are.

Figure 1 |
|
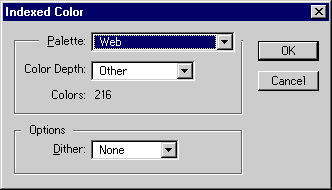
Figure 2 |
- Once the palette has been converted to a "web
friendly" format, the number of colors can be
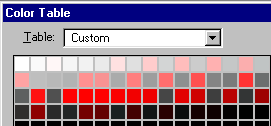
reduced through the "Color Table" command (see
figure 1). Selecting this command displays the current
palette of colors in your image (Figure 3, below). Very
often, several of the colors in your image will be very
close in appearance to one another. In the example below,
there are three different shades of red that are nearly
identical. You can remove colors by setting their values
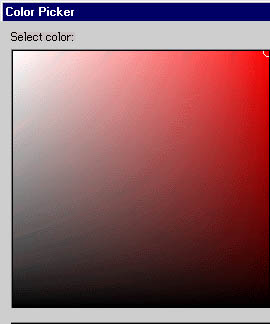
equal to each other. Click on one of the middle shades of
the red colors, which will open the "Color
Picker" window (Figure 4, below). Remember the HSB
settings (in this case 0, 100, 80). Then click on one of
the other red colors and enter those numbers into the
appropriate box and click "OK." When finished
editing the colors, click "OK" in the Color
Table window and watch your image. Hopefully, you will
see little or no difference in your image. If you don't
like the results, select "Undo" from the
"Edit" menu. When you are finished editing the
colors, to remove the duplicate colors, select RGB Color
mode followed by Indexed Color mode, using exact colors.

Figure 3
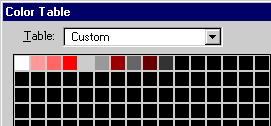
An example of how colors can be reduced is shown below. The
original image is a 64 color gif image. The reduced file contains
only 11 colors, resulting in over a 50% reduction in image size.
Last updated 11/17/99