 Forepart:
The forepart (both the taffeta and backing layers) were attached to
the quilting frame and the black gimp was sewn on, following the
pattern chosen. This was then attached to an (indulgent) 5 yard
cartridge-pleated skirt. The bottom of the pleats was sewn level
with the bottom of the waistband, then the top of the pleat was
attached to the middle of the waistband for added stability. When
placed on the dummy, the line was similar to
wearing a bum-roll.
The first picture on the left shows the forepart attached to a "hooky
rug" or quilting frame. You can see the gimp strings trailing
off, and the pins used to mark out the pattern. The second
pitcture is a sketch of
the pattern used.
The bodice pattern was based on the same pattern used for the corset, ajusted to cover the corset but to reveal the shift. The neckline comes to a point at the back (see below), as does the corset, which holds the narrow shoulder straps in position. This produces a conservative version of the "no-shoulder-strap" appearance of pictures such as that of Princess Elizabeth. The front closure is hook and eye, rather than the ties visible in the More picture, as my intention is to add a false front to cover the hooks and eyes and any bumps would show, as well as creating problems at the front waist closure. This way the skirt can be attached directly to the bodice, while the false front covers the join between the bodice and skirt of the gown.
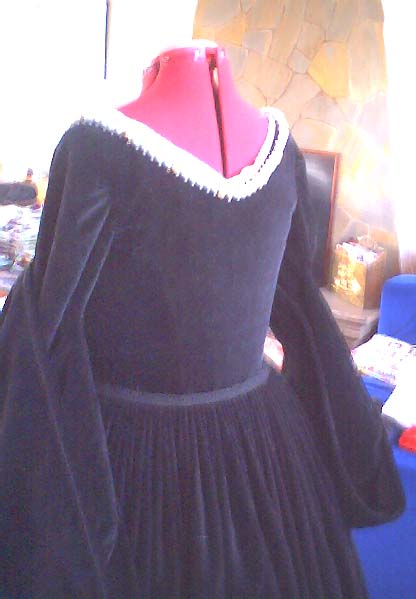 When the time came to fashion a pattern for the sleeves, the bell-like
sleeves in the early 16th century did not produce the correct turn
over.
I also did not like the idea of sewing the folded-over sleeve to the
upper
arm, either, so the weight of the sleeve had to be adequate to both
look
and sit correctly. I found that a kimono-style sleeve, combined
with
the effect of two layers of velvet and an interlining layer of flannel
worked
adequately. Around the edge of this, on the inside, a stripe of
decorative
gimp serves to attach all the layers together, and provide subtle
decoration.
You can see the edge of the inside sleeve in the picture on the
left.
When the time came to fashion a pattern for the sleeves, the bell-like
sleeves in the early 16th century did not produce the correct turn
over.
I also did not like the idea of sewing the folded-over sleeve to the
upper
arm, either, so the weight of the sleeve had to be adequate to both
look
and sit correctly. I found that a kimono-style sleeve, combined
with
the effect of two layers of velvet and an interlining layer of flannel
worked
adequately. Around the edge of this, on the inside, a stripe of
decorative
gimp serves to attach all the layers together, and provide subtle
decoration.
You can see the edge of the inside sleeve in the picture on the
left.
The velvet of the skirt has been reinforced around the edges and
from the
waist to approx. knee lengh with flannel, and attached to the
lining. The skirt was finished in the same way as the underskirt,
then cartridge pleated and attached directly  to the
bodice. Despite the weight of the velvet, flannel etc. there is
still a hint of a bum-roll curve to the hips. This is due
more to the two sets of cartridge pleats over each other than to any
stiffness inherent in the fabric.
to the
bodice. Despite the weight of the velvet, flannel etc. there is
still a hint of a bum-roll curve to the hips. This is due
more to the two sets of cartridge pleats over each other than to any
stiffness inherent in the fabric.
The oversleeves are patterned after the forepart, with a decorative border on the bottom, open seam. The gimp was sewn to the taffeta and flannel backing. The fastenings are ribbon, later trimmed and tied with the ends tipped.
Due to living in the back of beyond, it is rather difficult to find pearls of sufficient size to imitate the neckline and waist banding in the portraits, as well as the biliments on the french hood. The solution of this was to buy several packets of Fimo plasticine, a bottle of pearl paint, and have a go. This worked for irregularly-shaped items, but pearls were beyond me. I also noticed that the vinyl-based paint did not adhere with the Fimo, allowing it to peel off if pulled too hard. The can of pearl spray-paint helped, and I am hoping that combined with the backdrop of black velvet the end result will look reasonably pearl-like. These will be interspersed with gold knots, and bordered with smaller pearl beads (sprayed to match the fimo-nightmare-pearls).
I am now a professional pearl-sprayer, having discovered the trick to dulling the surface of pearl beads to match the fimo-nightmare-pearls. The sundeck may never recover. A great deal of these will end up on the french hood below.
 This was created using the sources mentioned on Drea Lead's incomparable website,
something called "pruning wire", plastic canvas, velvet and satin, and
prayer. The pattern of the back overcap was a "cooked" version of
the undercap. As you can see, I did not succeed in creating the
graceful side curves on both caps. The undercap was made of white
cotton over a wire frame, the crimped gold ribbon (which is more easily
seen on the underside in the picture) incorporated into the front seam.
The veil was then shaped onto the back of this frame. A chin strap
balances the two flaps that cling to the back of the head, under the
veil. The black overcap was velvet and wire, strengthened by
plastic canvas. This was then sewn together, and the pearls
applied over.
This was created using the sources mentioned on Drea Lead's incomparable website,
something called "pruning wire", plastic canvas, velvet and satin, and
prayer. The pattern of the back overcap was a "cooked" version of
the undercap. As you can see, I did not succeed in creating the
graceful side curves on both caps. The undercap was made of white
cotton over a wire frame, the crimped gold ribbon (which is more easily
seen on the underside in the picture) incorporated into the front seam.
The veil was then shaped onto the back of this frame. A chin strap
balances the two flaps that cling to the back of the head, under the
veil. The black overcap was velvet and wire, strengthened by
plastic canvas. This was then sewn together, and the pearls
applied over.