Getting Started in iMovie
Open
the iMovie tutorial.

The
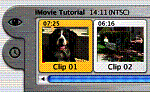
frames on the Shelf are video clips.
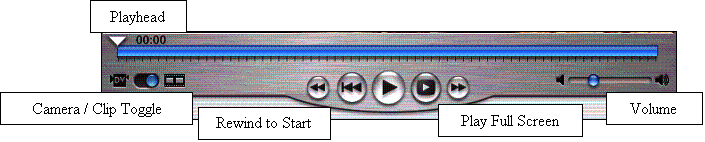
To view the clips, click on the clip. The frame of the selected clip turns
yellow. It will appear in the large Preview
Screen. Press the Play button
below the Preview Screen.
The
Shelf contains the raw clips for the movie. To begin sequencing the movie,
Click and Drag clips from the Shelf into the Clip Viewer.
 Once there are several clips in the Clip
Viewer you can watch the flow of the movie by pressing the Play button. To
rewind to the beginning of the movie, select the Rewind to Start button.
Once there are several clips in the Clip
Viewer you can watch the flow of the movie by pressing the Play button. To
rewind to the beginning of the movie, select the Rewind to Start button.
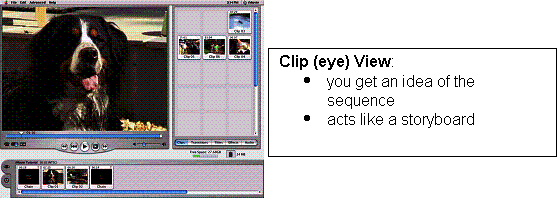
The
length of each clip and the total length of the movie can be seen in the Clip
(eye) Viewer.
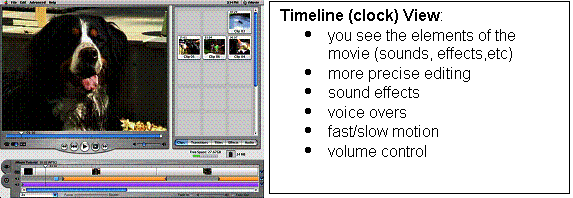
The
comparative length of clips can be seen in the Timeline (clock)
 Viewer. This view is also
used when adding sound effects and music clips.
Viewer. This view is also
used when adding sound effects and music clips.
Toggle
between the two views:
Starting From Scratch:
 Connect the digital video camera to the computer via
the firewire cable.
Connect the digital video camera to the computer via
the firewire cable.
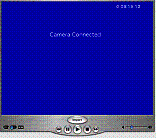
The
camera can now be controlled through the computer. It will automatically determine
the camera is connected. Press Import
to bring video clips from the camera onto the computer.
As
the film is imported, the computer creates a new video clip and put it on
the clip Shelf. A new clip is created for each
time the camera was switched off, or put on standby.
Cropping and Copying a
Video Clip in iMovie
iMovie offers many techniques for editing
your video and audio clips. You may find that you want to remove unwanted
material in a clip, make a copy of a clip, split one clip into two clips,
rearrange clips, or replace or rearrange video.
This Step-by-Step Card demonstrates how to crop extra footage from a video clip and how to copy a video clip so you can edit it without damaging the original clip. For information on other editing techniques, refer to the iMovie tutorial or the help system. (Choose iMovie Tutorial or iMovie Help from the Help menu.)
Cropping a video clip
When you want
to crop the beginning and/or end of an iMovie video clip, you first select
the part of the video clip that you want to keep. There are several ways you
can do this.
1. Click
to select the clip you want to edit.
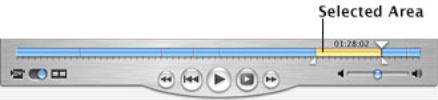 2.
Click and drag below the scrubber bar. Two triangular crop markers
appear. Drag the crop markers to where you want the clip to begin and end.
When you release the mouse button, part of the scrubber bar has changed from
blue to yellow. The portions outside of the crop markers will be deleted when
you crop the clip.
2.
Click and drag below the scrubber bar. Two triangular crop markers
appear. Drag the crop markers to where you want the clip to begin and end.
When you release the mouse button, part of the scrubber bar has changed from
blue to yellow. The portions outside of the crop markers will be deleted when
you crop the clip.
3.
To increase or decrease the edited area
frame by frame, click either crop marker once, then press the Right Arrow
or Left Arrow key on the keyboard to move the crop marker.
Note:
If you change your mind and want to undo what you selected, choose Select
None from the Edit menu.
4.
Choose Crop from the Edit menu. The excess
footage has been removed from your clip.
Another
way to select the area you want to crop is to move the playhead to where you
want the clip to start. Holding down the Shift key, click at the point of
the playhead on the scrubber bar and drag to select the portion you want to
keep.
Note:
If you want to remove a section in the middle of the clip instead of the beginning
or the end, you can use a different technique to delete that portion. Instead
of selecting the area you want to keep, select the area you want to delete
with the crop markers, then choose Clear from the Edit menu. The area between
the crop markers is removed.
Creating an edited copy of an existing
clip
You
may find you want to create a new clip by copying a segment of video from
a clip on the shelf without changing the existing clip. In this way, you can
edit a clip and keep the original intact. To do this, you will use some of
the editing skills that you have already learned in this Step-by-Step Card.

1.
Click the clip on the shelf that has the
portion you want to use. The clip is highlighted in yellow.
2.
Choose Copy from the Edit menu.
3.
Choose Paste from the Edit menu. A new
clip appears on the shelf.

4.
Rename that clip and then edit out any
parts you want to remove. After removing that footage, notice that the length
of the clip has been reduced from the original clip.
Adding Titles in iMovie
Titles can be used at the beginning and at the end of a movie as
well as over clips throughout your iMovie project. Several title styles are
included with iMovie. You can download additional ones from the iMovie Web
site at www.apple.com/imovie. This Step-by-Step Card demonstrates how to add
titles to your project.
1. Open your iMovie project.
2. To
add a title over a clip, click to select that clip in the clip viewer or the
timeline viewer. A title can also appear on a black background as its own
clip.
 3. Click the Titles
button to display the Titles panel.
3. Click the Titles
button to display the Titles panel.
4. Click
to select a title style from the list in the Titles panel. A preview appears
of the title you selected in the title preview monitor.
5. Use
the Speed slider to adjust the speed for the title. With some title styles,
you can set the duration of a pause as well using the Pause slider.

6. If
directional buttons appear for the title style, you can click to change the
title direction.
7. Click
the Color box to choose a color for the title.
![]()
8. If
you want to create a separate credits page or another page with a black background,
check the Over Black box. (When you are finished creating your title and drag
it to where you want it, a new clip will be created.)
9. Select
QT Margins if you will send your movie out as a QuickTime movie. If not, leave
this option unchecked so that the movie will play showing all the text on
a television screen.
10. Choose a font from the Font pop-up menu. This list displays the fonts that are installed on your computer.
![]() 11. Adjust the font size
with the text size slider.
11. Adjust the font size
with the text size slider.
 12. Type your text in
the text field boxes. The text field shows two boxes for text at a time. For
most title styles, each text box is a line of text. If the title allows for
additional text boxes, you can click the plus button to add text. With some
title styles, such as the Rolling Credits title, each set of two text boxes
becomes one line of text. Click the minus button to remove text boxes.
12. Type your text in
the text field boxes. The text field shows two boxes for text at a time. For
most title styles, each text box is a line of text. If the title allows for
additional text boxes, you can click the plus button to add text. With some
title styles, such as the Rolling Credits title, each set of two text boxes
becomes one line of text. Click the minus button to remove text boxes.
13. Click
Preview in the Titles panel to see your title play on the main iMovie monitor.
 14. Once you have completed
your title, drag the title from the titles list to where you want it in the
clip viewer. If it is to appear over a clip, drag it to before that clip.
If you want it at the beginning or end of the project, drag it before or after
the clips. If you want it to appear in the middle of a clip, you need to split
the clip into two clips and then place the title before the clip you want
it on.
14. Once you have completed
your title, drag the title from the titles list to where you want it in the
clip viewer. If it is to appear over a clip, drag it to before that clip.
If you want it at the beginning or end of the project, drag it before or after
the clips. If you want it to appear in the middle of a clip, you need to split
the clip into two clips and then place the title before the clip you want
it on.
The rendering process starts. A black line is
displayed that fills in with red as rendering continues. Allow your computer
time to finish this process before moving on.
15.
Save the changes to your project.
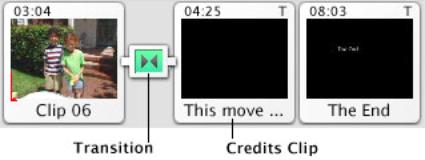 |
Tip: In some cases, you might want to have a transition
leading into a credits page. To do this, select a transition and drag it in
front of the credits clip. See the Step-by-Step Card "Adding Transitions
in iMovie" for more information.
Adding Transitions in iMovie.
With iMovie, you can easily add transitions
between clips or at the beginning or end of your movie. This Step-by-Step
Card explains how to do this.
1. Open
your iMovie project.
2. Click the Transitions button to view the
Transitions panel.
3. Use the Speed slider to set the speed of
the transition. Slower transitions take longer to render.
 4.
Click to select a transition. A sample of the transition appears in
the transition preview screen.
4.
Click to select a transition. A sample of the transition appears in
the transition preview screen.
5.
Click an arrow to select a direction for
the transition if the Transition button is available. Not all transitions
allow you to set a direction.
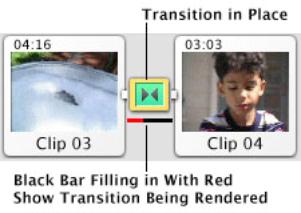 |
6. Drag the transition to the clip viewer so that it's between the two clips you want to modify or at the very beginning or end of your movie.
Note: Depending on the speed of your computer and the transitions being added, this process may take some time. The status of the rendering is shown on the black bar filling with red.
Adding Sound and Music in iMovie
You can add music and other sound to your iMovie projects in several
different ways. You can record your own voice, add a sound effect from a collection
that comes with iMovie, or use a clip from an audio CD. In this Step-by-Step
Card, you will learn how to add sound to your desktop movie in these three
ways.
Adding a voice clip
iMovie allows you to record your own voice (or
someone else's voice) to use in your movie. To record your own voice, follow
these steps:
1. Check to see whether your computer has a
built-in microphone or an external microphone. You need one or the other to
record your voice.
2. Make
sure that your computer is set to record from that source. Choose Control
Panels from the Apple menu, then choose Sound from the submenu. Click the
Input tab and make your selection in the Input panel. (You can also select
your input device by opening the Sound Strip module on the Control Strip.)
3. Open
your iMovie project.
4. Position
the playhead where you want the narration to begin.
5. Click
the Audio button to open the Audio panel, if necessary.

6. Click
the Record Voice button and speak into your microphone.
7. Click
the Stop button when you finish.
Your recording now appears in the timeline viewer
as an orange colored strip.

Adding a sound effect
iMovie comes with a number of prerecorded sound
effects that you can use in your projects. The sound effects are located in
the Audio panel. You can download many more sound effects from the iMovie
Web site at www.apple.com/imovie and use them in your projects.
To add a sound effect to your project, follow
these steps:
1. Click
the Audio button to open the Audio panel, if necessary.
2. Scroll
through the list of sound effects, clicking whichever ones you'd like to hear,
until you have located a sound effect you'd like to use in your project.
3. Click
the timeline viewer tab (the icon with the clock).
4. Move
to the spot where you would like to add the sound effect. Drag the sound effect
you want from the Audio panel and place it in one of the two audio tracks
in the desired location.
Adding music from a CD
You can add clips from an audio CD to your iMovie
projects.
 1. Click the
Audio button to open the Audio panel, if it's not already open.
1. Click the
Audio button to open the Audio panel, if it's not already open.
2. Insert
an audio CD in the computer's CD-ROM drive.
A list of tracks appears.
3. Click
to play any track in the list.
4. Move
the playhead to the point in your movie that you want the music to start from.
5. Click
the audio CD track that you want to add, then click the Record Music button.
You hear the track playing and see it being added to one of the two audio
tracks.
6. Click
Stop when you want to stop the recording.
7. To
crop the recorded music track, place the pointer on the triangle at the right
end of the music track and drag to the left. Once you have determined the
length you want, choose Crop from the Edit menu.
Tip: You can add a fade in or fade out effect.
To do this, first select the audio track you recorded and then select the
Fade In or Fade Out option, or both.
Adding Video Effects in iMovie
iMovie allows you to add video effects, such as soft focus and sepia tone, to your clips. You can use the effects that come with iMovie or download additional ones from the iMovie Web site at www.apple.com/imovie. This Step-by-Step Card shows you how to apply a video effect.
1. Open your iMovie project.
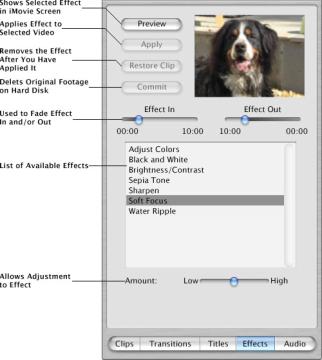
2.
Select the clip(s) or portion of a clip
to which you want to add the effect. To learn more about selecting clips,
see "Selecting video" in the iMovie electronic help system.
3.
Click the Effects button.
4.
Select the effect that you want to add
from the list in the Effects panel. Some effects, such as Soft Focus, allow
you to make additional adjustments to them using sliders that appear below
the Effects list.
5.
Click Preview to play the video in the main iMovie screen with the selected
effect.
6.
Click Apply when you are satisfied with the effect.
7.
If you want to remove the effect, click
Restore Clip. You can change the effect
by selecting a different one and clicking Update.
Note: When you add an effect, the original footage is still retained on your hard disk. If you want to delete this footage, click Commit. If you do this, however, you won't be able to change the effect.