
If you've gotten to this page you're probably interested in how I make my title belts, possibly because you'd like to make some of your own.
Fair enough. The following text describes the step-by-step process I use for making a title belt, and this system pretty much evolved empirically through trial-and-error. The bottom line is when I first started to make title belts I wanted a process that would allow me to come as close as possible to print a title belt on my inkjet printer, and this is what came closest to achieving that goal. This isn't the only way to make a title belt, but it's the process that works for me. I don't go into too much detail with regard to how to use graphics applications and such, but I do make comments and suggestions along the way, and I do tend to editorialize in some areas.
One other thing. Throughout this page you'll notice that from time to time I'll mention specific brands for the tools and materials I used in making the belts, and some places where they can be purchased. I'm not affiliated with any of the manufacturers or establishments, nor do I necessarily endorse their products as being the best choices for the project. In most cases they were just the most conveniently available. Also, I make no warranties on the accuracy of the information on this page or on the success you will achieve in your own project should you follow the steps below, nor will I be held accountable for any and all damages that occur as a result of said process. Ultimately, making a good title belt depends on how much time, effort and skill you're willing to put into it.
So if you're still with me, read on!
Contents:
- Tools & Materials Used
- Step 1: Get Your Hands On A Toy ECW Title Belt
- Step 2: Make A Template Of The Plates
- Step 3: Work On The Plate Designs
- Step 4: Print The Design On Mylar Film
- Step 4.1: Spray Fixative On The Mylar Film (optional)
- Step 5: Laminate The Mylar Film
- Step 6: Cut Out The Flexi-Foam Plate Shapes
- Step 7: Glue The Flexi-Foam Plate Shapes To The Belt
- Step 8: Cut Out The Mylar Film Plate Shapes
- Step 9: Glue The Mylar Film Plate Shapes To The Flexi-Foam Plate Shapes
- And if all goes well...
- Computer
- Object oriented vector-based graphics design application program (such as Micrografx Designer)
- Color InkJet (or BubbleJet) printer
- Toy ECW title belt (made by Figures Toy Company, Inc.)
- 8.5" x 11" mylar film sheets (called "Silver Reflective Film" by Mirage InkJet Technology)
- 9" x 12" Self Adhesive Laminating Sheets (made by GBC Office Products)
- *Fixative spray (such as "Workable Fixatif" by Krylon), optional
- *Flexi-Foam (made by Fibre-Craft), preferably Black
- *Soft-rubber craft roller (such as the 4" Brayer made by SpeedBall)
- *Contact Cement (made by the Super Glue Corporation)
- *Aleene's 2-in-1 Glue (made by Duncan Enterprises)
- *Aleene's Original Tacky Glue (made by Duncan Enterprises)
- *Flat Black Enamel Paint Marker (made by Testors Corp.)
- *5/16" Circle Hand Punch (made by Provo Craft)
- *Craft scissors
- *Sponge brush
- *Tape measure and/or ruler (used for measuring the belt plates)
- Scratch printer paper (the unprinted back-sides of a used sheets will do)
- Pin or needle (used for removing air bubbles in the laminating plastic)
Step 1: Get Your Hands On A Toy ECW Title Belt
This is the most important step in the process, primarily because getting ahold of a toy ECW title belt can be difficult. These belts provide the foundations upon which I build my own belts, and I make it a point not to start working on the plate designs until I have a toy ECW title belt ready to work with.
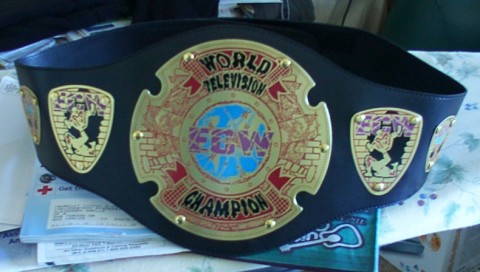
These belts were made by the Figures Toy Company, Inc. sometime in the late 90's and, by all indications, they didn't sell too well at the time, as there appear to be many out there in "factory sealed" condition. There are three types of toy ECW title belts (Heavyweight Champion, Television Champion and Tag Team Champion) and they were available in Adult and Child (or "Kid") sizes. All three of these toy title belts have relatively flat plates, so you could pretty much use anyone of them for making new title belts. When compared to the higher end title belts that FigInc makes, these toy belts appear very cheap and cheesy. But when I first came across them I immediately saw that I could cover the plates with my own designs and effectively "recycle" them. My personal preference is the Television Champion belt (pictured above), because the main plate is a perfect circle (when you work around the four grooves) and is, by far, the easiest one to make designs for. Also, I only use the Kid sized belts, partly because I've never been a big fan of title belts with large plates, but more for practicality; the main plates on the Adult sized belts are usually wider and/or taller than a design that will fit on an 8.5" x 11" sheet of mylar film. With the Kid sized belts, I can print the main plate and four side plate designs on a single sheet. And while they may be "kid" sized belts, they will fit waists up to 38", making them big enough for most adults.
Unfortunately, FigInc nolonger makes these belts, so finding one may not be easy. Your best bet at this point in time is to search eBay (which is what I did) and you may find them ranging in price from $7.99 to $15.00 for the Kid sized toy belts. Another possible source is HighSpots.com, which sells prowrestling merchandise; I saw them listed there before, but their stock looks like its dwindling. Another option is to use the toy WCW title belts, another discontinued product line of FigInc. Like the ECW variety, most of these toy belts also have flat plates (I don't theink the WCW Heavyweight Champion belt has a completely flat plate), but I wasn't too keen on their shapes. If you can acquire a WCW belt and feel like giving it a try, more power to you!
Whatever toy belt you decide to use, please be aware of one thing: this process will permanently deface the original belt design. When you follow the steps below to make a new belt, the underlying metal plates will be covered with paint and glue, and I don't believe you'll ever be able to restore it back to its original condition if you wanted to. I knew this from the beginning and I assume that if you decide to follow these steps to make your own belt that you're also willing to sacrifice the toy belt. If you're a collector not willing to ruin the belt or have some other sentimental attachment to it, then I suggest you find an alternative process to making a title belt.
Step 2: Make A Template Of The Plates
After you've acquired a toy belt, the next step is to create a template of the plate shapes on your computer. In my case, this involved manually measuring the plates with a ruler and recreating them in Micrografx Designer.
This was a somewhat tedious process, because after I made the shapes in Designer I'd print them onto plain paper, cut out the patterns and match them up with the metal plates on the belt. More often than not, the first attempts didn't come out quite right, so I'd have to repeat the printing/cutting/matching process again and again until I got a good shape. It didn't have to match exactly, but the shape had to completely cover the underlying metal plate. In the case of the ECW TV title belt, the main plate was easy, but working on the shapes of the side plates took a lot of time.
Note: You're probably gonna be printing on plain paper a lot while you're tweaking the designs , as well as later on in the project. If you wanna be good to the environment, I recommend used printer paper as scratch. I had a lot of old printouts that I had no use for, so I printed on the clear back-sides of the sheets.
The beauty about this step is you only need to do it once for each type of belt that you're using. Once you get the shapes right, you can skip this step and reuse the template you've already created for future projects, as long as you stay with the same belt type (that's another reason I prefer the ECW TV title belt).
Step 3: Work On The Plate Designs

The next step is to work on the plate designs using the template you created. This is the most creative part of the entire process and the one I enjoy the most. It's also the part that usually takes the most time. Sometimes I can make a design in a day or two, sometimes it takes a couple of weeks.
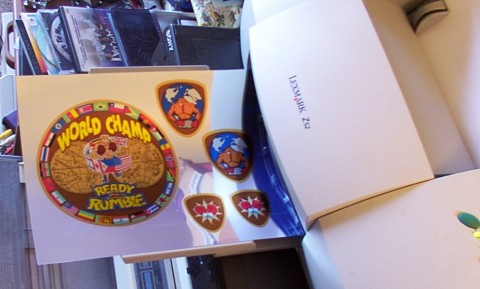
What I tend to do here is look for characteristics that identify the subject matter of the title belt and try to put those elements into the designs. I also spend a lot of time looking at the designs of other title belts and "borrowing" certain elements from them (images of prowrestling title belts are all over the Net). In the above example, I was working on the Ready 2 Rumble World Champ plate designs and I wanted it to look like the WBC title belt, so I borrowed heavily from that design. Normally I toss things together to see how they look, make a few sample prints on plain paper and tweak the designs as needed. Sometimes I cut out the sample prints and adhere them to the belts with tape just to see how they look. Other times I have Micrografx Designer running with the design on the screen and I step back a few feet from the monitor to view it at a distance.
There aren't any hard-and-fast rules on making the plate designs; it's all a matter of preference and taste. For the most part, title belt designs are supposed to be gaudy, so you can usually go all out on them. I do have a habit of using icons and ding bats to cover bare areas in the design, but that's certainly not a requirement and you may have other ideas. Again, what goes into a belt design is entirely up to you.
Step 4: Print The Design On Mylar Film
Once you're comfortable with your plate designs, the next step is to print it onto mylar film. The one I use is called "Silver Reflective Film," made by Mirage InkJet Technology, and is available in 8.5" x 11" sheets (there's a "Where To Buy" link on their site to find resellers). This is a highly reflective plastic media that has a mirror finish and is made specifically for inkjet printers. I really like this media because it's very easy to cut and takes the ink from my printer (Lexmark Z52) very well. In fact, when I print a gold color on the film it really looks "gold!"
Before going on to the next step, I recommend waiting about a half hour to allow the ink to dry. During this delay, try to avoid touching the surface of the ink surface of the film because it's very susceptible to finger prints. Also, make sure you print on the side of the film that has the coating on it for ink to adhere.
Step 4.1: Spray Fixative On The Mylar Film (optional)
Before laminating, you may want to spray a layer of fixative onto the ink surface of the mylar film. Over time, the adhesive on the laminating sheet will tend to dissolve a little and may smear the ink on the surface of the film. From experience, I've found that fixative, such as the "Workable Fixatif" spray made by Krylon, reduces this smearing considerably.
Whether or not you will need to apply fixative is entirely up to you and may not be necessary. Inkjet ink varies from one manufacturer to the next, and I suppose that it's possible some inks are more resistant to smearing than others. For example, the spec sheet on the mylar film indicated that its compatibility with most Epson and Hewlett Packard inkjet printers was "excellent," but only "good" when used with my printer (Lexmark Z52). Maybe it's designed to take other inks better. Another consideration is that even if the ink smears, it may create a good looking effect. For example, the color that smears most on my designs is the gold tone, but it doesn't look too bad because it makes the gold appear slightly "tarnished," which adds to the realism. So using fixative is your choice.
If you do decide to use the fixative, don't over do it; one thin layer on the surface will do just fine. Using too much fixative will dull the mirror finish of the mylar and ruin the whole effect. And after you've sprayed the film, make sure you give it enough time to dry before moving on to the next step. I usually wait one to two hours, just to be on the safe side.
Step 5: Laminate The Mylar Film

After the ink dries (or the fixative dries, if you did that step) you're now ready to laminate the mylar film. I use the 9" x 12" Self Adhesive Laminating Sheets made by GBC Office Products, which you can get at Office Depot (there are also similar products available at craft stores).
All we really do here is apply the ink side of the mylar film onto the adhesive side of the laminating sheet. The key here is it has to be done very carefully; if you mess it up, you just wasted a sheet of mylar film, a laminating sheet and maybe a couple of hours of your life (don't ask how many times I messed up). When you do get the laminating sheet onto the film cleanly, use a craft roller to squeeze the two surfaces together. Roll over it several times. Try to avoid giving into the temptation of using a hard item, like a coin or something, to crease the laminating sheet because this results in ugly scratch marks.
No matter how good you are, there are gonna be air bubbles in between the laminating sheet and the mylar film, and no matter how many times you run the roller through you won't be able to get rid of them. Since the laminating sheet and mylar film are both non-porous, there's really no place for the air to go. So the only real way to get rid of air bubbles is to use a pin or a needle to pop them. What I do is use the roller to "herd" all the smaller air bubbles into one big one, then pop the bubble with a pin and squeeze the air out with my fingers. And if I carefully position the big bubble over a section of the design that has dark colors, the pin hole isn't too obvious. Not very glamorous, but it works.
One other thing. If you sprayed fixative over the mylar film before you applied the laminating sheet, you'll see a thin powdery layer when you squeeze them together. I don't really know what this is, but I presume it's what happens to the fixative when it interacts with the adhesive from the laminating sheet. I worried about this at first, but then I noticed that after about a month the powder disappeared and the ink on the design didn't smear. So I guess this is normal.
Step 6: Cut Out The Flexi-Foam Plate Shapes
The next order of business is to make cut-outs of the plate shapes in Flexi-Foam, which will be sandwiched between the mylar film plate shapes and the actual metal plates of the toy belt. Flexi-Foam, made by Fibre-Craft, is very flexible sponge like stuff that's easy to work with and absolutely essential to this belt making process.
When I first decided to use the toy ECW belts to make my own title belts, I thought that gluing mylar film to it would be a walk in the park. Unfortunately, this wasn't the case, as two major hurdles arose. The first problem was that the rivets on the metal plates made it virtually impossible to glue the mylar film on flat. I tried to get around it by using a hand punch to make holes in the mylar film for the rivets to poke through, but the precision needed to get the holes exactly where they should be made it impossible. The other problem was, since the metal plate and mylar film surfaces where non-porous, air couldn't get through and the glue wouldn't dry. So I thought about using a material that I could insert between the two surfaces that was thick enough to allow the mylar film to hover above the rivets and porous enough for glue to work. I walked around Michaels Arts & Crafts, and when I saw the Flexi-Foam I knew I found what I was looking for. Flexi-Foam is about 1/16" thick, which provides just the right amount of clearance, and porous enough to to adhere properly to both the mylar film and the metal plate.
So now we make Flexi-Foam plate shaped cut-outs. The easiest way I've found to do this is to make a print out of the template, glue this print onto the Flexi-Foam with 2-in-1 glue, cut out the plate shapes and peel off the paper from the Flexi-Foam (2-in-1 glue is something of a temporary adhesive, sorta like the glue used in Post-It Notes). You'll notice that the Flexi-Foam is very easy to cut with scissors. Even then, the shapes don't have to be perfect; even if they're ever so slightly larger than your design, they'll be fine.
Once you have the Flexi-Foam plate shapes, you need to punch holes into them for the rivets to poke through. The way I normally do this is to lay the Flexi-Foam plate shape over it's target metal plate, mark out where the rivets are, then use a hand punch to make the holes in the Flexi-Foam plate shape. Since the rivet patterns aren't exactly the same on each of the plates, I usually write identifying marks on the Flexi-Foam plate shapes to indicate where they go (ie. "Left 1," "Left 2," "Main Top," etc.).
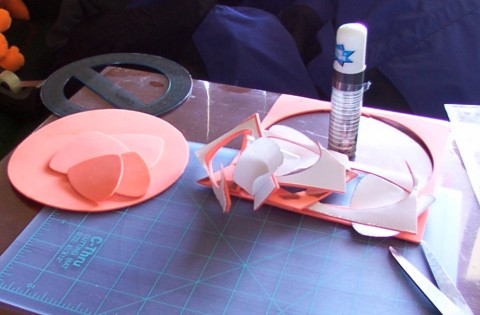
Now, depending on the color of the Flexi-Foam you have, there may be one more extra chore before we're done with this step. Since parts of it will be visible, the Flexi-Foam should be black to match the color of the belts "leather." As you may have noticed in the picture above, I didn't get black Flexi-Foam (they were out of stock and orange was the only one available). To get around this, I use a black enamel marker to paint the sides and edges of the Flexi-Foam. The Flexi-Foam takes the paint well, but waiting for it to dry does add some additional time to the project (about half an hour).
Step 7: Glue The Flexi-Foam Plate Shapes To The Belt

Note: This is the point of no return for the toy belt. Once you start this step, the metal plates of your toy belt will defaced forever. Proceed only if you're absolutely sure that you want to complete your title belt project and you're willing to sacrifice the toy belt.
After cutting out the Flexi-Foam plate shapes, it's now time to glue them onto the metal plates of the toy belt. That's where the Contact Cement comes in. If you haven't worked with Contact Cement before, I suggest you read the instructions on the packaging before using it. This stuff is strong and bonds very quickly. What I do is run the roller over the Flexi-Foam plate shapes after adhering them to the metal plates to squeeze them in thoroughly. The Flexi-Foam may feel a little lumpy afterwards, but that's normal and usual flattens out once the cement dries completely.
Before gluing on the Flexi-Foam plate shapes, I suggest using the black enamel marker to blacken out the rims and edges of the metal plates. The reason for this is there's a good chance that some of the "gold" not completely covered by the Flexi-Foam plate shapes will still be visible. Painting the rims and edges black allows them to blend in with the color of the belt strap. Of course, painting the metal plates black means you should wait for them to dry before gluing on the Flexi-Foam plate shapes, so this chore is optional and entirely up to you.
Step 8: Cut Out The Mylar Film Plate Shapes
While waiting for the toy belt to dry, get the laminated mylar film and cut out the plate shapes using a pair of scissors.
Not much to say about this step, other than it's probably the most boring part of the project. The important thing here is to cut the design out very carefully; steady hands are crucial. It also takes more time than you'd expect. On the average, it takes somewhere between 30 to 45 minutes to cut out the plate shapes. I usually cut out the patterns mid-afternoon, sitting by the window so I have a lot of light to see what I'm doing.
Step 9: Glue The Mylar Film Plate Shapes To The Flexi-Foam Plate Shapes

Now it's time bring everything home; we glue the mylar film plate shapes onto the Flexi-Foam plate shapes. What I do is squirt a liberal amount of glue onto the surface of a Flexi-Foam plate shape, spread it evenly using a sponge brush, position the mylar film plate shape on top of the glue and squeeze it in using the roller. Then I repeat this process to finish the other plates.
You can use just about any glue you like here, but I like using Tacky Glue. This glue can be spread on very flat, and it dries clean and clear. Although it dries well enough to adhere the mylar film plate shapes to the Flexi-Foam plate shapes permanently, it doesn't dry too stiffly that you couldn't remove the mylar film if you wanted to. A good forceful tug should remove the mylar film from its Flexi-Foam partner. This works for me because I always wanted these belts to be recyclable; as new games and interests emerge, I could "retire" the plate designs on an old belt and rebuild it into a new title belt with different plate designs. Another advantage to the semi-permanent adhesive is it makes it easier to repair any damages that occur to the mylar film plate shapes. So Tacky Glue works for me!
And if all goes well, you should have a pretty good looking title belt!

Note: The specific design documented in this page is that of the Ready 2 Rumble World Champ v.2 title belt. But looking at the plate designs on this page, you may have noticed that the side plate designs differ from those that appear in the Title Belt Gallery. That's because a few days after completing this belt, I decided to redo just the side plates with the cooler looking images of George Foreman and Muhammad Ali. What was great about this exercise is that it confirmed that using Tacky Glue made it easy to replace or repair the plate designs without having to go through the entire belt making process again.