THANK YOU FOR YOUR INTEREST IN MYCONTACTS.
Please Purchase At:

THANK YOU
This Version will work with Mips (Casio) and Strong Arm (Ipaq) Pocket PC 2000 and Pocket PC 2002
MY
CONTACTS
VERSION 1.6 Trial
DOCUMENTATION
Written By Douglas J Gray
Copyright (C) January 2002
THANK YOU FOR YOUR INTEREST IN MYCONTACTS.
Please Purchase At:
THANK YOU
This Version will work with Mips (Casio) and Strong Arm (Ipaq) Pocket PC 2000 and Pocket PC 2002
Program Revision History:
- Version 1.2 Changes:
1) Took out Pimstore.dll, this dll should already be on Casio Pocket PC devices.
2) If you selected MULTI from the category list you would get the spinning wait curser I fixed that.
- Version 1.3 Changes:
1) Fixed problems with Select List Phone Number wont be reset when you hit set and
Cell Number Updates to Home in view properly
2) Added word wrap to Notes Text Box in View at bottom
3) Added Strong Arm Version (IPaq & Pocket PC 2002)
- Version 1.4 Changes:
1) Added ability to view/edit/create new appointment for contact.
2) Tap and hold on a web address in either view will pull up Pocket Internet Explorer.
and if connected to the internet will pull up the web page.
3) Tap and hold on an email address will pull up pocket mail with a send window.
4) Add Europeon date option in setup (DD.MM.YYYY)
5) Added days till for Anniversary and Birthday.
- Version 1.5 Changes:
1) Fixed Problem on Edit/Add Screen on Misc Tab if you press None on Birthday/Anniversary
it wont remove changes on other field.
2) Added Confirm Cancel On Edit/Add Screen and Notes Screen
3) Other Cosmetic Changes.
- Version 1.6 Changes
1) Added Name format change to views in Setup You can Select First Middle Last or Last Middle First
2) Select Background/Text color for View/List
3) Add Ability to view/edit/add Task for Contact
4) Add Ability to save notes as pocket word/Notes file
5) Added name format for view
6) Added Prefix/Suffix Fields
My web site:
http://www.oocities.org/dougjgray/
My Email Address
dougjgray@yahoo.com
Check this site for Docs Updates or Trial Updates.
Paid User will recieve Free Updates through email
If you have any questions or concerns please email me at the above address
Thank You.This Software is provided "AS IS" with no warranty or guarantee (Hence the Trial Period).
Please make sure functionality and usefulness meets your needs before purchasing.
However I will suport the program through email. Errors, Answer questions etcINSTALLATION INSTRUCTIONS
Unzip the downloaded file with your favorite Unzip program. In the zip Archive are: The Docs HTML Files and CAB Files and MyContSetup.exe. After Unzipping goto the unzip folder and click on 'MyContSetup.exe' then it should install (Winzip Should be in Wizard Mode for easiest operation) and a link will be created under Programs in the start menu on the pocket pc . You can move the program to any folder you like after install (Storage Card etc), but you will have to create a new Link.Installation Note: If you have trouble installing MyContacts make sure all files got extracted from the Zip file Especially the 2 CAB files, MyContacts.INF, MyContSetup.exe, and Setup.ini. If it still wont install you can copy the Cab file from the unzip folder on your PC to your Pocket PC My Documents Folder with ActiveSync Explore Option. Then on your Pocket PC Open Pocket File Explorer and find the cab file and tap it, MyContacts will install and the cab file should automatically delete it self. The Appropriate cab for your machine is if you have an Ipaq or Pocket Pc 2002 machine with an Arm/XScale Processor you should copy the Cab 'MyContacts.sa.CAB', if you have a Casio Machine With Pocket PC 2000 with the Mips Processor you should copy the 'MyContacts.mips.CAB'. (Sorry for the inconvience).
- Multiple ways to navigate list:
* Select Letter (Tabs)
* Scroll Bar to scoll through list
* Find Text in list
* Category Filter
* Multiple Categories Filter- Two Views:
* Select View: Use Bottons to select fields to view. Favorite fields can be set with SET
Function so they will show up by default when selected in list.
* Page View: Fields are organized by tabs: Company/Name, Telephone, Mobile, Address,
Web and Misc.- Selectable Telephone Numbers in List (Home, Business and Cell)
- Three Sorts (Default – File As, Company, Name)
- Search Function: You can search all Contact fileds or just selected groups.
- Edit/View/Add Appointment and Task Data for Contact
- Tap and Hold on Web Address to pull up Page in Pocket Internet Explorer.
- Tap and Hold on Email Address to pull up Pocket Mail Send window.
- Select Background/Text color for view or list
- Save/Load Notes to and from Pocket Word or Pocket Note File
SELECTVIEW ----------------------------------------PAGEVIEW

Program Operation
List NavigationTab Strip - Tap Letter to scroll list to that letter, Press arrow buttons to
switch between A-M and N-Z.
Scroll Bar - Scroll Up/Down to move through list.
Find - Enter text here to scroll list to entered text..
Filter - Box at right of display, Press arrow to pull up list to select category
to view
MULTIPLE CATEGORIES DIALOG

Mul Cat Button - Tap to pullup Multiple Categories dialog. Select multiple categories to
view, you can also do reverse selection to see all but selected categories
Tap List Entry to View Fields in view
Set List Telephone Menu
Tap and Hold: on Selected Contact Pulls up a menu To Select List Telephone Number and Appointment for an individual contact. Select Normal for Normal operation or Home, Business, Cell. If Home .Business or Cell Selected then that will be the list Telephone No unless Blank.To reset you can select Normal. This is also reset when you select UnSet from the Menu.
Note if whatever Telephone field you select here is blank then it will skip it. Also in this menu you can Select Appointment which will allow you to View/Edit/Add an appointment for the selected contact.
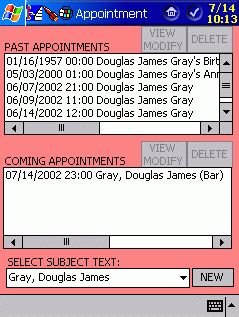
The Appointment Dialog will show two list; one for Past Apointments and one for Coming appointments. by selecting an appointment you can tap the VIEW/MODIFY button to edit/View the appointment or press DELETE to remove the appointment. To add a new Appointment Select desired Subject text from the drop down list then press NEW to add an appointment. To be assured that the appointment will show in the Past or Coming List your New Appointment Subject must contain one of the Options in the drop down list, however you can add to the text to the End as you like in the Subject Line on the Appointment Edit Screen (The Left side of the subject must contain the selected Subject text to be found in the past/coming list) The list Options are the same as the options for the File As Field. The Appointment Edit/View Screen that is pulled up by NEW or MODIFY is the same as with the built in Appointment Program.
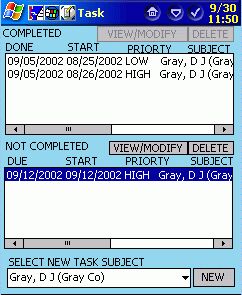
The task Dialog will show two list; one for Completed Task and one for Not Completed Task. by selecting a Task you can tap the VIEW/MODIFY button to edit/View the Task or press DELETE to remove the Task. . To add a new Task, Select desired Subject text from the drop down list then press NEW to add a task.. To be assured that the Task will show in the Completed or Not Completed List your New Task Subject must contain one of the Options in the drop down list, however you can add to the text to the End as you like in the Subject Line on the Task Edit Screen (The Left side of the subject must contain the selected Subject text to be found in the Completed/Not Completd list) The list Options are the same as the options for the File As Field. The Task Edit/View Screen that is pulled up by NEW or MODIFY is the same as with the built in Task Program. In the list is displayed DUE DATE, START DATE, PRIORTY, SUBJECT.
List Navigation Notes:
Telephone Number shown in list will be searched for non-empty number as follows:
If Default Sort (By "File As" Field) and Name Shown, Home Tel. will be
checked first then Business then Cell or if Company Shown then Business Tel.
will be checked first then Home then Cell. The program checks to see if
the first part of File As field contains the company name or name.
If Name Sort Home Tel will be checked first then Business then Cell.
If Company sort Business Tel will be checked first then Home then Cell.
'~' At the end of Name or Company Name means text was to long to fit (view
in page view below)
':' between Phone No and Type means long Phone Number.File As Field is shown if you use Default Sort.
Name Field is shown if you use the Name Sort.
(Contacts with blank Name fields will not be shown)Menu / Toolbar
Setup Allows you to set up defaults for program start up:
Initial Sort : Select button next to Company, Name or Default.
Name: Set name display; First Middle Last or Last, First Middle.
List Telephone : Select Default, Home, Bus, Cell. If other then default. the
program will display in list whatever you selected here unless that field is blank.. Defailt shows Number based on Sort.
Set Filter : You can select a default filter from list or Multi Cat. the list will be Filtered Appropraitly at Start Up.
Comp/Name : Select initial field for Select View Line 1 field. Default will select either Company or Name dependent on whats in the list
Phone: Select initial field for Select View Line 2 field.
Mobile: Select initial field for Select View Line 3 field.
Addr: Select initial field for Select View Line 4 field. Default will select the address based on the List Phone Number
Web: Select initial field for Select View Line 5 field
Misc: Select initial field for Select View Line 6 field
Note: if these fields are blank then it skips to non-blank field when viewing contact. Except default field may not be skipped.
View: Select View either Tabbed Page View or Button Select View
Default Page : Select Default Tab when using page view
Font: Select Normal or Bold Font.
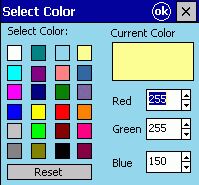
Color : Select Background/Text color for list or view. Tab the Appropriate box to select color for B - Background, T- Text The Select Color
Dialog will come up where you can Select your desired color or you can use the Red Green Blue Boxs to adjust the current color. Reset will set the color back to original
Date: You Select desired Date format for Birhtday and Anniversary either mm/dd/yyyy or dd.mm.yyyy (for europeon users)
Add: Add New Contact. This button pulls up Dialog box seperated with Tabs, Enter data for each Tab.
Edit: Edit Selected Contact. This button pulls up Dialog box seperated with Tabs,
Enter data for each Tab.
Delete: Delete Selected Contact (You will be prompted to confirm).
SelectView: Display Button Select View. Will Display in Button Select Format with
column of buttons. Tap button to choose field to view
PageView: Display Page View. Will display in Tabbed List format. Select Tab to view
A list of fields
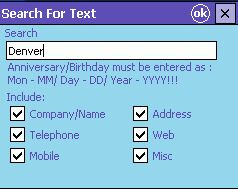
Search: Enter text to search in selected fields, only records containing text in selected
Fields will be displayed. You can check or uncheck groups of fields to search.
There are 6 groups: Company/Name, Telephone, Mobile, Address, Web
and Misc. May save time. I recommend if searching for a month or day
using this format 'MM/' or 'DD/' and MM/DD/YYYY for date. will work in
conjunction with Filter.
Search Reset: Reset List to show all contacts.
NOTE: The Search Function will not search catagories and it may not find text in Notes that have graphics in them.
Set: Active on Button Select View, Will set the default fields and list Tel # for selected contact so
when you select it again the same initial fields will be displayed.
Un Set: Active on Button Select View. Will Clear Set fields so default initial fields will be
displayed.ADD Button: Add New Contact. This button pulls up Dialog box seperated with Tabs,
Enter data for each Tab.
EDIT Button: Edit Selected Contact. This button pulls up Dialog box seperated with Tabs,
Enter data for each Tab.
SET Button: Active on Button Select View, Will set the default fields for selected contact so when
you select it again the same initial fields will be displayed.
Note: This function uses the Contact Suffix field, dont use this feature if you use the
Name Suffix field.
PAGE VIEW Button: Display Page View. Will display in Tabbed List format. Select Tab to
view a list of fields
SEL VIEW Button: Display Button Select View. Will Display in Button Select Format with
column of buttons. Tap button to choose field to view
Select View:
This view shows fields in a button selected enviroment as follows:
Note: if field is blank it will not be displayed unless it is set to be default.
In parenthesis are the button labels.Line 1 Button (Top) - Company / Name Fields.
Company (Comp) -> Name (Name) -> Assistant (Asst) ->Department (Dept) -> Job Title (Title) -> Office Loc (Loc)
if Default is selected in Setup for this line. it will determine if company is the list and display the name here otherwise if Name in list it will display company here
If Assistant is selected and there is an Assistant Telephone No. it will be desplayed
in Line 2 (Telephone Fields).
Line 2 Button - Telephone Fields.
Business No (Bus#) -> Business Fax No (BFax#) -> Home Fax No (HFax#) ->
Home No 2 (Hom2#) -> Business No 2 (Bus2#) -> Assistant No (Asst#).
if Business No is displayed in list then Home No. (Home#) will be displayed instead
of Business No (Bus#)
Line 3 Button - Wireless Telephone Fields
Cell Phone (Cell) -> Pager No (Pager) -> Cell Phone 2 (Cell2) ->
Satellite Phone (Sat#)
if Cell Phone is displayed in list then Home No (Home#) will be displayed instead
of Cell Phone.
Line 4 Button - Address Fields.
Business Address (Bus Add) -> Home Address (Home Add) ->
Other Address (Other Add). If Default is selected in setup for this Line then default address is based on the list telephone number
Line 5 Button - Web Fields.
Email Address 1 (Email1) -> Email Address 2 (Email2) ->
Email Address 3 (Email3) ->Web Page (Web)
Line 6 Button - Misc Fields.
Categories (Cat) -> Anniversary (Anniv) -> Birthday (Birth) -> Spouse (Spouse) ->
Children (Child)
Notes Button: Click to Edit/Add Notes and drawings and recordings.
Only text part of notes is shown in Select view. click button to view/edit.Page View
This View shows fields in a list organized by Tabs. Tap the appropriate tab to view list of
fields.Com/Name Tab : Company/Name Filelds .
Tel Tab: Telephone Fields.
Mobile Tab: Cell Phone / Wireless Fields
Add Tab : Address Fields.
Web Tab: Email / Web Page Fields.
Misc Tab: Categories, Anniversary, Birthday, Spouse, Children, Notes
Notes Button: Click to Edit/Add Notes and drawings and recordings.
Only text part of notes is shown in Page view. click button to view/edit.
EDIT AND ADD SCREEN
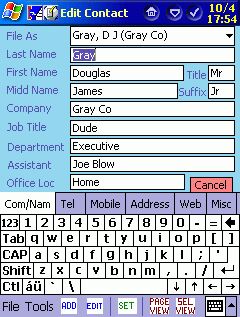

Edit/Add Screen
There is a Red Cancel Button on every page, press to abort Edit or Add (Will Ask To Confirm).
Pressing OK will Save the added Record or Edited Record.
There are six tabs grouping fields:
Com/Nam Tab: Edit/Add Company and Name Fields
File As will be filed in with Name (Last, First Middle) or
Company if FileAs is blank. If you Tap the down arrow
on the FileAs Field you will get a list of suggestions for this
field as in Outlook on a PC. or you can input what you like.
Tel Tab: Edit/Add Telephone Fields.
Mobile Tab: Cell/Pager Fields.
Address Tab: Address Fields - Business, Home, Other.
Web Tab: Email1-Email3 and Web Page.
Misc Tab: Categories, Anniversary, Birthday, Spouse, Children, Notes.
* You Can Enter a category manually, or tap the down arrow
to bring up a list of existing. You can enter multiple categories
by seperating with a comma or for multiple existing categories
tap the Multiple Categories Button and select from the list.
* if you Tap in the Anniversary or birthday and it says none todays
date will appear, change as desired or tap the down arrow to
bring up calender. To remove date press the 'None' Button.
* Notes shown in darkened box is only for viewing purposes.
To edit Press the Edit Notes Button.NOTES DIALOG
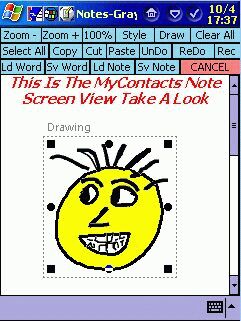
Notes Dialog:
Zoom - Button: Zoom Window Down, Interval is 25% Minimum is 75%
Zoom + Button: Zoom Window Up, Interval is 25% Maximum is 300%
100% Button: Reset Window to 100 % Zoom.
Style Button: Toggle Style of page: Plain->Lines->Grid->Dotted Lines.
Type/Draw Button: Toggle Mode 'Type' for text or 'Draw' to Draw or Write.
Clear All Button: Clear All Notes (Drawings and Text)
SelectAll Button: Selects all of notes for Copy/Cut/Paste.
Copy Button: Copy Selected to clipboard.
Cut Button: Cut Selected int clipboard removing from window
Paste Button: Paste Clipboard into window.
Undo Button: Undo Previous Operation.
Redo Button: Redo Previous Operation.
Rec Button: Pull Up Record Tool Bar for voice recording. Press red button
to record. then square to stop recording. after recording a
speaker icon will appear in notes press that icon to hear.
Note: It Appears that if you have a recording in the notes the contact errors out
when syncing to Outlook 2000 on your PC, I havent found a sound format that will sync with outlook.
Ld Word: Will Load a Word Document into Notes. This might be useful to load drawings and formated/Color Text.
Sv Word: Will Save Notes as a Word Document, This might be useful to add Formating to Note text plus add color drawing.
Ld Note: Will load note file into notes. This might be useful for using a Template.
Sv Note: Will save notes as Pocket note file.
Note: When loading Note/Word File it will overwrite anything in the notes. you can use cut/copy/paste to/from Pocket Word or Notes to add to the notes.
Cancel Button: Abort. Any action will not be saved (Will Ask To Confirm).