
MYDESKTOP
VERSION
1.0 Trial
DOCUMENTATION
Written By Douglas J Gray
Copyright
(C) September 2002
This program is shareware. You have 15 days to try this program then you must purchase the registered version.
the trial version will only operate for 15 days. To Purchase this software please remit $5.00 US
THANK YOU FOR YOUR INTEREST IN MYDESKTOP
Please Purchase At:
THANK YOU
This Version will work with Mips (Casio) and Strong Arm (Ipaq) Pocket PC 2000 and Pocket PC 2002 and Pocket PC 2003
My web site:
http://www.oocities.org/dougjgray/
My Email Address
dougjgray@yahoo.com
Check this site for Docs Updates or Trial Updates.
Paid User will recieve Free Updates through email
If you have any questions or concerns please email me at the above address
Thank You.
This Software is provided "AS IS" with no warranty or guarantee (Hence the Trial Period).
Please make sure functionality and usefulness meets your needs before purchasing.
However I will suport the program through email. Errors, Answer questions etc
INSTALLATION INSTRUCTIONS
For Pocket PC 2003 in the Unzip folder navigate to the MyDesktop2003 folder and use MyDesktop2003Setup.
Unzip the downloaded file with your favorite Unzip program. In the zip Archive are: The Docs HTML Files and CAB Files and MyDeskSetup.exe. After Unzipping goto the unzip folder and click on 'MyDeskSetup.exe' then it should install (Winzip Should be in Wizard Mode for easiest operation) and a link will be created under Programs in the start menu on the pocket pc . You should select the default install location. If you would like to move the jpg tile images you can do that
Installation Note: If you have trouble installing MyDeskTop make sure all files got extracted from the Zip file Especially the 2 CAB files, MyDeskTop.INF, MyDeskSetup.exe, and Setup.ini. If it still wont install you can copy the Cab file from the unzip folder on your PC to your Pocket PC My Documents Folder with ActiveSync Explore Option. Then on your Pocket PC Open Pocket File Explorer and find the cab file and tap it, MyDeskTop will install and the cab file should automatically delete it self. The Appropriate cab for your machine is if you have an Ipaq or Pocket Pc 2002 machine with an Arm/XScale Processor you should copy the Cab 'MyDeskTop.sa.CAB', if you have a Casio Machine With Pocket PC 2000 with the Mips Processor you should copy the 'MyDeskTop.mips.CAB'. With Pocket PC 2003 Machines with Arm/XScale processor use 'MyDeskTop2003.sa.CAB' in the MyClock2003 folder.(Sorry for the inconvience).
UN-INSTALL INSTRUCTIONS
Before UN-Installing You should run MyDesktop and goto setup then un-select 'Run at start up' press OK, then you can un-install. if you dont do this and you get a message when your Pocket PC Resets then you will have to with File explore go to /Windows/Startup snd delete the link 'MyDesktop.lnk'.
You should be able to remove by going to Settings in start menu then hit System then Remove
programs. if not then:
Simply open file explorer and go to the Program Files folder and delete the 'MyDeskTop' Folder under /Program Files . also see above Before Un-Install note
Then Go to the windows folder and then Tap Start Menu then Tap Programs then Highlight
'MyDesktop.lnk' then delete.
MAIN PROGRAM FEATURES:
Virtual DeskTop Holds up to 180 Icons. Select DeskTop size from 240 x 268 (15 Icons) up to 960 x 804 (180 Icons).
Can launch Programs, Built in appl Docs, URLs from favorites, Web Addresses, also lnk files. Plus you can add File Associations or replace Associations.
Versaitile Background image options can be stretch, tiled, centered, Fit Width and Fit Height on either screen or desktop.
BackGround can be any gif/bmp/jpg/2bp file.
Can be run from startup
Use Navigation Button to navigate Desktop.
Edit Options for Desktop Includes Add/Edit/Delete. Icons can be cut/copied and pasted to a new location.
Single tap to execute icon
You can make a different desktop for your individual storage cards and when you change storage cards you can Open the desktop saved on that Storage Card.
Program Notes:
If change the Size of the desktop Icons out of that size will still be there so if you would like to hide icons that is possible.
When you fisrst start MyDesktop the first time you goto a screen the icons may render kinda slow, but after that they are rendered proeprly.
Large Images may take a lot of memory, so you might want to take that into consideration especially if you have a lot of programs running and are using larger images for background.
You do not need to add associations for url (favorite Links) or internet sites that begin with http or www they are handled by the program. if a site begins with other then www you will have to put in the http:// prefix
You can also put .lnk files (links) so if you dont want to search for the program and you have links under the start menu then you can use that. However the links used by builtin apps probably wont work and you may find others then you will have to browse for the Program File.
The MyDesktop Folder in the Program Files has some Little jpg Background tiles.
MAIN DESKTOP SCREEN
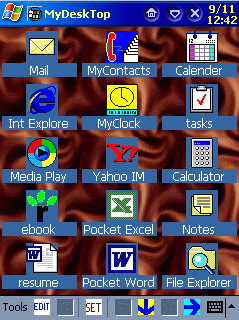
Tap icon to execute program
Use arrow icons to navigate through desktop displaying other icons on virtual desktop. You can also use the navigation button to move as well. Arrows will dissapear to indicate location on the desktop.
The SET (Setup) Icon will allow you to set program options (Start Up, Desktop Size, Background & Background options). (See SETUP DIALOG Below)
EDIT Icon allows you to edit/delete/add icons (See DESKTOP EDIT SCREEN Below).
The tool menu shows Program Functions: (Exit/Edit/Save/Save Desktop/Open DeskTop/Set Default/Set File Assoc/Setup/About)
Exit - Exit Program
Edit - Same As Edit Icon. (See DESKTOP EDIT SCREEN Below) Allows you Add/Edit/Cut/Copy/Paste Icons.
Save - Same As Save Icon. Will Save Edited Desktop after edit operation (See DESKTOP EDIT Below)
Save Desktop - Allows you to save desptop with different location or name. This is useful if you would like to create a different desktop for different Storage Cards.
Open DeskTop - Open a Saved Desktop from a specific Location (storage card etc)
Set Default - Set Opened Desktop as the Default when you start the program (if the Default Desktop is on a storage card you must Re-Start MyDesktop or do open Desktop to load the default desktop after you insert a different card)
Set File Assoc. - Will Allow you to change/replace/add file association for Icons on the desktop. Note programs added must support command line arguments for this to work properly. (See SET PROGRAM ASSOCIATION Below)
Setup - Same as SET icon. will allow you to set program options (Start Up, Desktop Size, Background & Background options). (See SETUP DIALOG Below)
About - Shows the Default desktop and Current Loaded Desktop.
SETUP DIALOG
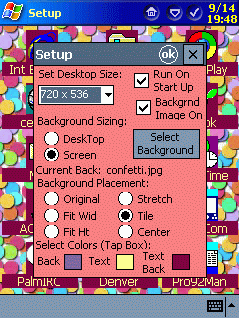

Set Desktop Size will let you select from Option
Desktop Sizes. Options Are:
960 x 804 (12 x 15 icons 4 x 3
Screens)
960 x 536 (12 x 10 icons 4 x 2 Screens)
960 x 238 (12
x 5 icons 4 x 1 Screens)
720 x 804 (9 x 15 icons 3 x 3
Screens)
720 x 536 (9 x 10 icons 3 x 2 Screens)
720 x 238 (9 x
5 icons 3 x 1 Screens)
480 x 804 (6 x 15 icons 2 x 3 Screens)
480
x 536 (6 x 10 icons 2 x 2 Screens)
480 x 238 (6 x 5 icons 2 x 1
Screens)
240 x 804 (3 x 15 icons 1 x 3 Screens)
240 x 536 (3 x
10 icons 1 x 2 Screens)
240 x 238 (3 x 5 icons 1 x 1 Screens)
I
have found that 720 x536 (90 Icons) works best for 800 x 600, 640 x
480 images stretch wise.
Check Run At Startup to have MyDeskTop Start when the you reset the Pocket PC.
Check Backgrnd On to have Backgrnd Displayed or uncheck for the No background.
Background Sizing will let you select how the
background Placement is oriented, if you select Desktop then
Placement applies to Desktop or if you select Screen Placement
Aplies to the screen.
Note: if Screen is selected the image
origin is always the Pocket PC screen you display and if you select
desktop the origin is the origin (0,0) of the Desktop and will be
scrolled when you scroll to different parts of the Icon DeskTop.
Background Placement allows you to set how the
image is displayed and apply to Background sizing. the six options
are:
1) Original - displayed as the saved image size
2) Fit
Width (Fit Wid) - Fit to Screen/Desktop Width.
3) Fit Height (Fit
Ht) - Fit to Screen/Desktop Height.
4) Stretch - Fill
Screen/Desktop with image.
5) Tile - Tile image over
Screen/Desktop with image
6) Center - Center Image on
Screen/Desktop.
Note Screen/Desktop Refers to the Background
sizing option
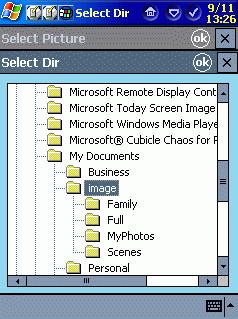
Select Background will pull up Select Image Dialog with a file list and Current Dir and Thumbnail view. You can select a different image to use for background here. To change Directory, Press the Change Dir to view/Select a different Directory to select the background image from. Press OK on either Dialog to return.
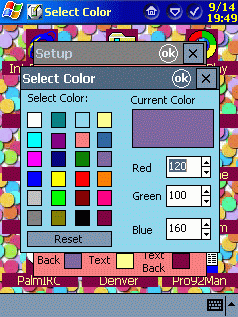
To Change Background color of screen or Icon Text Background or Icon Text Color Tap the appropriate colored box. The Select Color Dialog will allow you to select from 24 colors and you can adjust the color to your taste with the red/green/blue controls (to scroll the values 0-255 I recomend tapping the edit box then use the navigation button versus tapping up and down for faster operation).
DESKTOP EDIT SCREEN


![]()

Press EDIT to go to the Desktop Edit Screen Blank Icons are replaced with smiley faces with "Empty" in the icon Text.
Tap an Icon to bring up the edit menu.
if you tap on a smiley face you have the following options:
Paste - Paste a the previously copied/cut icon to this location.
Select/Edit Icon - will pull up the Select/Edit
Icon Dialog where you can edit the text label and File for the
Icon.
I reccomend useing the Select file Button to Select the
file from Select File Dialog.
if you tap on an existing icon you have the following option
Cut - will delete the icon and and save the icon to paste somewhere esle
Copy - will save the icon to paste somewhere else and leaves it in this location.
Paste - will allow you to replace this Icon with the one saved with Copy/Cut.
Select/Edit Icon - will pull up the Select/Edit
Icon Dialog where you can edit the text label and File for the
Icon.
I reccomend useing the Select file Button to Select the
file from Select File Dialog. You can Select Program files or
Document files that are in the Program Association list, Plus link
files (.lnk) and Favorite Links files (url) and Html or Htm. You
can manually type in www and http:// web pages (they must start
with either www or http to be recognized.
Delete Icon - Will permanently delete the icon from this location (It will prompt for confirmation).
Press Arrows or Navigate Button to move to different screens of the desktop
Press Save to save the changes
SET PROGRAM ASSOCIATION DIALOG
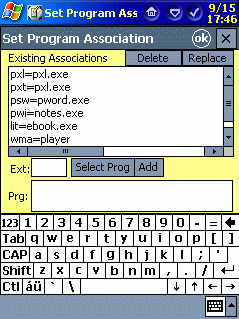
List Box will show existing Associations
To Add a new one, enter the extension in the Ext:' Box then Press Select Prog Button to Pullup Program List or enter Path into Prg Edit Box then Press Add.
To Replace an existing Association Select the Association to Replace from the list then edit/enter the extension in the Ext: Box then Press Select Prog Button to Pullup Program List or enter/edit Path into Prg Edit Box then Select the Association to replace from the list the Press Replace Button.
To Delete Select the Existing Association from the list to Delete then press Delete Button.
For internet explorer you dont need to associate to htm or html or url (favorites) or web sites starting with www or http. You would only need an association for jpg/bmp/gif/2bp if you use Internet Explorer to view image files.