|
Tutorials
-
ADJUSTING
CONTRAST: Don't use the Contrast control! The Histogram
tool is far better.
Image
/ adjust / levels menu.
The Histogram (Levels) shows the total tonal distribution
in the image. It's a barchart of the count of the pixels
of every tone of gray that occurs in the image.
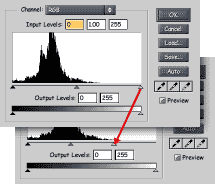
By dragging the right hand triangle (whitest point) back
to the end of the data indicated in the graph, and also
dragging the left hand triangle (blackest point) back to
the start of the data shown on the graph. This will give
a much more even contrast
  
Also, if the printing process is likely to darken the image,
then tweeking the middle triangle can lighten the middle
tones of the image to compensate.
-
FAKE
DUOTONE: For Greyscale images
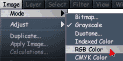
First convert image to Indexed Colour
(Image / Mode / Indexed colour)
Create a new layer
Change it's settings from Normal to Colour
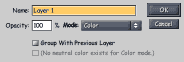
Dump the Colour for the duotone into this layer
Hey Presto! . a semi Duo tone! =)

The colour layer can also be used to create a colourised effect
similar to the old technique applied to B&W photographs,
simply by painting the various colours into the colour layer.
-
SELECTIONS:
Complex selections can be made by combining various selection
methods.
COLOUR: To select a section made of one colour: quickly use
the Lasso or Marque Tool to isolate the area.
Then Select / Colour Range menu.

Click in the image, on the colour to be selected
More than one colour can be selected by using the Shift key
while clicking. Adjusting fuzziness changes the sensitivity
to similar colours.
RUBBERBAND LASSOO: when holding the option key down (DURING
the first mousedown), the lassoo selection links in straight
line sections from clickpoint to clickpoint.
SUBTRACTED SELECTIONS: When pressing the option key BEFORE
the first mousedown, all new selections would be subtracted
from previous selections.
ALTERNATIVE SUBTRACTED LASSOO: (Easily allowing the use
of a negative rubberband lassoo) to subtract from an existing
selection.
Invert the selection (shift-option-I)
Then use the positive Rubberband Lassoo as normal (option
clicking) (the positive will become negative)
Then invert the selection again.
MAGIC WAND: Existing selections can be added to, by holding
the Shift key down while using the Magic Wand, or subtracted
from by using the option key.
Adjusting the tolerance controls the deviation from the selected
colour. (between 10 and 30 is often the most usfull)

Making a selection on one layer, and using that selection
on another layer is very common.
-
ADDING
TEXTURE: Open a seperate texture file
Select all (command-A) . . then
Edit / Define Pattern
then go to file you want to add the texture to
Select the area needing texture
Make new layer...
Change layer from Normal to Multiply
Edit / Fill ... change contents to pattern, OK
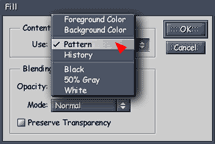
Adjust the Opacity of the Multiplied Texture layer to suit
your needs.
-
COLOUR
ADJUSTMENTS:
Take one green Jacket ... add a pinch of blue,
 
add
blue make
purple
or an orange jacket turned purple
To do this first select the jacket (use lassoo)
or select / colour range...
then choose a colour
then choose a brush
adjust brush settings from "Normal" to "Colour"
and apply with a big brush.
 
pre
tan post
tan
ToGive a nice Tan
Select skin area (lassoo or ColourRange again)
use burn tool with large brush
keep applying untill the tan suits your needs
-
 The
Burn and Dodge tool can be very usefull for creating shading
and highlights on objects.
The
Burn and Dodge tool can be very usefull for creating shading
and highlights on objects.
Mask/Select the object area first.
 (lassoo or magic wand tool)
(or Select / ColourRange)
-
COLOURED
CARTOONS: Create the original linework by hand on paper or
on computer,whatever suits.
If the original is on paper... then Scan in at high resolution
(between 300 and 600dpi) in B&W...
COMPUTER
STRUGGLING?:
If your machine is slow or short of memory,
it may be practical to scan the original line art at
a high res in B&W, save it, then change the resolution
to 200dpi or even 150, do all the coloured layers at
this res.
Then
when the job is finished, delete the working 'line'
layer, change the resolution back up to the (exact)
original high res.
Then import the originally saved hires line work back
into its own layer.
Flaten the image, and Save in the required format
|
7 cont...

Convert to Greyscale,
then again to RGB
Rename layer (call it something like "LINE")
(the renaming allows transparency)
Select / Colour Range
Click on white part of image
... click OK
Press the delete button
(this makes the white transparent)...
(When
doing this sort of thing in Freehand or Illustrator,
it would be important to Lock this "LINE"
layer, so that all interaction was with the coloured
layer. However, in Photoshop it is usefull to leave
the line layer unlocked, to allow easy selections.
However, you will need to be carefull that you don't
accidentally colour in the line layer.)
|
7
cont...
Create New Layer
Move Line Layer to the top so that it is always visable
Rename New Layer
(call it something like "COLOUR")
Select an area to colour in the line layer with magic wand
Make colour layer active
Fill with colour or Graduated tint.
(A Graduated tint makes a very usefull underpainting)
-
GAPS
BETWEEN LINE and FILL?: To repair the leaky holes between
the line art and the fills.
 |
-->
|
 |
|
from
this
|
-->
|
to
this
|
Make
Line layer active
Try making a selection around the line work where
the gaps are

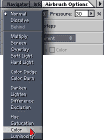
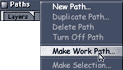
Go to Paths window
from the pulldown arrow go to "Make Work Path"

Go to Colour Layer
Adjust the brush size and colour to suit the repair work
needed
(select colour by holding down the option key and clicking
on colour)
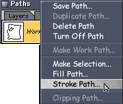
Then from same pulldown as above...
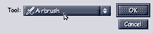
"Stroke path with AirBrush"
With any luck.... the gaps R now filled =)

|
Basic
Tips
-
NEW VIEW:
If you can't see what you are doing to the main image when
zoomed in, create a new view from the View menu. Now you can
keep a 'fit in window' view in the background while you work
on the details.
-
MOVE
SCREEN: Press the space bar, and the cursor becomes a hand
with which you can move the image, within the window.
-
STRAIGHT
LINES: Draw
in straight lines with any tool. Choose your tool, and click
on the image anywhere to define a starting point. Now hold
down the Shift key and click anywhere else - the tool will
draw a straight line between them. You can continue drawing
straight lines by keeping the Shift key down, and clicking
wherever you want.
MOVING: Move
things in straight lines by holding down the Shift key to
constrain movement - very handy for moving text and aligning
web buttons.
FINE ADJUSTMENTS: with the object cursor (top right) U can
carefully move things with the arrow keys.
-
DIMENSIONS
of NEW FILE: If you have an image in the Clipboard and you
choose to create a new image from Photoshop, it will pick
up the exact dimensions from the image in the Clipboard.
-
CROSSHAIR CURSOR: If you are doing detailed work, you can
force the cursor to appear as a crosshair by just putting
Caps Lock on. This comes in very useful for tricky fills,
selections and precise drawing.
-
DUPLICATE:
Duplicate parts of your image with ease. With an area selected
and using the Move tool, just hold down Option (Alt on the
PC) to drag a copy of the area rather than the original.
-
COLOUR MATCH: Want to match a colour used in another document?
The Eye Dropper tool works across all documents, so you
can pick up a colour from any open image, even when it isn't
active.
-
CLONE PATTERN: You can also use the clone tool to clone
parts of a different image. Just Option click it on the
image you want to clone while the image you are cloning
in is still active. If you want to save yourself loads of
time touching up areas of an image, select a good area,
define it as a pattern and create a new image. Fill the
new image with the pattern, and youÕll have a nice large
image to clone from without having to worry about cloning
the wrong bits.
-
HIDE PALETTES: If the floating palettes are getting in your
way, click on the Tab key to toggle them all on and off.
Photoshop will remember where they all were and everything!
-
SWATCH:
create your own set of colours by dropping each colour you
like into the swatch palette.
eg. a set of skin tones
Save a new palete for each collection of colours you want
to reuse.
-
TOOL
SELECTIONS: Switch between tools easily. With all the Drawing
tools, you can momentarily get the Move tool by holding
down Control, or the eyedropper by holding down Option (Alt
on the PC)
-
MORE TOOL SELECTIONS: Use the keys to pick different tools
too! A is airbrush, B is brush, Y is the pencil, E is the
eraser, C is the crop tool and so on. It sort of makes sense.
-
INFO RULERS: Using the Info window, you can turn the line
drawing tool into a useful measuring device. Create a new
layer, and use the tool to measure the distances and angles
between elements of your image.
-
INFO: Use the info window! Not only does it give you colour
values for the pixel underneath the cursor, it can tell
you how far you have moved an object, what angle you are
drawing your lines at, and plenty more. You can open up
the info palette by selecting Show Info from the Window
menu.
-
SELECTIONS:
When selecting OBJECTS, the "Shift Key"
works like a plus or minus key. Selecting or unselecting this
+ this + this.
When selecting AN AREA with any of the selection tools, the
"Shift Key" acts only as a plus...
adding new bits to the selection.
The "Option Key" is the minus
or... ... ... ...
by inverting the selection
(Shift-Command-I) (Shift-Control-I on a PC)
(the Apple key is the Command key on a mac)
then adding the unwanted selection bits with the shift key,
then (Shift-Command-I) (Shift-Control-I on a PC) again.
Sounds more complex but I find it much more flexable.
=)
-
HIDE SELECTION: If those pesky 'marching ants' are making
it difficult to see what's going on, hide them! You can
toggle them on or off with Command-H (Control-H on the PC).
Whether they are visible or not, the selection still works.
-
SAVE SELECTION: Save your selections! What's the point of
spending ages selecting something if you are going to have
to do it again later
-
UNZOOM: Don't waste time zooming out, just double-click
on the Magnifier tool at any time to return to a 100% view.
-
ZOOM TOOL: No matter what tool you are using, Command-Option-Space
(Control-Alt and Space on the PC) will select the Zoom out
tool.
-
SWAP
COLOUR: Swap the foreground and background colours easily
by pressing the X key.
-
SCRATCH DRIVE: If you can, select a different physical drive
for your scratch disk from the one containing your virtual
memory swapfile - this will decrease the amount of time
it takes to access both of them.
-
IMAGE SIZE: The easiest way to check the active image's
size and colour mode is to click the Image File Size gauge
at the lower left corner
|