 Put
Your Web Site Online
1. Get a Yahoo Account Needed
for setting up a Geocities website.
- Get a Yahoo Account by going to http://login.yahoo.com/ and
click on Sign me up!
- Type in a Yahoo ID. This will also be in your internet address.
I typed in burpquest. I answered all the questions on the page and
clicked on Submit This Form. If your Yahoo ID
is already taken, hit the Back button on your browser and try another ID possibility.
Type in your passwords again.
- When you have your registration completed, click on Continue
to Yahoo.
2. Prepare Your Geocities Site Your
website address will be http://www.oocities.org/burpquest or your Yahoo ID
- Go to http://geocities.yahoo.com/home
- Click on the link www.oocities.org/burpquest (just
above the Start Building Now link).
- Choose a Topic (I chose Schools & Education) and enter
the confirmation code. Click on Submit This Form.
- Click on I Accept at
the bottom of the form.
3. Define the Site in Dreamweaver and Upload
Your Files
A. Define Local Info See figure 1. Locate
your main web pages folder. Make sure this folder has the first page of your
site - index.html.

figure 1
- Select Site > Define Sites.
- Click on New.
- Type BurpQuest in the Site Name window.
- Click on the folder icon to the far right of the Local
Root Folder window.
- Navigate to your IT Classes Folder and only click once on
the burpquest folder. Select the Choose button.
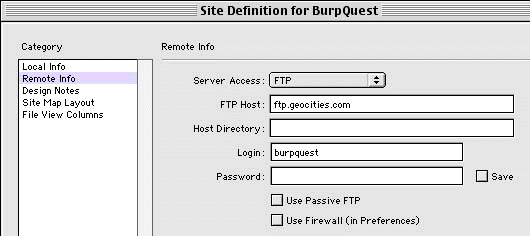
B. Define Remote Info See
figure 2. Locate
your internet site using ftp - file transfer protocol. This is so you can transfer
files there.

figure 2
- Click on the Remote Info option on the left. Choose
FTP in the Server Access Options.
- In the FTP Host window type ftp.oocities.com.
- In the Login window type burpquest.
C. Define
Site Map Layout See
figure 3. This will identify
the index.html file that is the first page of your site. If the index.html file
is in the Local Info folder as you just defined in Local Info, this should already
be done for you.

figure 3
- Click on the Site Map Layout option on the left. Click on
the folder icon to the far right of the Home Page window. Locate your
index.html file and double click on it. Click OK and click Done
in the next two dialog boxes.
D. Uploading Files to the Internet
- The BurpQuest Site palette appears on the screen. The left
side of the palette has the files located at our Remote Site (Geocites). The
right side has all the files we have in our Local Site folder (IT Classes...).
- Press the button in the middle of the keyboard that connects
to the remote site.
 If
you hold your mouse over the button, it should say "Connects to Remote
Host." After you press this button, type in your yahoo password.
Click OK.
- If Geocities is not too busy, you will connect and you will
see your folder (burpquest) and an index.htm file on the Remote Site. Click
on the index.htm file and green down arrow on the tool bar (Get
Files). This will download the index.htm file to your folder. This will not
replace your index.html file because they have slightly different names. You
may want to save this file in case you want to take your index page offline
for some reason. Just replace your index.html file with this index.htm file.
- Click again on the index.htm file in the Remote Site
area and hit the delete key and press OK. You now should only
have one folder (burpquest) at the Remote Site.
- Click on index.html and click on the blue up arrow
(Put Files) to place the file on the Remote Site. Click Yes
to include dependent files. The index.html file and the images
folder are both placed on the Remote Site.
- Click on begin.html and click on Put (blue
arrow) to put that file on the Internet. Click Yes.
- Open a browser and surf to http://www.oocities.org/burpquest/
to view your site.


