|
|
|
|
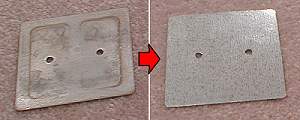 The electrodes (anodal/cathodic plates) on the Drionic device will corrode over time, becoming pitted and
marred with mineral deposits. This makes them much less effective in treatment. What is remarkable is
that the plates, made from nothing more than aluminum sheets, is very expensive if you buy from the makers
of Drionic (General Medical Co.) ... to the tune of US$12.00 per set of 4 plates, plus shipping ($5-15,
depending on where you reside). Here, I present a method of making your own for literally pennies each
in raw materials, and some time/effort on your part.
The electrodes (anodal/cathodic plates) on the Drionic device will corrode over time, becoming pitted and
marred with mineral deposits. This makes them much less effective in treatment. What is remarkable is
that the plates, made from nothing more than aluminum sheets, is very expensive if you buy from the makers
of Drionic (General Medical Co.) ... to the tune of US$12.00 per set of 4 plates, plus shipping ($5-15,
depending on where you reside). Here, I present a method of making your own for literally pennies each
in raw materials, and some time/effort on your part.
Tools and Parts List
The plate fabrication required the following: Plain aluminum sheeting (often used in roofing) works well, and is extremely cheap. You can find it in your favorite home renovation and building store (like Home Depot) in the roofing/siding supplies aisle. Aluminum flashing is a good idea if you want to buy small quantities rather than a whole roll, and a single flashing will cost you well under a dollar. I bought a 10-foot roll of a 6" wide aluminum strip for Cdn$5.00 (about US$3.00). This is enough material to make 80 plates (20 sets of 4), and works out to about US$0.15 per set, rather than US$12.00 if buying from the manufacturer. The key thing is to buy plain aluminum sheets, rather than the galvanized variety, since galvanized metal is typically ferrous (iron-containing) with aluminum plating -- what tends to happen with these is that the water and electrical current used for Drionic will catalyze the corrosion of the aluminum, exposing the iron which readily rusts. Aluminum will corrode, but does not form rust. You can tell the difference because new aluminum sheets will be fairly uniform in color, while galvanized sheets have lighter and darker shades throughout -- the heating/ventilation ducts in your home are generally galvanized metal. The rest of the parts are commonly found around the house, and are shown below. Be sure to wear your safety glasses or goggles at all times while performing the procedure described! If you don't have any, do not proceed any further! Eye injury or damage is not worth saving a few bucks. Be smart and use common sense. Also, aluminum sheet can have sharp edges, so using work gloves may save your hands and fingers from nasty cuts. This is particularly important if you want to use Drionic to treat your hands soon after making your new plates! There's nothing more painful than iontophoresis with wounded skin.
|
|
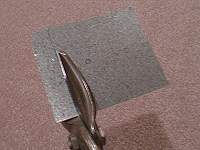
1. If you bought a roll of the aluminum sheet, carefully remove the tape or binding strap. Wear gloves to avoid getting cut, and goggles to protect yourself from eye injury. Keep in mind that the roll will unwind quickly if you let go of it, and can pose a danger if it isn't carefully unwound slowly. |
 2. Using one of the old plates as a template, mark its outline on the aluminum sheet. Use an existing
straight edge if possible to reduce the amount of cutting you need to do. Note the plates are
precisely 2.5" x 2.5". Don't worry too much about the rounded corners. Outline for four (or more)
plates.
2. Using one of the old plates as a template, mark its outline on the aluminum sheet. Use an existing
straight edge if possible to reduce the amount of cutting you need to do. Note the plates are
precisely 2.5" x 2.5". Don't worry too much about the rounded corners. Outline for four (or more)
plates.
|
 3. Using tin snips, rough-cut the traced plates. I find that approximately 3" x 3" works well, leaving
about 1/4-1/2" around the edges. The plates will then be more carefully cut to size.
3. Using tin snips, rough-cut the traced plates. I find that approximately 3" x 3" works well, leaving
about 1/4-1/2" around the edges. The plates will then be more carefully cut to size.
|
 4. Cut out the squares using straight cuts and don't worry about the rounded corners for now. Also, cut
slightly inside the line to account for the enlargment resulting from tracing. I find that cutting
with the scrap piece facing my left (using right-handed snips) is easiest. You can then round off the
corners using the snips, or grind to form with grinder.
4. Cut out the squares using straight cuts and don't worry about the rounded corners for now. Also, cut
slightly inside the line to account for the enlargment resulting from tracing. I find that cutting
with the scrap piece facing my left (using right-handed snips) is easiest. You can then round off the
corners using the snips, or grind to form with grinder.
|
 5. After the 2.5" squares are cut out, carefully round the corners. Notice that the original
manufacturer's plates are rounded slightly more than they need to be to fit properly in the Drionic
device, so you may want to round the corners lesss.
5. After the 2.5" squares are cut out, carefully round the corners. Notice that the original
manufacturer's plates are rounded slightly more than they need to be to fit properly in the Drionic
device, so you may want to round the corners lesss.
|
 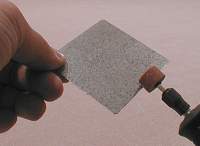 6. Deburr the cut edges by filing them down or using a grinder, so that edges are no longer sharp. I
find the grinder works best, and is also useful for forming the round corners.
6. Deburr the cut edges by filing them down or using a grinder, so that edges are no longer sharp. I
find the grinder works best, and is also useful for forming the round corners.
|
 7. You may need to try fitting the square into the Drionic unit, and trimming down the piece so that it
fits snuggily.
7. You may need to try fitting the square into the Drionic unit, and trimming down the piece so that it
fits snuggily.
|
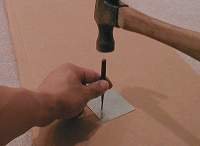 8. Using a center punch and hammer, put a small dent into each of the center of the circles which will be
drilled. This will make drilling easier since the drill bit is less likely to slip.
8. Using a center punch and hammer, put a small dent into each of the center of the circles which will be
drilled. This will make drilling easier since the drill bit is less likely to slip.
|
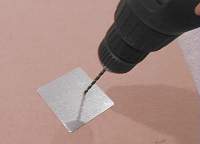 9. With a drill and 5/32" bit, drill two holes for the plastic screws.
|
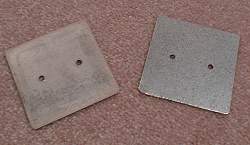 10. Repeat steps 4-9 for the other plates, and you'll have a complete replacement set, ready to be used!
Shown here are my old plates beside the new ones. Making one complete set took about 30 minutes of
work.
10. Repeat steps 4-9 for the other plates, and you'll have a complete replacement set, ready to be used!
Shown here are my old plates beside the new ones. Making one complete set took about 30 minutes of
work.
|
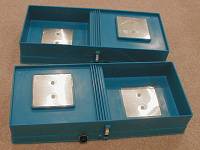 11. Install the new plates, replacing the old ones, and your Drionics will be as good as new!
|
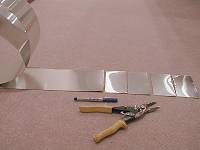 TIP. I find that while I have all the supplies out, it's easier to make several sets of plates at once
rather than making them each time when necessary. For instance, it takes me about 30 minutes to
make one set, while I can make three sets in about an hour. Also, you may want to pre-cut the
aluminum sheet/strip into 3" x 6" strips, as I've done here, so that it stores easily and is
ready for making more plates in the future. Doing this, each strip will yield two plates, and
the entire roll will yield about 80 plates. That's a lot of plates!
TIP. I find that while I have all the supplies out, it's easier to make several sets of plates at once
rather than making them each time when necessary. For instance, it takes me about 30 minutes to
make one set, while I can make three sets in about an hour. Also, you may want to pre-cut the
aluminum sheet/strip into 3" x 6" strips, as I've done here, so that it stores easily and is
ready for making more plates in the future. Doing this, each strip will yield two plates, and
the entire roll will yield about 80 plates. That's a lot of plates!
|
|
|
