|
Finding a donor
First
thing on the list was to find the skeleton for this project… Mini’s are 10 a
penny aren’t they?, should be no problem to find a reasonable one for
sensible money right?…. WRONG! The little run abouts are getting sort after
and ones in reasonable nick are going for big bucks.
E-bay
was an eye opener. Things that on the crappy small pictures looked like
wrecks were going for 7, 8, 900 quid!! I went to look at a few in the flesh
and found plenty of Minis that were home to the rust weevil. Eventually a
friend spotted an add in the Hull Daily Mail, “E-Reg Mini 1000 for Sale”
(Thanks Ken!). I hot footed round to the guys house and looked it over in the
dark one Thursday evening and decided it looked solid, but buying a car in
the dark is a mistake even if it is the only reasonable car you have seen in
over a month. I organised a return visit for early Saturday morning (I had to get up early to take him). In day light it was apparent
the paint work wasn’t brilliant, but the metal work looked solid in all the
right places… and deal was done, money and paper work soon changed hands and
it was in my garage by 9 O’clock (I went back to bed).

My little red mini… first day at its new home
Finding an engine
The
engine was the next decision. The contenders were:
Suzuki
Hayabusa: 175bhp, £3000 typical
-
“the”
engine to have, loads of torque, loads of power, but loads of dosh!
Honda
Blackbird: 160bhp, £2000 typical
-
very
strong engine, great torque and power, but not cheap.
Honda
Fireblade: 130bhp, £800 typical
-
Fantastic
bang for the buck, but “peaky” and may be not enough bhps for the mini
Kawasaki
ZX1100: 160bhp, £1700 typical
-
very
similar performance to the blackbird, but a bit more of an unknown, and a bit
lardy
Yamaha
R1: 150bhp, £1100 typical
-
Very
light engine, lots of power. The later injection versions better with a wide
power band.
The
‘busa, the ‘bird, the ZX too expensive, the ‘blade too peaky, so the choice
was made, the Mini project had become the YamaMini project.
Zcars
could provide me with an R1 for £1300 (carb version) £1600 (injection) which
was a little too pricey for my liking. I set about trawling the net to source
my own. I found a couple of breakers doing R1’s. Cheshire Motor Salvage and
M1 Salvage at Luton both could do carb versions for around the same price as
Zcars. E-bay turned up a few, but frustratingly they were at never with
150miles of home. More frustratingly R1’s would come up and then get
withdrawn before the E-bay auction ended due to a private sale…gerrr. But
eventually a breaker in Dartford advertised a 2003 spec R1 on E-bay for
£800…Hmmm too good to be true? After contacting them, £800 quid only got the
engine not the rest of the running gear, but a deal was done and £1160 got me
everything that I needed, which was a pretty good deal as I would have been
lucky to get an early carb R1 for that price from other breakers…even
factoring in the van hire and diesel down to Dartford, I was still quid’s in.
Other bits to shop for
By
the end of the Tiger build I was aware of a lot more places to buy specialist
car parts, and since the Tiger build E-bay had taken off, opening up a huge
auto-jumble. The Mini build was going to be frugal on spend as possible (all carefully managed by yet another spreadsheet).
Wheels:
Minilites were high on my list for the tiger, but cost new of £100 each put
me off. So when I spotted 4 13x7 Minilite’s plus tyres on E-bay I had to bid.
I won the auction at £250. The wheels alone would have cost over £300. The
Tyres were Bridgestone Protenza’s, not my first choice but not too bad, but
would get me up and running (He then conned his in-laws
into picking them up as they were local to my home town not East Yorkshire).
Brakes:
The standard bolt-on upgrade to the mini brakes is to swap the discs and
callipers for MG Metro Turbo items… 4-pot callipers and vented discs. Metro
Turbos were not build in huge numbers, so the items are not in every breakers
yard. So when I spotted a set on E-bay I put in a bid. £40 got be the full
set of discs, pads, hubs, drive flange and callipers… all in pretty good
nick, better than the stuff I was taking of the Mini in any rate.
Still
to find:
-
GRP
mini front end.
-
GRP
boot lid.
-
Yamaha
R1 tacho or tacho that goes up to 13000rpm
-
Mini
windscreen
-
Sports
seats that fit in a mini
Preparing the Mini
Christmas
2004 saw the first spanner wielded at my mini. Before getting started I
decided to weigh my little red Mini. I did this using two cheap bathroom
scales with a plank to bridge the two. I weighed each corner individually
with the other corners chocked up with wood to keep the car level, not very
accurate you might think but using this method on my Tiger gave me the same
result as the SVA station’s weighing scales to within a couple of Kgs. The
results were:
Front
left… 194Kg xxxxxxxxxxx Front right… 182Kg
Xxxxxxxxxxxx Front axle total: 376Kg
Rear
left… 110Kg xxxxxxxxxxx Rear right… 126Kg
Xxxxxxxxxxxx Rear axle total: 236Kg
Grand
total: 612Kg
The
Haynes manual reckons 620Kg for my spec of mini, so I’m probably not far out.
Anyway I want this for a comparison to what it weighs when it’s finished, so
absolute accuracy isn’t important.
Engine
Out
The
first job was to remove the A-series lump. To get it out it’s a tight squeeze
and there is a hell of a lot that needs removing and disconnecting:
· Disconnect accelerator cable, choke
cable and speedo cable
· Disconnect clutch pipe
· Disconnect engine mounts
· Disconnect fuel pipe
· Disconnect gear stick linkage
· Disconnect horn
· Disconnect HT lead
· Disconnect leads to coil
· Disconnect oil sensor
· Disconnect pipes to heater matrix
· Disconnect plug leads
· Disconnect temperature sensor
· Remove brake servo and master
cylinder
· Remove carburettor
· Remove distributor cap and rotor arm
· Remove drive shafts
· Remove exhaust manifold
Most
of it came off easily enough, the exhaust put up a fight as the previous
owner had put some weld tacks onto the down pipe/collector union so the 2
would not separate without chiselling off the weld. The other tricky job was
removing splitting the track rod end ball joints. Even with a splitter they
put up a fight.
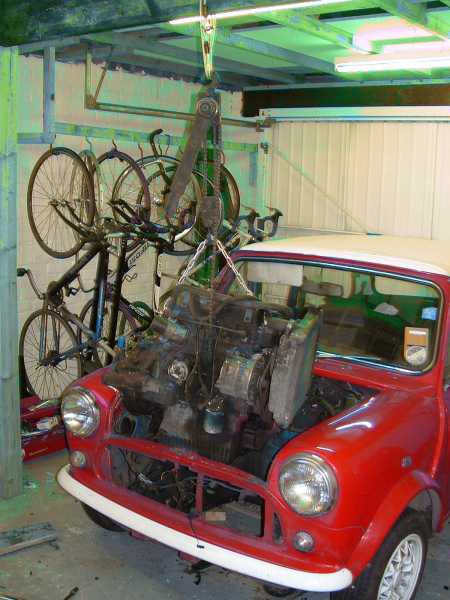
up, up and way! engine on its way out
A
couple of things I discovered pretty soon on tackling the mini, is that a
half inch AF spanner is a good investment. ½ AF seems to be the favourite nut
size on the mini. 12mm sockets and spanners are slightly too small and 13mm
often rounds the heads off 1/2AF nuts and bolts. The second thing to learn is
that the Haynes manual for the Mini is even less help than normal.
Sub Frame Out
Once
the engine was out, the sub frame was the next. This is a very easy job, 6
bots and it all drops down and out. Due to the leaky nature of the A-series
engine, its pretty well as new except for a little surface rust here and
there.
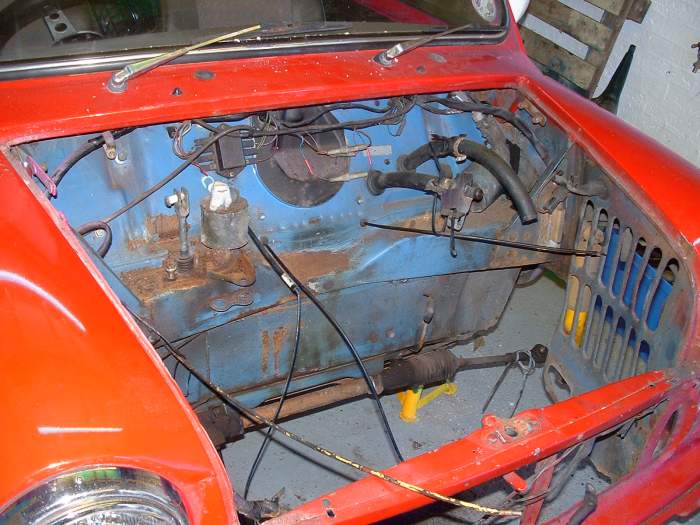
engine and subframe removed
With
the sub-frame removed a pretty clean engine bay was revealed. A couple of
rust spots to sort out, but nothing of any concern. The steering rack looked
tidy, gaiters in good condition. A bit of cleaning and a spot of paint and it
will look like new.

A bit of surface rust, nothing to worry about

looks as good as new with a cleanup and paint
Doughnuts
The
challenge for the sub frame was removing the rubber doughnuts from the
suspension towers. The Zcars kit comes with coil over shocks for the front,
so the old suspension goes in the bin. If you intend to re-use the doughnuts
a compressor tools in needed. If not, I found hack sawing through the
aluminium cone under the rubber doughnut works. Splitting this cone releases
the pressure on the suspension arm, which then can be removed allowing the
rubber doughnut to be removed from the suspension tower.
Fuel Tank Out
A
top tip for anyone doing this – run the car until it stops. I believed the
gauge, it read empty so I expected about a gallon or less to be in the tank.
I found it still had around 2 gallons in it! The tank is awkward to hold and
there is no easy way to pour the petrol out, the filler cap was never
designed for pouring! The tank comes out easy enough. Just clamp the breather
and fuel lines, cut the line with a knife, unbolt the retaining strap, remove
the filler cap and manoeuvre the tank out. Don’t forget the safety though –
disconnect (better still remove) the battery before messing with anything on
the car, especially the fuel bits. You will no doubt spill a little petrol in
the process, so keep the garage door open so no fumes build up.
Interior
The
engine will go where the rear seats are, so the rears seats go. Just pull
them and they come out. The plan is to fit some seats that give proper head
restraint. So the front seats go as well. This is a simple unbolt job.
Rear Sub Frame
Not
tackled this job yet.
Front Body
Still
to do
|