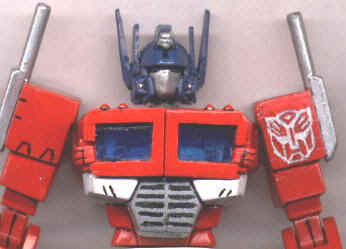
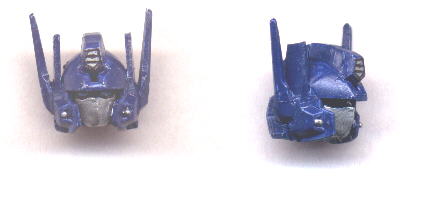
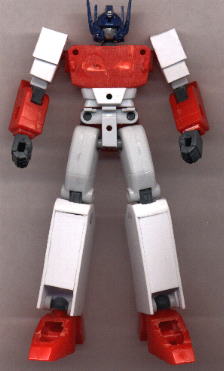
Front View Side
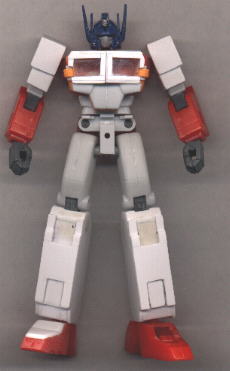
View
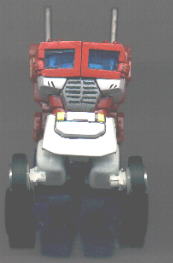
Back View Original kit
Comparison shot - with original
Optimus Prime toy
This kit bash turned out to be even MORE work
than I thought even when I started on it, VERY little of the
original kit remained.
Around a month before the actual kit arrived, I used an extra Heavy Arms Custom head to make Prime's head.
I carved the Gundam's "face" into Op's faceplate, and
painted the whole thing (eyes too) silver. Then I simply painted
clear blue over the eyes, and used a Gundam marker for the black
around them. To make the "helmet", I cut the antenna
fins from the V antenna, I used the middle section for Op's
forehead , and attached the fin pieces to the side of the head
instead of HArms small antennas. I then added two small pieces of
sheet styrene (thin sheet plastic...a very common thing for
Prime, as you'll later see) to make Op's inner "fins",
and painted it Medium Blue. Click here
for a close up of it. When I began working on the whole kit,
there were 4 major "stages" I went through:1. Leg and
arm development, 2.Body development, 3. Transformation
development and detail additions, and 4. Painting.
Leg and Arms development.
Well I decided a while before I had the kit that I was going to
completely scratch build the lower legs out of sheet styrene (I
used .8 and 1 mm thick styrene), and that I would need to "beef
up" the upper arms since I was not going to use the big
shoulders of the kit. For the legs, I used HArms leg "innards",
the parts that the polycaps would connect too, and the rest was
scratch built. This was tricky process as I had to do a lot of
measuring, and everything had to be very precise so that the legs
would look right, its just a good thing that the styrene is easy
to work with. With the arms, I simply built up over the smaller
upper arms with more styrene. I added yet another layer on the
shoulders as well to make his arms look like Op's. I also had to
remove the Army Knife attachment form his right hand....I thought
about leaving this on, but it would interfere with
transformation, so oh well. At this time, I also removed the
Gatling Canons inside the chest, and removed the top part of his
feet in order to give them a flat appearance. Click
here to see what Op looked like at this stage.
Body
This was the easiest stage, but had one very tricky step. I
started out by removing a small piece(which would be of use later
from the orange chest frame. Then I had to cut the small shoulder
cannons off (refer to the previous HArms pics), and then I
removed the entire "neck base" (its the white platform
that the head sits on), and glued it back it upside down, thus it
is now sunked in instead of raised above the top of the body.
This allowed room for the new neck piece, and would provide a
better look in vehicle mode. The last step in altering the chest
was creating the window area, which was also the hardest. I took
HArms two opening chest plates, and cut then at about the middle,
leaving the pieces that went together as truck's grill, and the
pieces that would become the opening window sections. However
there was a problem, the pieces were solid, but I wanted clear
windows....so after a VERY careful, and at times frustrating
procedure I managed to get a thin frame which I could work with.
I added a piece of clear plastic to the frame and then built it
up some with some thin styrene, until it looked like Op's chest.
After the window frames were done, I attached the whole
contraption (orange frame, grill, widows) to the body. Also at
this time I finished the adding pieces to the lower legs, and
puttied up all the needed areas. Here is
what he looked like.
Transformation and Details
This was the longest stage, as a lot of work was done in it. To
begin with, I had to create the transformation hinges to swing
his arms back, which really got my mind going. How to make
something transform, that was not supposed to at all? Well I had
the idea to add a swiveling polycap inside the chest, attach a
peg to that which would in turn attach to the polycap in the arm.
Well MUCH easier said than done. But after quite a bit of work, I
got it done, and after more work, I got the joint area to look
good again. I was now able to finally glue the torso together.
The I went on to the wheels. I used some lego indy car wheels for
the large rear ones, and a pair of lego landing gear wheels for
the front. Next I used more styrened to fill in the waist panels,
and to top off the feet. After shortening the elbow extensions, I
went to my spare pats box and got some of the little tiny MG Zeta
Gundam light pieces at glued them to the top of Op's chest to
make his little light pieces (which look SO perfect as them).
Finally using two pieces of a parts tree, and what used to be the
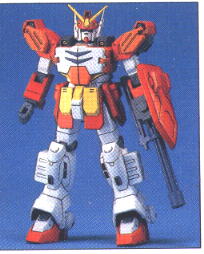
shoulder cannon covers, I made the his smokestacks. The gun is a
black painted Wing Gundam buster cannon, with a small piece cut
off so that it would fit better into the hands I was using (from
the Gundam Wing Endless Waltz series which come with 3 pairs,
fist, open and weapon holding). Here is
this stages pic.
Painting
Self explanatory. The red is acrylic gloss red, the white, flat
white, and the blue is gloss medium blue. The lines were done
with a Gundam Marker for panel lines.
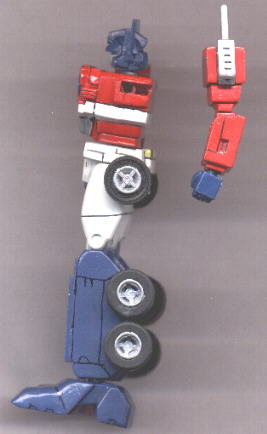
Transformation to Vehicle mode.
It is a simple transformation. Remove head (with neck), and both
hands, turn waist around, fold legs up at hips, then swing the
arms back, and rotate the lower arms into the right position.
Vehicle Mode:
Side view
Front view: a low front angle
While this is a vehicle mode, it really is not much of a truck.
My main emphasis of these figures were there robot modes, having
the alternate modes as just a bonus. But overall I think its a
good mode considering that the original kit did not transform at
all. To equip this mode with a gun, simply attach a fist the arm,
then attach the gun.
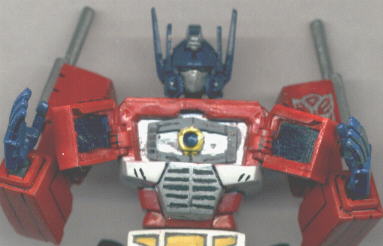
And Finally, The MATRIX:
Using some styrene rods, and the small piece I removed from the
orange chest from, I made a Matrix, after all I couldn't let
HArms opening chest gimmick go unused for Op. The Matrix is not
removable, but the chest opens more than enough to get a good
view of it. Here it is
Heh, creating a Transformer from a Bandai product...isn't that
like blasphemy or something...
Back to the TF Project