
|
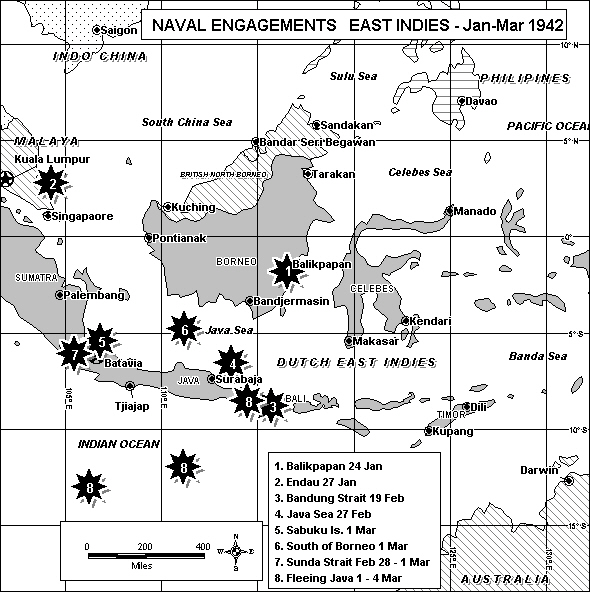
The Map of Naval Engagements in the Dutch East Indies and Malaya, December 1941 - March 1942 The map is the courtesy of Vincent O'Hara |

|
...Hits were made by both sides in the salvo of high explosive projectile
exchange, but as the allied squadron was in the act of altering course for another round of battle, the two Dutch cruisers both
blew up simultaneously in a massive cavalcade of seawater and steel armour plate with a huge loss of life. De Ruyter and Java
hit by high explosive warhead long-lance torpedoes sank immediately and Doorman went down with his Flagship... |

|
...The Java took the Japanese destroyer (Asashio) totally by surprise. Asashio first searched the area with a searchlight, but the 40 mm battery of the Java acted very quickly and blew it overboard.
When the Java at this time was firing as quickly as she could, De Ruyter hadn't opened fire yet as a result of an order from the Rear-Admiral, that the Java would open fire on targets on their port side, and De Ruyter on the starboard side, where there we none.
The high rate of fire continued until the destroyer moved out of sight... |

|
...The battle of Sunda Strait was an unknown one for most of the war. The crews of the ships were taken prisoner and initially, the allies had no idea what happened to them.
Only of the Evertsen was known she was beached, as she signalled it to Helfrich, but of the Perth and Houston, no such signal went out. Only the fact that several years later a Japanese transport with Australian survivors of the Perth was torpedoed, and the Australians rescued, shed some
light over what happened to the Perth. There was no account of what happened to Houston at that time... |

|
...Cdr.Talbot now reversed course to the south and reduced speed to make a more deliberate attack. The USN destroyers attained their first success when torpedoes from the leading
destroyer, Pope, struck and sank the Sumanoura Maru (3519 tons) around 330. The last two destroyers in line, Parrott and Paul Jones, attacked the already damaged transport Tatsugami Maru (7070 tons) with torpedoes and obtained hits which cause her to sink at 335.
This was followed by the Ford's attack with her main armament and torpedoes on the Kuretake Maru (5175 tons), which is struck by at least one torpedo quickly sinking her at around 345. Another two
transports suffer damage from gunfire and torpedoes but remain afloat. Also at around 345, patrol boat P37 takes torpedoes and gunfire from the Pope and Parrot and is sunk in shallow water... |
Note It is known that many more Allied merchant ships were sunk by Japanese naval surface ships, aircraft, submarines, and possibly in minefields planted by submarines. However, this is all that I have been able to find names for. If you have additional documented information on Allied merchant ship losses other than those listed above please contact Dan Muir and Arie Biemond.
SPECIAL THANKS goes to Dan Muir (USA) and Arie Biemond (the Netherlands) who made this site possible.
DOWNLOAD: Allied and Japanese Shipping Losses in the Pacific War 1941-1945