
**This
tuorial was written using PSP7 but should also work in earlier versions!**
What
you will need:
PSP7
or earlier
A
sense of adventure!
Pumpkin
Selections ZipFile
and
this color chart:

open
a new image 400 x 400, transparent background, 16.7 million colors
Add
a new layer named "pumpkin" and open your pumpkinmain.sel file
Click
on the first orange color and floodfill the selection.
DO
NOT DESELECT!

And
a new layer named Pumpkin2
Click
on the second orange color and set your Paint Brush Tool to the following:

And
draw a few lines from the top of the pumpkin to the bottom following the
natural shape.
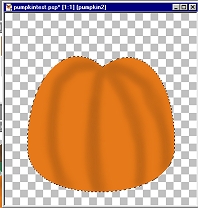
It
shouls look something likes this :)

Now
go to
Effects>Blur>Gaussian
Blur>4
Now
draw your lines over the original ones again and then
Effects>Blur>Gaussian
Blur>4 once more
Add
anew layer Named Pumpkin 3
Using
the third orange color, draw a few more lines on your pumpkin, try to run
these lines beside
the
first ones you drew...we do not want to cover them up completly.
Now
go to
Effects>Blur>Gaussian
Blur>4
Next
go to
Layers>Merge>Merge
Visible
Rename
this layer pumpkin...do not deslect yet!
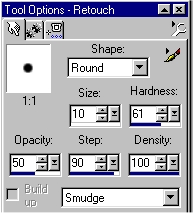
Next,
Click on your retouch tool 
And
use the following settings:
Now
what you want to try and do is pull some of the differnt colors into each
other,
there
is no real rule to this...just experiment until you find what works best
for you but I always
try
and follow the natural curve of the shape and pull down and off to the
side.

Now
go to
Effects>Blur>Gaussian
Blur>2
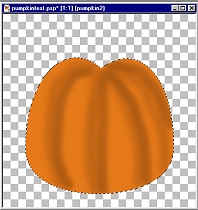
And
then continue to smudge your lines in a nice fluid motion till you have
something like this:

Deselct
Add
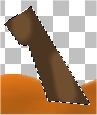
a new layer named "Stem" and open your pumpkinstem.sel file
Click
on the first brown color and floodfill the selection.
Add
a new layer named "Stem2"
Set
the second brown as your foreground color and
click
on your paintbrush tool and using the settings from before,
paint
a few lines on your stem
Now
go to
Effects>Blur>Gaussian
Blur>4
Then
Make your Pumpkin Layer invisible and merge all visible layers
Rename
this layer stem
Then
go to Layers>Arrange>Send to Bottom

 Page
2 Page
2
All
Graphics were designed and created by DWhiteStar
No
part of this page may be copied including graphics and text
without
permission. Thank you.
copyright
2001
|