Shooting Star Tutorial
by DWhiteStar

**This tuorial was written
using PSP7 but should also work in earlier versions!**
What you will need:
Star
Selections ZipFile
PSP7 or earlier
A sense of adventure!
The Background
open a new image 350 x 350,
transparent background, 16.7 million colors
Add a new layer and name
it "Background"
flood fill it with black.
Now, change your foreground
color to white and select your paintbrush tool
and use the following settings

now the fun begins!!!
Randomly add a few dots (between 5-6) of the white to
your black background (keep
in mind that we are trying to create a star field effect!)
Now change your setting
on your paint brush tool again to:

and randomly add 2 or 3
more dots to your background
The finished effect should
look something like this...but yours will be different ofcourse!!
That's the fun of it! :)

(image has been resized)
The Star
Allright, now add another
layer and hide your background layer for now.
load the star selection
and flood fill with #DDDD92
leave the star selected
for now
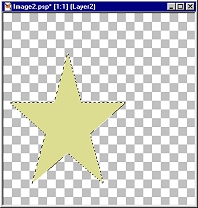
(image has been resized)
now, add another layer,
change your foreground color to #8A8B2B
and click on your airbrush
tool using the following settings
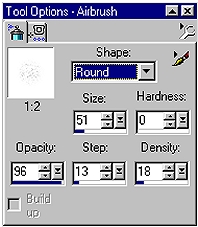
paint three diagonal lines
across your star

(image has been resized)
then go to your tool bar
and EFFECTS>BLUR>GAUSSIAN BLUR> 7.00
add a new layer and go
to your tool bar again using EFFECT>3D EFFECTS>CUTOUT
with these settings
vertical/Horizantal=5
opacity=75
blur=25
shadow color=#BDA225
fill interior=unchecked
then add a new layer, use
the cutout effect again but change the vertical/horizantal to -5
(all other settings remain
the same)
Merge all visible, and add
a drop shadow with the following settings
vertical/horizantal 3
opacity 63
blur 3
color WHITE
deselct and rename the layer
STAR
you should now have something
like this :)
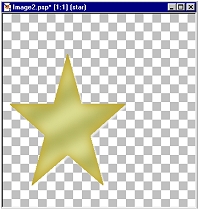
(image has been resized)
The Tail
Alright, now add another
layer and hide your star and background layers for now,
load the startail selection
and flood fill with #DDDD92
leave the startail selected
for now
now, add another layer,
change your foreground color to #8A8B2B
and click on your airbrush
tool using the following settings
paint 2 lines diagonal top
to bottom on your tail then switch your foreground color to white,
leaving your airbrush settings
the same, and paint 2 more lines which are over lapping your
original lines just a bit

then go to your tool bar
and EFFECTS>BLUR>GAUSSIAN BLUR> 7.00
add a new layer and go
to your tool bar again using EFFECT>3D EFFECTS>CUTOUT
with these settings
vertical/Horizantal=5
opacity=75
blur=25
shadow color=#BDA225
fill interior=unchecked
then add a new layer, use
the cutout effect again but change the vertical/horizantal to -5
(all other settings remain
the same)
Merge all visible, and add
a drop shadow with the following settings
vertical/horizantal 3
opacity 63
blur 3
color WHITE
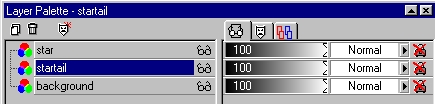
deselct and rename the layer
STARTAIL
The Effect!
Now, make all of your layers
visible again, and move the startail layer inbetween the star and
background layers
now, set your layer opacity
to the following

this will give our image
a nice "etheral" effect
add a new layer and with
the same airbrush settings as we used before, change your
foreground color to white
and paint a few diagonal white lines on your tail
(image has been resized)
then go to your tool bar
and EFFECTS>BLUR>GAUSSIAN BLUR> 7.00

(image has been resized)
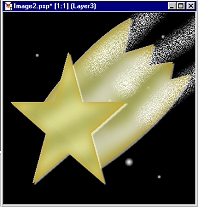
you should now have something
like this...a speeding star!
The Finishing Touches
now, before we merge all
of the layers together, if you feel like you would like
some more "stars" on your
background, this is the time to do it.
Make your background active
and using the settings from earlier,
add a few more stars to
your sky!
Once you like what you have,
merge all your layers together and now it is time to
finish it off!
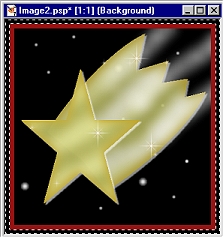
If you would like, you can
use a sparkle tube of your choice to give your
star a little more...flare!
LOL!

(image has been resized)
also, you may want to add
a snazzy frame to your shooting star!
to do so, resize your image
75% and sharpen once.
now change your background
color to something nice and dark
I chose to use #951313
now add a border to your
image with the following settings

change your background colour
to black and add the border effect again with the same
settings. Using your
magic wand, select the black border
(image has been resized)
add the folowing inner bevel

keep the black border selected
and add the following drop shadow
vertical/horizantal 3
opacity 63
blur 3
color BLACK
then add the drop shadow
again with the following settings
vertical/horizantal -3
opacity 63
blur 3
color BLACK
then go to your tool bar
and sharpen once more!
and there you have it!!
I beautiful framed, shooting star

Don't forget to make a wish!
 HOME HOME
All
Graphics were designed and created by DWhiteStar
No
part of this page may be copied including graphics and text
without
permission. Thank you.
copyright
2001
|