Moving the seam on a modern sleeve pattern
Most
modern sleeve patterns will look essentially like the picture to
the right,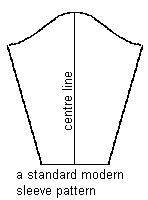 this pattern produces a sleeve with a seam
running down the underside of the arm. However most 16th century
sleeves have the seam running down the back of the arm similar to
the pattern to the left.
this pattern produces a sleeve with a seam
running down the underside of the arm. However most 16th century
sleeves have the seam running down the back of the arm similar to
the pattern to the left.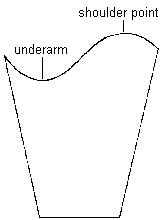 So how do we get from a modern sleeve to a
period sleeve? The process is very simple.
So how do we get from a modern sleeve to a
period sleeve? The process is very simple.
Equipment:
Ruler
(optional), pen/pencil, scissors, sleeve pattern, paper or fabric
to trace the pattern onto (e.g. newspaper).
Before
you start altering things check the fit, you can get a basic idea
from measurments or comparing the pattern to (non stretch)
clothes you know fit you.
Step 1. make a copy of the sleeve pattern, trace it
onto another piece of paper or fabric (remembering to copy all
the important markings) and cut it out. If you make a mistake
this allows you to go back and start the process from scratch
without needing to buy a new pattern.
Step 2. Take your basic pattern and fold it in half
lengthwise. Mark this centre line (the crease from folding it in
half will do).
Step 3. Unfold the pattern and fold the side seam
into the centre this fold is indicated by the red line (right).
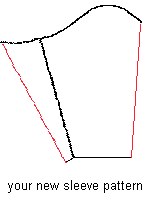 Step 4. Cut the pattern into two
pieces along the second crease (you may want to rule a line along
the crease to make sure it's straight.
Step 4. Cut the pattern into two
pieces along the second crease (you may want to rule a line along
the crease to make sure it's straight.
Step 5. Tape the two pieces together along the
original seam line.
Step 6. Trace onto a new piece of paper
straigtening out the wrist line and adding seam allowance along
the new seam.
This page is maintained
by Elizabeth Walpole
Known in the SCA as Elizabeth Beaumont
Last updated, 4 November
2004