Isn't that primer the most hideous color?
|
|
I decided to overhaul my steering system for the following reasons. (listed in order of importance)
1. I have no idea how old the steering cables are, but I DO know that they are AT LEAST 8 years old.
2. The engine control cables fall into the same catagory as the steering cables.
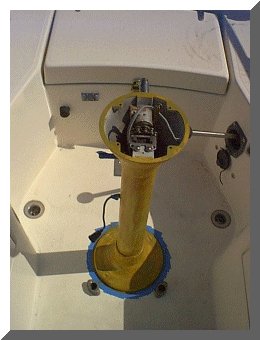
3. The Edson pedestal itself is VERY worn and in some areas the white paint is completely worn away leaving bare aluminum showing.
4. Having everything torn apart would allow me to take accurate measurements to fabricate a teak drink holder to mount on the pedestal.
I searched the Edson web site and they recommended using the Interlux Interthane Plus (a linear 2 part polyeurathane system). This was financially attractive since I had some white Interthane Plus as well as the appropriate thinner left over from a project on my last boat. I consulted the Interlux guide for the list of solvents, primers etc. to complete the job. Time for another trip to West Marine. I think I should have bought stock. :-) I removed the wheel and autohelm, the steering compass, the pedestal guard and cockpit table, the wheel brake handle and the engine control head. At this point I replaced the steering cables as well as the engine control cables. These are straight forward jobs, but getting my 6 ft large frame into the lazerette was a tight squeeze to say the least.
With this work done, I noticed that the white delrin bushings for the throttle and shift levers as well as the one for the wheel brake were in bad shape. After a call to Edson, 3 bushings as well as new decals for the throttle and shift levers were on order.
Materials required:
14 ft. 3/16" 7 x 19 stainless cable ($16.66 at West Marine)
Throttle cable ($34.99 from SailNet)
Shift cable ($34.99 from SailNet)
Bushings for throttle, shift and brake ($18.00 from Edson)
Decal set for engine controls ($9.00 from Edson)
Interthane Plus paint, thinners etc. (on hand)
Interlux Vinyl Lux Prime Wash (on hand)
Total cost of this project: $113.64
I followed the instructions provided by Interlux
and wiped everything down with solvent, then sanded all the parts with
medium grit emery cloth. This was followed by several more wipe downs
with solvent. Next I mixed up and applied a thin coat of Vinyl Lux
Prime Wash thinned with the appropriate thinner. This was left to
dry for about 3 hours (Interlux recommends at least 1 hour but less than
12 hours.)
Isn't that primer the most hideous color?
I then applied the first of 3 coats of the Interthane Plus.
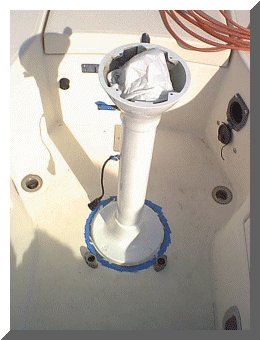
Pedestal after first coat of Interthane
Plus. At least it is WHITE!!!

Control head and pedestal guard
plate after first coat of Interthane Plus
After an overnight drying of the Interthane Plus, I wet sanded the pedestal with 320 grit wet/dry paper and applied the second coat.
This was followed by a third and final coat after an overnight dry and wet sanding one more time.

Pedestal after third and final coat of Interthane Plus
After letting the third coat dry, I reassembled everything and lubricated all cables and chain.

Pedestal after reassembly
Copyright 2001-2009 No duplication of any portion of this website without express permission.
Permission may be obtained by e-mailing the webmaster at
earlylight160@yahoo.com.