|
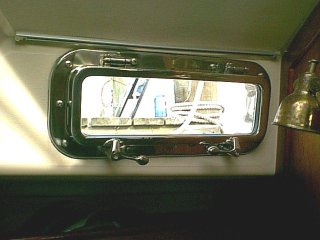
stainless steel opening ports |
The porthole configuration aboard Early Light when I purchased her was as follows:
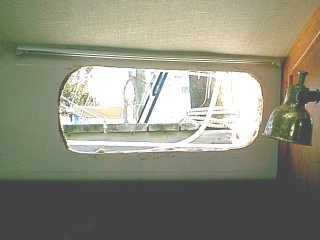
Forward cabin: Two fixed safety glass ports (one to starboard and one to port) with aluminum frames
Over hanging locker: One fixed safety glass port (on the port side) with aluminum frame
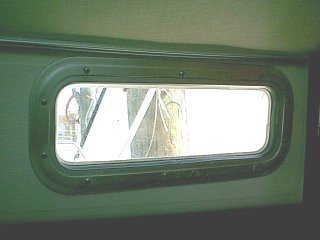
Head: One Beckson opening port (on starboard side) with plastic frame
Main salon: Two Beckson opening ports (one to starboard and one to port) with plastic frames
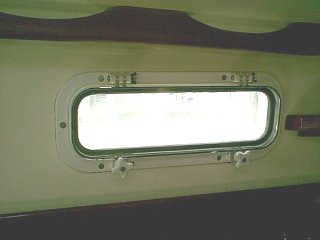
It was my desire to have opening ports in all six locations for better ventilation. I did not like the plastic ports so at first I looked at aluminum ports as an economical replacement. John and Bridget Wilson in southern California were kind enough to email me some JPG files of the stainless steel opening ports they had installed in "Sailsoon" a Sabre-34 MK I. These ports came from New Found Metals in Port Townsend, WA. and were only slightly more expensive than any of the quality aluminum ports I had considered.
I visited New Found Metal's booth at the Sailboat show in Annapolis on October 10, 2003 and received a quote with a substantial boat show discount. I was sufficiently impressed and ordered 6 new ports, six chrome screens and six chrome hangers (to hold the ports in the open position) prior to leaving the show. (I never seem to get away from the Annapolis show without putting a substantial drain on the ole wallet.) :-(


This project required the following supplies:
1. Six each 4 in. X 14 in. Stainless steel ports ($1190.95 from New Found Metals)
2. Six each 4 in. X 14 in. Chrome screens ($191.70 from New Found Metals)
3. Six each Chrome hangers ($41.70 from New Found Metals)
4. Three boxes (60 feet each) 3M Strip-Calk ($33.93 from NAPA auto parts)
5. Three tubes Sikaflex 29L-521 ($47.97 from West Marine)
6. Sixty each 6mm x 25mm pan head stainless steel machine screws ($24.00 from Ace Hardware)
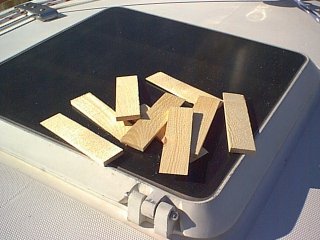
7. Assorted hardwood wedges ($2.00 from Ace Hardware)
8. Mineral Spirits to clean up butyl caulk (On hand)
9. West Epoxy to seal any open core (On hand)
Total cost of this project: $1532.25
The following tools were required to complete the project:
1. 3/8 in. variable speed drill
2. 1 1/4 in diameter drum sander
3. large 1/2 round file
4. Set of fractional drill bits
5. Set of counterbores
6. Putty knife
7. Set of X-acto knives
8. Hardwood drill guide (made using drill press)
9. Small mallet
10. Assorted phillips screwdrivers
Once the ports arrived, I was ready to start my project. I started with the starboard fixed port in the V-berth. The first order of business was to remove the 12 screws that secured the port in the coach roof side. The inner trim ring was easily removed and I then used a sharpened putty knife to break the seal around the port on the outside. With the port totally removed it became time to remove all the old bedding compound. This was done using a plastic scraper as well as a variety of solvents.
With the area completely cleaned up, I did a dry fit of the new stainless steel port and made any minor adjustments in the fit by filing the fiberglass where necessary as well as making the two notches for the rain drains using a drum sander in my drill. I used some hardwood wedges to shim the ports into the exact position I wanted and then traced around them with a sharp pencil on the inside and outside of the cabin so that once I got ready for the final installation I would be able to align them precisely. I now marked the outside of the coachroof for the 10 screws with the template provided. At this time I drilled the 10 holes in the side of the coachroof using a 5/16 in. bit and a drill guide to keep the bit perpendicular to the side of the coachroof. This insured that the screws would line up with both the mounting holes in the porthole as well as the tapped bosses in the trim ring. I then counter bored the cabin side with a 5/8 in. counterbore for the 10 bosses that were cast into the outside trip ring.

Next the ten 6mm x 25mm stainless machine screws were checked to see if they had to be cut to length. Fortunately they did not. To bed the ports I used 3M Strip-Calk (a butyl rubber product that can be purchased from any NAPA auto parts store) that was recommended by New Found Metals. The hinged portion of the port was removed to make the unit lighter while doing all the fitting etc. I ran a strips of the 3M Strip-Calk around the port in the right angle corner where the spigot meets the inside port facing making sure there was sufficient caulk to completely fill the gap between the port and the fiberglass. Next I ran a strip of the 3M product around the inside perimeter of the trim ring and then rolled a thin layer on all of the inner face of the trim except the outer 1/4 inch as the instructions called for. A small bead of White Sikaflex #29L-521 was then laid around the very outer perimeter of the trim ring. This will insure that no paint or other chemicals will ever come in contact with the butyl 3M Strip-Calk possibly causing problems with the sealing of the port to the coachroof. The port was then screwed into the trim ring sandwiching the fiberglass between the two pieces. Following the instructions, I alternately tightened the screws until the trim ring was drawn up to within approximately 1/16 in. This insures that all the caulk is not squeezed out leaving a poor seal.
The excess butyl caulk was cleaned up using a plastic scraper followed by some Maguiars #50 One Step Cleaner/Wax.

The port was left alone and the Sikaflex was allowed to come to a full cure which takes 5 days.
The above process was repeated for each of the five remaining portholes. I was very impressed with the looks as well as the functionality once the project was completed.

Copyright 2001-2009 No duplication of any portion of this website without express permission.
Permission may be obtained by e-mailing the webmaster at
earlylight160@yahoo.com.