|
to the stern pulpit |
Required items:
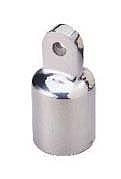
2 ea. 45 degree stainless bases ($15.98 at Boater's World)
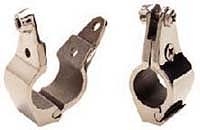
2 ea. Stainless hinged rail clamps ($45.90 at Boater's World)
2 ea. Stainless rail ends ($19.98 at Boater's World)
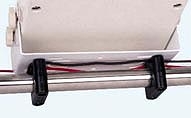
2 sets Helm rail clamps (25.98 at West Marine)
2 pcs. Stainless tubing 13 in. long ($11.00 at canvas shop)
6 ea. #10 x 1/2 in. oval head stainless self tapping screws (on hand)
8 ea. #10-24 x 2 in. stainless pan head machine screws (on hand)
8 ea. #10-24 stainless barrel nuts ($1.60 at Boater's World)
1 pc. 1/2 in. Starboard 24 in. x 54 in. ($89.00 at Boater's World)
Total cost of this project: $209.44

Required tools
Saber saw
File
Sandpaper
Electric drill and set of bits
Phillips screwdriver
The first step in this project was to make a pattern for the seats. There is a bit of opportunity to make them to your own liking so feel free to be a little creative. The pattern was made of the starboard side seat using cardstock. Once you are satisfied with the pattern, just flip it over for a mirror image for the port side seat.

The pattern was now traced onto � inch starboard and the seats were cut out using a saber saw. The edges were sanded and then rounded over by hand sanding.
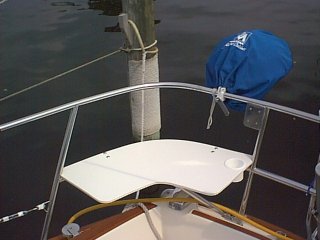
A pair of Helm brand rail clamps was attached to the seats (one to clamp to the aft portion and one to clamp to the side portion of the pulpit). These were attached using 2 inch 10-24 pan head machine screws inserted from beneath and secured on the top using 10-24 barrel nuts.
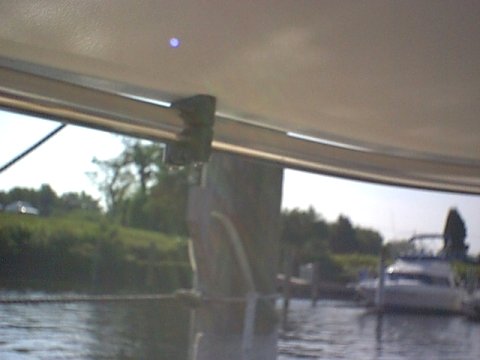

To support the inboard portion of the seat a strut was fabricated using stainless steel tubing. This strut was attached to the underside of the seat (near both the center and the inboard edge with a 45 degree stainless steel rail mount using 3 each � inch #10 oval head stainless self tapping screws. The lower end of the tubing was attached to the aft vertical support of the stern pulpit using a stainless steel rail end and a stainless steel hinged rail clamp.


|
|
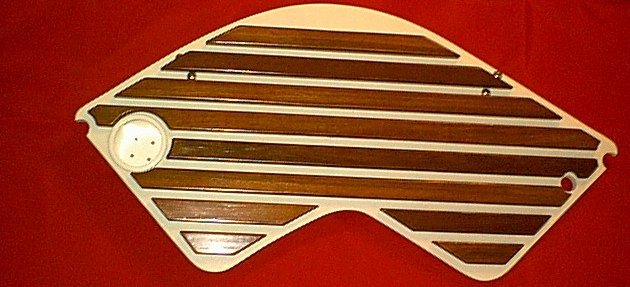
Well, after two years I finally got around to dressing up the stern pulpit seats with the addition of some teak battens. I purchased 14 teak battens in 1-1/2" x 1/2" x 36" pre-cut pieces on ebay for $15.00 plus $7.00 shipping. I used a total of 10 of these pieces for this project.
I started by laying out some cardboard strips cut to the width of the battens and placed them on one of the seats leaving 1/2" spacing between the battens. The starboard seats were drilled and counterbored so the battens would be screwed in place using 3/4" stainless screws from the underside. This would allow the battens to be removed in the future for refinishing without the hassle of removing teak plugs as would be required if I had attached them from the top. The battens were cut 1/2" short on either end for a pleasant appearance. I also cut them to stop short of the built in drink holders in the seats.
Once the battens were all cut the top edges were rounded over using a plane and sandpaper. They were then given 5 coats of Cetol on the bottom and 7 coats on the top. When installing them, the screw holes in the battens were sealed with silicone caulk.
Below are a couple of photos of the seats prior to installing them on the boat. The seats will be re-installed during spring commissioning as there is no need to put them through any extra time in the elements.
Materials used for this upgrade:
Teak..............................................................$22.00 (including shipping) from ebay
1 box # 8 x 3/4" FH stainless wood screws......$ 5.75
Cetol..............................................................$ 0.00 On hand
3M Marine grade silicone caulk......................$ 0.00 On hand
Total cost.......................................................$27.75
Tools required:
Back saw (fine toothed)
3/8" variable speed drill
Hole saws (to cut arcs as required)
Jack plane
Phillips screwdriver