|
gets Television |
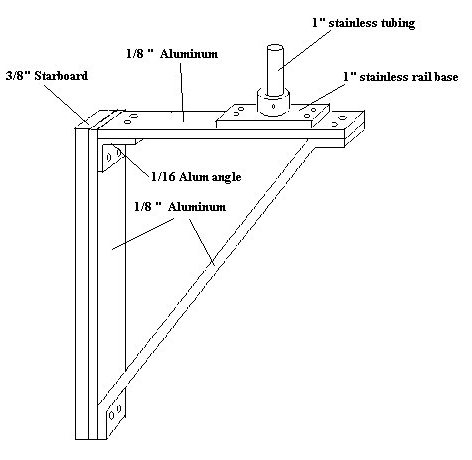
While spending many hours aboard Early Light when one must remain below due to inclement weather I was left wishing I had some entertainment. I decided to install a small (9 inch) color TV with a built in VCR. Being in a fringe area for reception required that I purchase an omni-directional antenna with built in amplification. After checking out fellow boater's antennas, I decided on the Shakespeare Model 2025. This is approximately 15 inches in diameter and I really did not want it permanently mounted on the mast. The first order of business was to devise a mounting system that would allow the antenna to be deployed easily and yet removed when not in use. I decided to build a mounting bracket that would ride in the mainsail luff track of the mast. This would allow the unit to be hoisted to the masthead for best reception. Below are a couple of preliminary sketches of the bracket. Some changes were made and can be seen in the photographs of the bracket which follow the sketches.
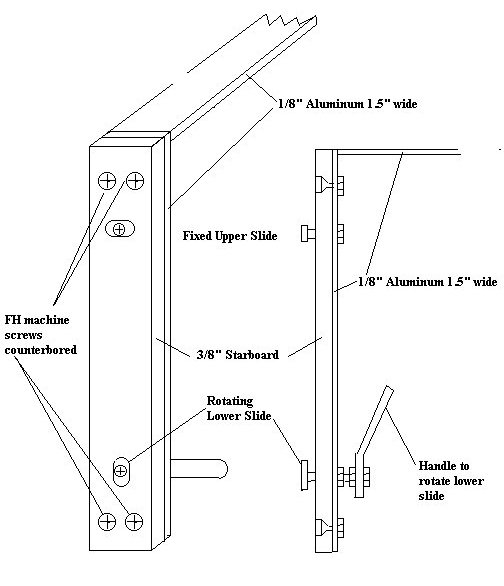
The principle behind this bracket is that a "fixed upper slide" is inserted into the mast track by turning the entire assembly 90 degrees from it's normal position. Once the "fixed upper slide" is in the track the entire unit is rotated back to it's normal position and the "rotating lower slide" is rotated by using it's small handle such that it will go into the track. Once the "rotating lower slide" is in the track, it is now rotated 90 degrees using the handle so it will not come out.
A stainless steel deck strap and a stainless steel ring were added to the top and bottom of the unit so that the main halyard could be attached to the top to raise the unit and a 3/16" downhaul could be added to the bottom to help lower the unit.
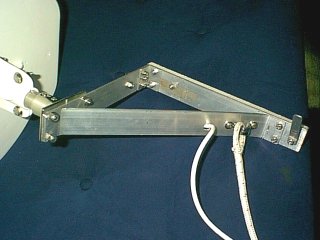
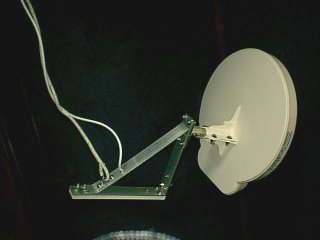
The completed bracket with antenna can be seen hoisted in the below photo.

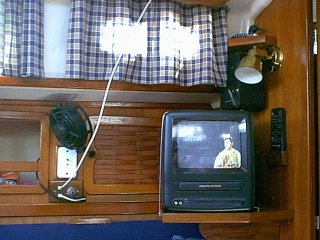
I purchased a brand new 9 inch Magnavox TV/VCR from a friend who had a spare.
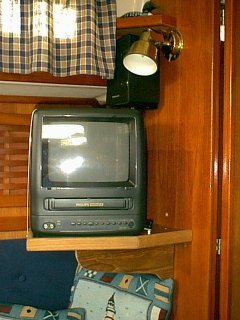
I decided the best location for the TV would be on a shelf that I would build at the forward end of the port setee berth. This shelf would have to be irregular in shape in order not to interfere too much with the forward most cabinet door on the port side of the salon.
I made a pattern for the shelf on cardboard and then transferred the pattern to the teak plywood. The teak ply was cut using a saber saw and then the edges were reinforced by glueing 3/8" x 3/8" teak strips around the perimeter beneath the shelf. The edges (except the two adjacent to the bulkheads) were then finished off using 3/4" teak edge moulding. West System epoxy was used to glue all pieces.

A pattern was made from card stock for a brace to support the shelf. I then cut the brace after tracing the pattern onto a piece of 1/2" teak stock. The brace can be seen in the below photo.
The antenna amplifier was mounted between the port side bookshelf and the forward cabinet as was the panel I made for the DC power connector and the antenna connections. These can be seen in the below photo immediately below the black cabin fan.
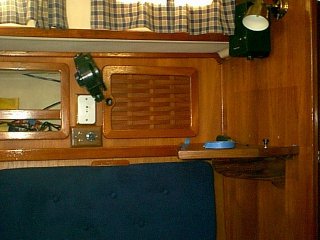
To keep from losing the remote, a small teak holder was fabricated and it can be seen in the above photo immediately beneath the brass bulkhead lamp with the remote stowed in it.
Material Required:
1 ea. Magnavox 9 in. TV/VCR ($90 from friend)
1 ea. Shakespeare 2025 antenna ($112 on sale at West Marine)
1 pc. teak plywood 17" x 24" x 3/8" ($14 at boatyard)
1 pc. 3/8" x 3/8" teak 3 ft long (on hand)
1 pc. 3/4" teak edge moulding 5 ft long ($20 at West Marine)
1 pc. 12" x 10" x 1/2" teak (on hand)
Misc serews (on hand)
Misc teak scraps to build holder for ramote (on hand)
115 VAC duplex GFCI outlet ($4 at Ace Hardware)
Plastic duplex outlet box ($3 at Ace Hardware)
Teak duplex outlet cover ($4.50 at Boater's World)
1.5 in x 1/8 in x 4 ft aluminum bar stock ($5 at True Value Hardware)
2 ea. stainless steel deck straps ($3.90 at SailNet)
2 ea. stainless steel rings ($3 at Boater's World)
3 ft. 3/8" x 1/16" aluminum bar stock ($3.50 at True Value Hardware)
Total cost of project: $262.90
The following tools were required for this project:
1. Phillips screwdriver
2. Saber saw
3. 3/8 in. electric drill
4. Drill bit set
5. Saber saw
6. Small block plane
7. Finishing sander
This project took approximately 13 hours plus varnishing time to complete.
Copyright 2001-2009 No duplication of any portion of this website without express permission.
Permission may be obtained by e-mailing the webmaster at
earlylight160@yahoo.com.