
|
|
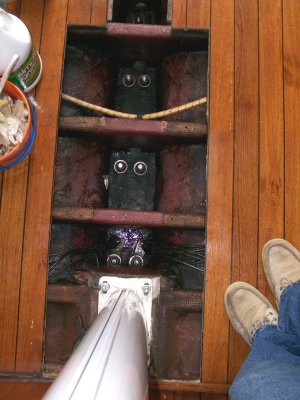
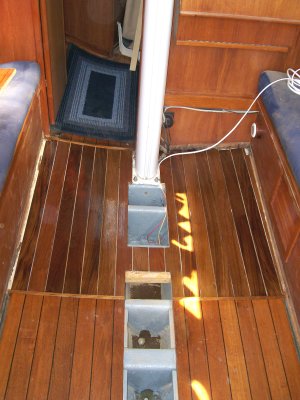
At the time I purchased Early Light, there was an area of delamination near the mast step. Having known about the dreaded "Mast Step Disease" that a few fellow Sabre owners had experienced, I had the surveyor check the mast step out for signs of problems. The step was still structurally sound so I kept a very careful eye on the area for the next few years. I think one of the previous owners had not kept the bilge pumped dry during winter storage and the rain water and snow melt that came down the inside of the mast was allowed to remain in the bilge until it got to a level at least as high as the bottom of the 1/2 inch marine plywood sub floor beneath the teak veneer sole. This eventually led to delamination and some amount of rot in this area.
I decided to attempt to repair this area this winter while the boat was on the hard. I purchased a Dremel Multi-Max oscillating tool (similar to the Fein Multi-Mate) to cut out the bad sections of the sole. With the aid of an aluminum straight edge that I used as a rip fence for the Multi-Max saw, I began cutting out the affected area. The area was larger than I had anticipated, but I kept going until I found solid dry wood with no signs of delamination. I then cut out to the next floor timber aft of this point which would give me a good foundation for the new sub-floor and teak sole. I ended up cutting out an area from the port settee to the starboard settee and from the main bulkhead aft to the floor timber that is approx 38 inches aft of the main bulkhead (approximately 44 inches wide by 38 inches fore and aft). The sole was cut out in three separate sections as I searched for good solid dry wood with no delamination.
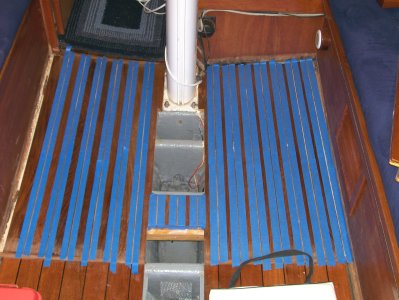
To remove the bad sections of sole close to the settees, the teak trim had to be removed. These pieces were taken home, stripped of the old varnish, sanded and given 5 coats of Captain's Varnish since it was too cold to continue work on the cabin sole at the boat.


After removing all of the bad area, all of the old screw holes into the floor timbers were sealed with thickened West System epoxy.
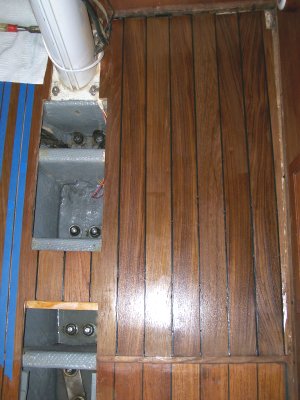
With relatively good access to the bilge area, I took the opportunity to take a couple of core samples of each of the floor timbers. No moisture or damage to the core was found. I then filled these holes with a mixture of epoxy and chopped fiberglass mat. This was followed by laying up two layers of fiberglass over these areas. While I was at it, I ground the inside of the limber holes using my Dremel tool and then gave them three coats of epoxy followed by two layers of glass just to make sure that the core was sealed. Next I cleaned the bilge area thoroughly with Simple Green using a variety of stainless steel wire brushes on my 3/8 drill motor and my right angle drill motor. Once dry, I wiped it down with acetone and sanded it thoroughly with 80 grit sandpaper. I then applied 2 coats of Interlux 2000E/2001E Barrier Coat.
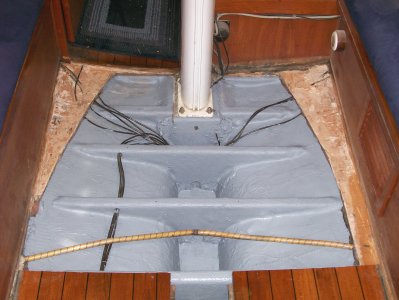
Next two coats of Interlux BilgeKote gray paint were applied to the bilge area in preparation for the installation of the sub-floor. With the patient opened up for surgery it was easy to fix these other ailments.
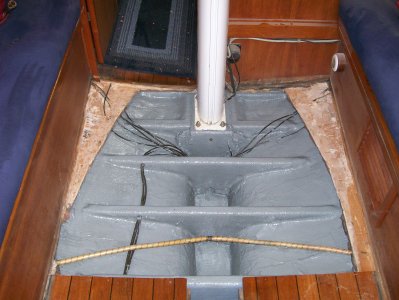
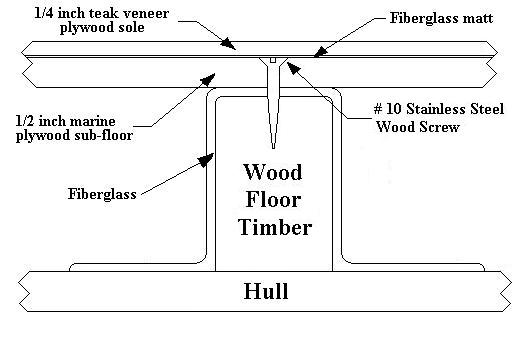
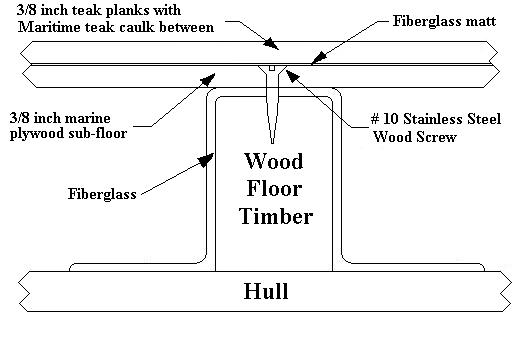
Sabre Yachts had originally constructed the sole in the following manner. First a 1/2 inch marine plywood sub-floor was laid down over the athwartships floor timbers and attached with # 10 stainless steel wood screws. It does not appear the sub-floor was sealed with anything during production. The 1/4 inch teak veneer plywood sole was then epoxied to the sub-floor with what looked like a thin layer of fiberglass mat between them. I assume the teak veneer plywood sole was weighted down in some manner since the sub-floor has some upward curvature to it the further outboard of the centerline you go. This curvature is more pronounced at the forward end (near the mast step).
Since teak veneer plywood originally used for the sole is no longer available in the same pattern as the original (the teak plank sections are 2 9/16 wide and the black stripes between the teak sections are 5/32 wide), I was forced to make some changes in the way I went about my repairs.
I first made a heavy cardboard template of the affected area.
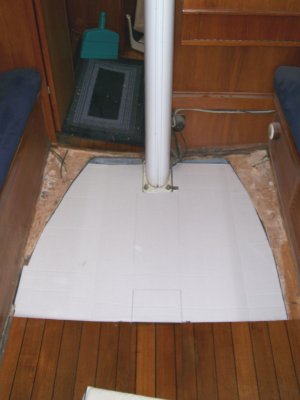
The cardboard pattern was then transferred to a scrap piece of 3/8 inch plywood to make a more substantial pattern.
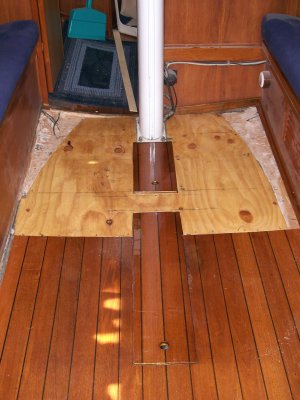
Once I was satisfied with the fit, I mixed up a batch of West System epoxy with West #410 Microlight filler to a peanutbutter consistency. This was applied on either side of the plywood pattern to bring the level up to that of the plywood.

The plywood sub-floor pattern was removed and transferred to a piece of 3/8 inch marine plywood to be used as the sub-floor. The 3/8 subfloor was then cut to shape using a table saw as well as a jig saw and taken to the boat for a test fit. After a few minor adjustments I was satisfied with the fit and I applied two coats of West System epoxy to all surfaces of the sub-floor paying particular attention to the edges to avoid any possible moisture intrusion through the open end grain.
Two stiffeners were fabricated from hardwood and coated with epoxy to stiffen the unsupported area of the sub-floor between the removable bilge covers. These were then attached with #10 stainless steel wood screws and epoxy to the underside of the sub-floor.

The sub-floor was attached to the floor timbers with #10 stainless steel wood screws with ample 3M4200 fast cure bedding at each screw hole. Next either side of the sub-floor adjacent to the settee berths was then bonded to the fairing compound using West System epoxy and 4 inch wide glass tape.
Once the epoxy and glass tape had cured, the final fairing was done in a similar manner as originally done at the factory using West System epoxy with Microlight #410 filler. This was to give the proper upward curve of the cabin sole to the vertical sides of the settee berths due to the upward curve of the hull. Once the epoxy had kicked, I smoothed it out using my random orbit sander in preparation for the application of the 3/8 inch solid teak planks.
I had approximately half the teak I needed on hand, but still had to make a trip to my favorite hardwood supplier (Exotic Lumber in Annapolis) to purchase the remainder that was required for the job. The next step was to prepare the teak for the new sole. I ripped the teak into planks that were 2 9/16 inches wide and approx 41 inches long. With this done, the next order of business was to plane them to a thickness of 3/8 inch using a surface planer. These would be epoxied to the sub-floor as shown in the sketches below.
Both the top surface of the sub-floor and the bottom surface of the teak planks were given a neat coat of West System epoxy using SLOW hardner.
The teak planks were then laid down one at a time after coating the bottom of each one with West System epoxy thickened with colloidal silica. To maintain the 5/32 inch spacing between the planks I found (Ace Hardware) a particular size of grout spacers used to lay ceramic tile were the perfect thickness. I used #6 wood screws and fender washers driven into the sub-floor along the 5/32 inch wide gaps between the planks to get downward pressure on the planks. At this point I removed the grouit spacers and waited for the epoxy to kick. I found that trying to lay no more than six planks at a time worked well.


Once all the planks were installed, I sanded the area with 80 grit to get a fair surface.
This was followed by 120 and 180 grit to prep for varnish using my Porter Cable random orbit sander. At this point the teak planks were given a coat of varnish cut 40% with turpentine to seal the wood from any dirt etc.
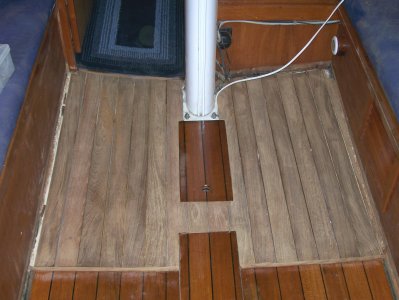
Following Early Light's launch, I returned to the task of finishing the cabin sole repairs. I started by masking either side of each of the seams prior to caulking with Maritime Teak Deck Caulk.
Once the taping was completed I began by caulking two seams at a time starting with the outboard most seam on the starboard side. Once the caulk was applied I smoothed it out with one long stroke using a putty knife. The tape must be pulled within 5 min of application of caulk as it begins to skim over very rapidly.

After letting the caulk on the starboard side cure overnight, I attacked the port side with my trusty caulking gun. The seams were caulked two at a time and then the tape was removed as was done on the starboard side.
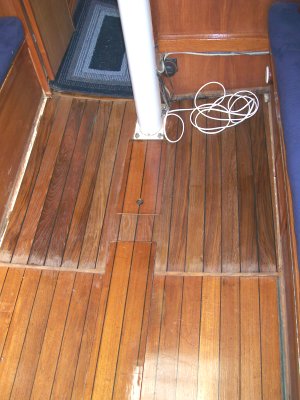
The caulk was left to cure for 48 hours and then I began sanding the sealer coat of varnish off so that the teak can be lightened a shade or two with wood bleach to match the rest of the cabin sole.
The repaired section has had several coats of varnish applied. It is still a bit darker than the original sole, so I will tint some varnish and apply it to the original sections for a better match. I will continue with the varnishing as time and weather allows but for now, the repairs are well protected and it is time to put down the varnish brush and go sailing.
Materials Required:
1 pc 3/8 inch marine plywood 39 in x 45 in (local lumber yard) 26.00
15 pc 3/8 inch marine teak 2 9/16 in x 42 in (Exotic Lumber) 262.00
.98 gal West System 105 Resin (Jamestown Dist.) 91.95
.86 qt West System 206 Slow Hardener (Jamestown Dist.) 37.55
West System Colloidal Silica (on hand) 0.00
5.0 oz West System 410 Microlight Filler (Jamestown Dist.) 27.65
1 qt Captains Varnish (West Marine) 21.00
5 ea 1 1/2 inch chip brushes (on hand) 0.00
10 ea 1 inch foam brushes (on hand) 0.00
10 ea 2 inch foam brushes (on hand) 0.00
Assorted Sandpaper (on hand) 0.00
1 tube 3M4200 Fast Cure caulk (on hand) 0.00
2 tube Maritime Teak Deck Caulk (Jamestown Dist.) 22.92
TOTAL COST OF MATERIALS 489.07
Tools Required:
Dremel MultiMax tool
Table saw
Surface planer
Jig saw
Band saw
Router table
Assorted wood chisels
Assorted screwdrivers
Mallet
Random orbit sander
This project required approximately 70 man hours to complete
Copyright 2009 No duplication of any portion of this website without express permission.
Permission may be obtained by e-mailing the webmaster at
earlylight160@yahoo.com.