CD43 Business Radio
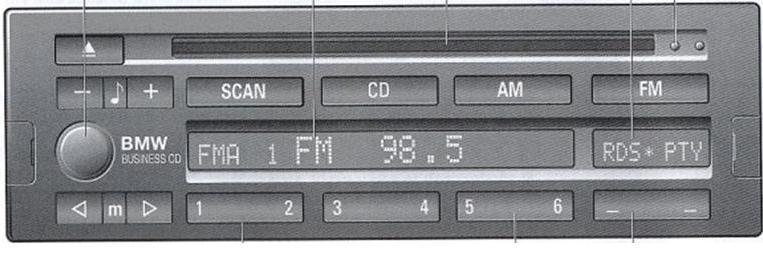
The CD43 Compact Disc Radio has become a popular after-market replacement for the standard C33 radio. It was originally offered on the E36 Z3 and M3 coupe in 1999 and later. You can often find these available on EBay – used CD43’s go for about $250. It features higher power and improved fidelity, especially for the FM tuner. The CD43 features RDS (Radio Data System) and PTY (Program Type) functions. There are two displays on the front – the larger one displays radio station or CD track information, and the smaller indicates the function of the two ‘-‘ keys directly underneath (soft keys). Unlike the old C33, the CD43 does not have a weather band feature. The CD43 uses the I-Bus system just like the older C33 and C43, so it is fully compatible with the optional trunk-mounted multi-disc CD changer. It does not have an AUX input, although like the other I-Bus based systems one can procure after-market interfaces for iPods or other external audio device if you’re willing to lose the CD changer.
Now for a quick rundown on installation and user instructions:
Installation
- To remove the old stock radio and install the new you will need the special BMW radio tool. These are available from many suppliers, typically for around $15. The mounting screws are located behind two plastic flaps on either side of the radio face.
- The installation is a direct plug-and-play replacement for the old radio. The stock cable harness uses a multi-lead connector with a slide locking mechanism. To detach the connector from the old radio, slide the locking mechanism to the side and then the connector lifts off the back of the radio. The antenna connector is a European style coax connector, which is simply a press-fit.
- When
the radio first powers up you have to enter the security code. Note
to the wise – whenever you buy or sell a BMW radio please make sure that
the security code is provided.
There seems to be some confusion in various web postings that I’ve
seen over whether the code consists of 4 or 5 digits - in my case it was 4
(my old C33 radio had a 5-digit code) – after some investigation I believe
that the radio expects a 4-digit code if it is set for European operation,
and a 5-digit code if set for the USA.
So if like me you have a 4-digit code but are in the
- Once
the radio is on you may have to change its region of operation
setting. In my case the radio was
pre-set for European operation, so that the AM and FM frequencies and the
RDS and PTY functions were not correct for the
User Instructions
Some of the less obvious features and functions of the CD43 are:
- My car has the optional trunk-mounted 6-disc CD changer. To access the discs in the external changer, you press the CD button twice. The buttons labeled 1 – 6 are used to select the CD you want to play, and the < and > buttons to select the particular track. You can also choose to play tracks in random order by selecting the “RND” soft key.
- The RDS (Radio Data System) feature allows the radio to display information that the station broadcasts on a sub-carrier of the FM signal, typically showing the station ID, song title, and artist. Press the button under the RDS indicator to control whether RDS is activated; an asterisk is displayed next to the “RDS” in the display when the feature is active.
- PTY
(Program Type, or “PT” in
- Setting
station presets: in AM or FM mode tune to the station you want using the
< and > buttons. Pressing
these buttons will cause the radio to tune to the next station with a
relatively strong signal. If you
want to manually tune to a particular frequency, first press the “m”
button and then the < or > button.
Once you have tuned in a station that you want to store in memory,
press and hold one of the station preset buttons for about 5 seconds. There are three sets of FM band presets
and two for the AM band. The radio
can also automatically select the strongest six stations by selecting the
“FMA” or “AMA” bands and then using the SCAN function.
- The procedure for putting the radio into Service Mode is as follows:
- Turn the radio on, and within the next few seconds press and hold the "m" button for about 10 seconds, and the radio's serial number should appear on the display. The unit is now in Service Mode.
- Use the ‘+’ and ‘-‘ keys to scroll through the various service functions, as described below.
- To change a value, use the “1” radio station preset button.
- When done, turn the radio off to store your changes.
- The Service Mode functions are:
- GI nn: Not sure what this is.
- GAL n: this is the speed-sensitive loudness feature, which adjusts the volume automatically with the speed of the car. The value of the GAL function can be set between 1 and 6, where 6 causes the greatest change of volume with speed and 1 no change of volume. The default setting is 3, which seems to work fine.
- DSPn and Vnn: I suspect that this has to do with an external DSP unit that was available on some other cars of the era such as the E38 7-series. In my case the values are all 0 and can not be changed.
- Pixel display test: press the 1 button and the display cycles between all off and all on.
- Area of Operation: adjusts the AM band, FM band, RDS, and PTY functions for your particular region of the world. Choices include:
–
–
–
– OC+RDS (Oceana?)
–
– NO AREA
Press the “1” button to cycle through the various choices. A word of caution: I have found that if you save a different region you will lose all your radio station pre-sets.
- Radio station signal strength: displays freq nn, where freq is the station frequency and nn is the signal strength. In this mode you can use the AM, FM, and tuning functions to select radio stations and see their relative signal strength. The values for signal strength seem to range from 1 to 15. I assume that these values are used in selecting the strongest stations that are automatically set in the FMA and AMA bands.
This page last updated October 3, 2007