EDF Fleet
Battle Report
Campaign Battle .
This is the final battle played between Jon Halter as the EDF and Karl Williams taking the Comet Empire. We Started with only four teams in our mini tournament. Karl dispatched an parked EDF force rather easily while Jon destroyed another Comet force. We are using as a base the Campaign guidelines from Richard Le clercq.
EDF Versus Comet Empire
EDF Fleet
|
Andromida 2 |
|
Argo |
|
2x SBCV Lexington Class |
|
2x SBC Hood Class |
|
12x SDD Gearing Class |
|
9 CTE Squadrons |
|
4 CTAB Squadrons |
|
4 CTF Squadrons |
Fleet Notes: Normally I like the Andromida I over the Andromida 2 but I knew that I would be facing a lot of heavy Comet Empire Ships. The Andy 2 has a lot more fighters and I knew I would have to use all the fighters I could get. I took the Argo for tradition plus the fact that it is just so well defended. It has plenty of SD defenses and plenty of fighters. I rounded out my force with two SBCV, Lexington class. Each one comes with 3 TB, 1 AB and 1F squadrons. I took Hoods over Konigsbergs for obvious reasons and took Gearing over Airone for the additional hull they have. I knew Karl would have a killer force of Antimatter Missile ships backed up by a Vengeance class SACV. That's a lot of Missiles and fighters. I was going in as the underdog but I felt confident that we could win the day.
 Comet Empire Fleet
|
Medarussa |
|
SACV Vengeful Class |
|
SBB Victory Class |
|
3 SCG(AM) Exterminator Class |
|
12 SDD Storm Class |
|
6 Scorpion Squadrons |
|
3 Eata 2 Squadrons |
Fleet notes: Karl said he picked the largest ships he could in hopes of overwhelming any enemy. The 3 Anti-matter Missile ships represented the core of his strength and backed up by a long range Medarussa he thought he would have no problem rolling over the weak human forces.
Note: This battle took place on a 40x 30 hex map. Both side could deploy up to 2 hexes into the map from their respective sides. The Initial range was about 37 hexes. Initial speed is 3. We played with a couple of house rules. For initiative and movement we treated Battlecraft squadrons and destroyer flotillas as one unit. Playing IGOUGO with individual flights and escorts would have really slowed down the game.
![]()
Deployment
|
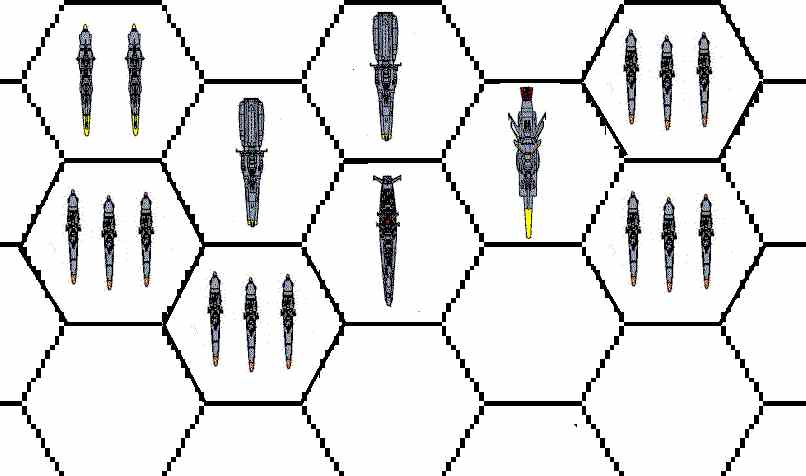
EDF Deployment. Click image to enlarge. |
Comet Empire Deployment Click image to enlarge |
|
|
|
![]()
Turn 1
EDF
EDF Wins Initiative but at this range it's pretty moot. The EDF Heavy ships move at speed 3 so they could begin launching Battlecraft while the EDF destroyers and Battlecruisers accelerated to speed 6. Each EDF ship launches a squadron of CTE Torpedo planes and a couple of flights of CTF that immediately go on CAP.
Comet Empire: The Medarussa and the Vengeful SACV both move at speed 3. The Vengeful launches 3 squadrons of Scorpions. The Remaining Comet Empire Ships Accelerate to 6. Moving to engage the EDF fleet.
Notes: The range was still to great for any combat this turn.
![]()
Turn 2
Comet Empire
: The Medarussa and Vengeful both move speed three again as the Vengeful launches another 3 Squadrons of Scorpions. The Rest of the Comet Empire Fleet Accelerates to 9 moving to engage the EDF fleet. The AMM ships unleash 56 M2 missiles at one EDF SBC and 40 at the other at long range. EDF Gunners shoot down many missiles but still 8 hit on one SBC and 5 on another. A Lucky Critical hit in the Engine Room explodes SBC1, while SBC2 losses a couple of "F" turrets. First blood to the Comet Empire.EDF:
The EDF Cap ships move speed 3 again and launch more planes. Now each Cap ship has a full squadron flying CAP overhead while a second group of CTE torpedo bombers makes it way towards the incoming enemy.![]()
Turn 3
. All Hell breaks loose!EDF
Wins Initiative. Destroyers and the remaining Battlecruiser swarm around the forward elements of the Comet Empire fleet. The EDF Cap Ships continue at speed 3, launching more battlecraft. Several destroyer flotillas unleash close range torpedo strikes on the Anti-matter cruisers causing heavy damage. Comet Empire Antimatter Missile ship #2 is pummeled by ship and Battlecraft launched torpedoes. A long range Hvy Shock cannon shot from the Andromida 2 Destroys her. AMM Ship #1 takes over 70 hits from Destroyer torpedoes and beam weapons from an EDF Carrier. An unlucky Critical hit roll disables it's Radar for the rest of the game. AMM#3 is attacked by two flotillas of Destroyers and takes about 80 damage crippling her but still leaving plenty of fight in her. 4 squadrons of EDF Torpedo planes attack the Comet Battleship. Comet gunners down 14 planes but the ship still takes 76 damage from AT1 torpedoes. Another unlucky critical hit roll explodes the Battleships engine. Finally a Destroyer Flotilla #1 take a bite out of a Comet Empire Destroyer flotilla #3 with torpedoes. Destroying two crippling one.Comet Empire
: The Comet Empire wasn't done yet. AMM ship #1 fired two AM missiles at the Argo, as well as a swarm of hvy missiles. The Comet SBB and a destroyer flotilla added more missiles and beam weapons while the three Squadrons of Scorpions fired Torpedoes at long range. The Black Tiger on CAP combined with the SD guns on the Argo to knock out both incoming AM missiles. However this let the other weapons fired at the Argo slam into the ship unopposed. The Argo takes 103 damage. Destroying her Wave motion gun, two g turrets and knocking out her engines.Fire directed toward the Andromida 2 wasn't so lucky. One of the two AM missiles fired at it missed and CAP fighters over the Andy easily gunned down the other. Other missiles scored about 33 damage. Leaving the Andromida 2 pretty well off. Things did not go so well for Battlecarrier #2. The EDF player split his defensive fire between the two incoming AM missiles and failed to destroy either! Both hit along with 12 M3 missiles, destroying the Carrier and the CTF squadron that had been flying CAP in that HEX. Comet Destroyers finished of the damaged SBC and took out a single Gearing class SDD while crippling another.
Note: Nether side had accumulated enough energy for special weapons fire yet.
|
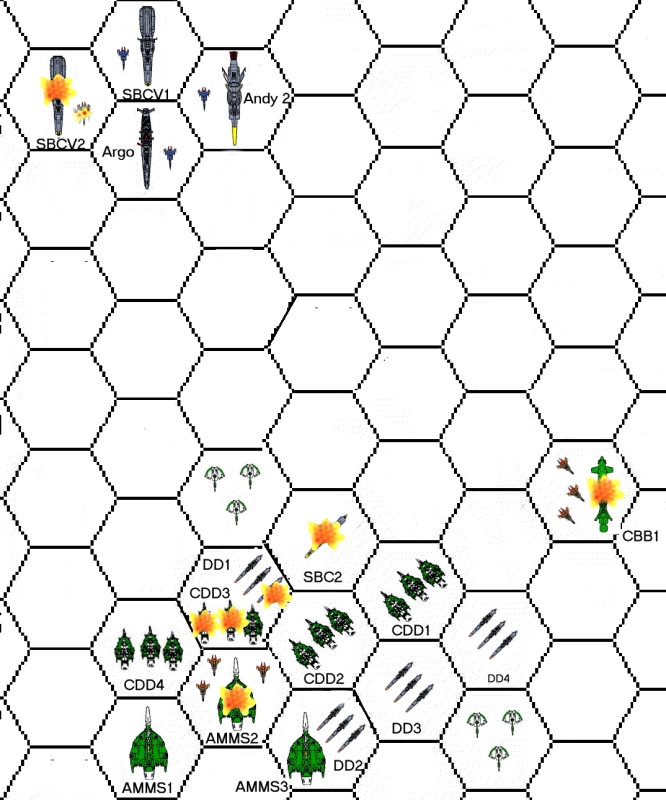
Turn 3 Main Battle. Click image to enlarge. Note several units are not shown on this map. Both the Medarussa and SACV are not on this map. |
|
|
![]()
Turn 4
Comet Empire:
The Comet Empire wins initiative as the Medarussa's Magna Flame Gun comes on line. The Comet Empire player makes an attack with several units in hopes of destroying the crippled Argo. Destroyers and Scorpion fighters swarm around the Argo. EDF Destroyers and fighters put up a heroic defense but it's not enough. Comet "A" batteries blow the Argo into space dust! The Medarussa lines up on t he SBCV1 and fires scoring 68 damage on the Carrier, destroying the command bridge, battle bridge, two turrets and the Wave motion gun. Several Destroyer vs destroy flotilla battles take place Comet losing 4 destroyers while the EDF loses 2. Scorpions tag the Andromida 2 but only score 16 points of damage after the CAP fighters intercept them.EDF
: The SBCV is the only ship with a powered special weapon and it lines up on the Medarussa. The WMG hits the Medarussa full on scoring 46 damage. One of the splash hexes lands on the Vengeful SACV doing 23! However the EDF's luck had not run out. With only one critical hit scored on the Medarussa a 62 is rolled on the charts Main Engine Destroyed! Ship explodes! To add insult to injury the Critical hit on the SACV rolls out as a Hull hit. A D6 is rolled and a 1 results in almost double damage on the SACV. Scoring two more criticals that damage the engine and hanger. The Comet Empire player throws his hands up in frustration and concedes the game!|
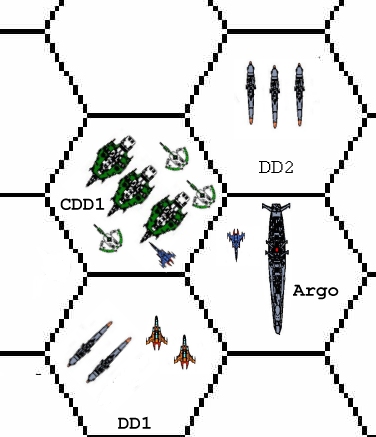
Attack on the Argo. The Argo is destroyed by combined beam weapon fire from the Comet Destroyers. |
![]()
The Aftermath
A Bloody battle for both sides. The Comet Empire lost a total of 8 destroyers, Medarussa, 1 AMM Ship and a Victory class Battleship. Another AMM ship was rendered useless from no radar. Over 50 Battlecraft were lost.
The EDF lost the Argo, 1 Carrier, 2 Battlecruisers 6 destroyers and over 60 Battlecraft( mostly CTEs) The Remaining Battlecarrier was badly damaged. Only the Andromida 2 remained un-crippled.
![]()
Closing Thoughts
EDF:
I was lucky in this game, very lucky. There were several things I would do different. I could have had a better formation with my destroyers and battlecruisers. I was able to capitalize on the very large gap between the forward elements of the Comet fleet and the trailing Medarussa and SACV. I tried with all my might to save the Argo alas after shooting down all 30 incoming missiles at the Argo she still dies to a bunch of "A" batteries from the Comet Destroyers. Next time I would use this fleet I would try and organize my attacks a little better and coordinate Battlecraft with my warships.Comet Empire:
Curse the luck! I hate that Critical hit table, It's my worst enemy. I can't believe I scored 7 critical hits on the EDF SBCV and it's still around and he hit me with just one lousy crit and kills me. Worse is a splash on my carrier that causes a Hull critical hit and from a WMG! Ouch! I did a lot wrong in this battle. My Medarussa was to far back to lend support to the first engagement on turn 3. I had hoped to rush my ships over there and hit them before the WMGs would be ready. It worked but not the way I had planned. I blew my Battlecraft placement and wasted a great opportunity. I should mention we also played this trying to finish in under two hours we failed, ( it took 3) and we were rushing with our turns as fast as possible.