Beginner's guide to Map making
for MCM2 Stunt Tag
by EiD_aRTy 13-Dec-2002
Best viewed with Netscape and 1280x1024
screen
This is a simple step by step process that will
allow you to make a map and run it. It gives some clues about how
to make good maps. Experience and much more effort are required for
making great maps as well as a whole bunch of different skills.
1. You will need a graphics program such as CorelPhotoPaint
or PaintShopPro and be familiar with how to use it to make height maps
and texture maps. You will have to have the program armadillo for
assembling tracks. You might find the program Leveller useful for
making height maps.
2. The fundamental thing that you must make for
a map is the height map. It tells armadillo how high every part of
the terrain is. It is a 513x513 TGA file in 24 bit format.
Only 8 or 16 bits are used. If you have a grey scale height map then
only then just 8 bits are used and you MUST use the smooth function in
armadillo or your map will really suck. I found this out from bitter
experience in my first 4 maps because I didn't have the armadillo update
which had smoothing in it, so you must have that too. If you use
leveller then you will be making a 16 bit height map using the red and
green parts of the colours (blue is not used ever) and the map can be as
smooth as you make it so you do not need to use smooth in armadillo.
3. Use your favourite graphics program or leveller
to make a height map. In a graphics program, white = highest point
and black=lowest. The shades of grey give the scale in between.
You should use large fuzzy paint brushes such as 150 pixels wide with only
modest amount of whiteness added, say up to 50 on the scale of 256, to
start and add repeated strokes to build up the hills so that only some
reach the maximum of 255. Vary the brush size gradually downwards
and reduce the added whiteness slowly also until you are adding little
bumps 1 or 2 pixels wide and just 1 high. The sequence might be 150/50,
100/30, 70/20, 50/15, 30/10, 20/7, 12/5, 7/3, 4/2, 2/1. When about
half way through this sequence, after making sure that you have no large
black areas left, use blur with about a 20 pixel radius to smooth your
map out and make it really flow. Then add the finer details working
only parts of each hill, leaving some parts for fast movement and filling
some in with bumps for take offs. It is variations in feature size
which make a playable map.
4. I prefer not to use the perimeter tiles which
have the boom zone or wall building problem. This is a matter of
taste, but if you follow this method then it is easier as you don't have
to make half the things so you can make a map faster. However you
do need to make your map move towards a black shade or low height at the
edges where it will meet the perimeter tiles which will be featureless
and uninviting to ride on. So no big hills just 2 pixels from the
edges and let the edges fade to black.
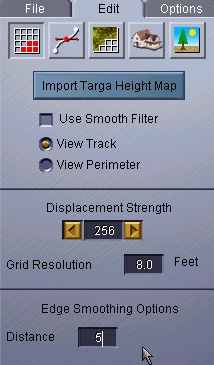
| 5. This is what the armadillo screens look like.
Assuming that you have made a height map then start up armadillo.
Choose stunt quarry and press create. In the edit screen set the
displacement to about 256 and the grid resolution to about 8.0 with an
edge smoothing factor of 0 to 10 depending on how much stuff you have at
the edges. Use 0 if you made all the edges fade to black, or 10 if
you forgot about that. Maybe 5 if you did a half pie job.
The 256 is the height difference in feet between
black and white and the 8.0 is multipled by the 513 size of your map to
get the width in feet. All perfectly obvious really isn't it?
:)
For a smaller midi sized map you can use 4 or
5 for grid resolution but probably need to reduce the displacement strength
to about 150 in such a case. If you forget to change the default
40 setting, your maps will be awfully lacking in jumps. Use about
4.5 rather than 8.0 if you use perimeter tiles otherwise the map will be
too big.
6. Use the smooth filter (place a tick) if you
have only 8 bit height map or your map will suck. Be aware however
that tiny details will be lost, so don't make the details too tiny.
If you smoothed your map in leveller before adding the finer details then
turn the smooth filter off here. Now press import targa height map
and load your map. |
 |
 |
| 7. Your map will now appear in armadillo.
Even if it was a 16 bit map it will still appear as an 8 bit grey scale.
The example shown is my "RollTide" map which is quite a popular one.
You can see that it has two long mountain ranges and that these allow plenty
of high scoring jumps.
Right in the middle is the elephants head with
its ears sticking out. The trunk is too faint to see here.
The sharp contrast between the near black and the elephants head shows
that there is a quick rise and with the mountains behind this means that
there are great jumps straight up the elephants face.
The upper right area is a major contrast to the
mountains. There are a number of rocky outcrops that allow heaps
of very fast 2x jumps. Mostly we all prefer the mountains, but sometimes
a quick burn around the lower parts is fun.
Learning to "read" the grey scale height map will
allow you to make better maps. |
 |
|
8. Armadillo is a very neat program, but is very
touchy, falling over if you hold your mouth the wrong way. Sometimes
it will allow me to ride the map I just loaded, but at others I have to
first save my project and reload it before I can test drive it. Always
test drive your maps before you make the texture map because you will likely
want to make many changes and these will have an effect on the texture
map.
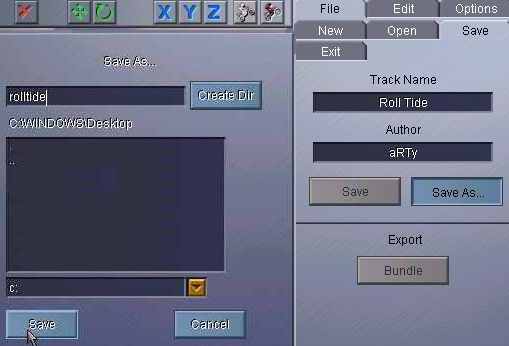
9. To save your map go to save and fill in the
details. I strongly suggest making your "Track name" here exactly
the same name as the "Save As..." name and making the zip file the same
too otherwise there is mass confusion.
Put in your author name even though no-one ever
sees it and do save as.
10. Then reopen the file so that you can test
drive it. I find that I must unselect and reset "test drive with
keyboard" every time to get it to work. You don't need to do bundle until
you have got your map to a reasonable stage and you want to try it in MCM2
itself. Always test drive and press "S" to set the starting position
and a yellow line appears at that spot, before you save and bundle.
Otherwise MCM2 decides to start you off at some place in the wilderness.
Armadillo forgets the start position, the smoothing option and a few other
things when you save and reload, so check everything twice. |

|
| 11. When you have finished testing your height
map with Armadillo and MCM2 then you can add a texture map. If you
don't make a texture map then armadillo makes a sort of grey rocky look
but it has the advantage of having well shaded shapes which are useful
to riders. These grey maps use less disk space than textured maps
and so much quicker to upload and download. I recommend that you should
properly shade your texture map if you make one.
Press the middle tab under edit and armadillo
will first process your height map before it lets you input your texture
map. Pick custom map at the top and then the [...] button on the
right below "Track". Fill in the dialogue with your texture map name
and you will soon be able to test drive your textured map. |
 |
| 12. Your texture map will appear like this.
You can see that the texture map for "Roll Tide" is made to fit the height
map shown in 7 above. The elephant is grey and has white tusks and
even little beady eyes (too small to see here but the real map is 1920x1920
pixels and true 24 bit colour TGA file).
You can see that I have shaded the hills as if
the sun is coming from the SE. The texture varies over the map, with
a little bit of sea and even some waves breaking on the shore. The
lower lying areas are a lighter shade, the middle areas are maroon and
the peaks have rocky textures on them.
For a beginners class you won't be expected to
do all of this. However it would be nice to see more people trying
to match the texture to the map. At least make the mountains have
a mountainess texture and the plains have some grassy stuff. That
isn't hard to do if you don't try to define them too exactly.
In advanced class we expect you to colour the
rocky outcrops accurately hitting the right place. |
 |
13. Once you have made your texture map to your
satisfaction there is just one more job to do. You need to make a
pretty picture for your map that people see when they select it to play.
This is the "Wrapper" or "Flyer" so make it nice. Mostly I start
by pressing "Print Scrn" in MCM2 to save (in MCM2 main folder) a picture
while I test drive. Then I edit this to add some text or whatever
and save it as a 16 bit TGA. This is very annoying, because most
graphics programs do not have 16 bit TGA and for a long time I couldn't
do this. PSP does have 16 bit TGA. You must put two pictures
in the same folder as your ".prj" and other files for the project and they
are 452x220 and 286x139 (which is a reduced version of the first) and are
named mapname.tga and mapnameS.tga and replace the ones that armadillo
made for you.
You will need to go back to armadillo and rebundle
your map to get the pictures in. Be careful if you do anything in
armadillo not to lose your starting location (this will happen if you resave
without resetting the start position with "S" while driving). Just
reload your map and bundle without the save. You now have a finished
map and can ZIP it up and share it with other people.
This is the basics only. Happy map making!
For more information on making decent texture maps and shading and such
like, see aRTy's
Map Making Page and then join
sessions 2 and 3 if you read this in time.
Return to index