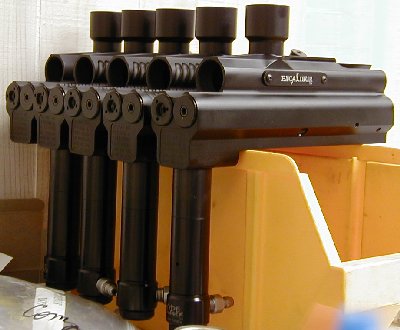
| Excalibur Paintball marker |
Bill Macke is now factory-trained on Excalibur markers.
 During Spring Break 2001, I went to Indianapolis, Indiana and spent a few days learning the Excalibur
inside-out. Arron Alexander of AKA Paintball instructed me on the cartridge design and assembly. We went over the internal regulator and its assembly and setup. Arron showed me how the Excalibur body was assembled and
how the internal components were installed. After watching him assemble one, he had me assemble a few bodies as well.
After going through the body and how it is designed and functions, Arron then went into explaining the
electronics of the marker. He showed me the solenoids and how they were installed. We soldered the lead
wires to the solenoid and installed them in the base of the marker. Arron then explained the design of the circuit board and where each lead plugs into. He also explained that the extra ports were going to be used
for an intelifeed adapter and a programming port. While at the factory, I saw an Excalibur with a prototype
intelifeed line running to a Warp-feed hopper.
Next, Arron proceeded to show me the grip frame and its assembly. He soldered lead lines to the on- off
switch and mounted it to the grip frame. He then showed how to solder wires to the micro-switch and install
it in the grip-frame. The switch is similar to the Angel switch. After adjusting the trigger we ran the
battery wires through the grip and then plugged the battery, micro-switch and on/off switch into the circuit
board. After mounting the circuit board to the grip frame, we bolted the frame to the Excalibur body, and
that was pretty much it.
Since seeing how it was done, I was allowed to assemble a few markers from scratch. During the few days
I was there I also assisted in upgrading earlier versions of the Excalibur to the new circuit board and
internal components. The upgrades include a better designed circuit board, changes to the Hammer to make it
faster and changes to the valve-chamber assembly.
After going through the Excailbur and assembling a number of them, Arron walked me through the Side-Winder
regulator. It is similar design of the WorrGames regulator and the KC No Hot-Shot regulator, with changes to
the size of the piston and diameters of air passages. It has a larger volume capacity and with its component
designed, it can be adapted to a number of configurations. I'll be testing one out on other markers later on.
This regulator is right up there with Palmer's Stabilizer. Arron told me when they were looking for regulators
to use on the Excalibur, the Stabilizer was the only one that offered the flow needed and could keep consistent
operating pressures at the low pressure the Excalibur operates at.
The picture at the top of the page shows some Excaliburs during the assembly process
Larry Alexander of Leads Metal Products showed me around the factory and I took some pictures of Excaliburs and Merlins and other stuff being assembled. You can see some of the pictures on the next page.
While I was up in Indiana, I went to visit relatives about 50 miles North of Indianapolis. Since Fort Wayne is less than two hours away I decided to take a day trip over to the Tippmann Factory Wanna see some pictures? Follow that link.

Got a Defiant or a Bushmaster 2000? Wanna make it run a little more consistent an help protect your solenoid? Put a
Strata adapter on it. It allows you to mount a Rock regulator.
Contact me
Site updated april 2, 2001
 During Spring Break 2001, I went to Indianapolis, Indiana and spent a few days learning the Excalibur
inside-out. Arron Alexander of AKA Paintball instructed me on the cartridge design and assembly. We went over the internal regulator and its assembly and setup. Arron showed me how the Excalibur body was assembled and
how the internal components were installed. After watching him assemble one, he had me assemble a few bodies as well.