
Of course, I *had* to experiment. I changed it a little (because I had a hard time getting the picots on the outside even and was too lazy to get out a gauge), here it is in progress in size 20 Cebelia:
And what I actually did:
Sh 1 black, sh 2 red.
Split ring:
sh 1: 3-3-3-3
sh 2: 3-3
Leave the split ring open and make a new ring with sh 2: 3-3-3-3 close
go back to split ring: 3-3,
close split ring.
Repeat for desired length.
Chain 3-3-3-3-3-3
Split ring:
sh 1 3-3-3-3
sh 2: 3-3+3-3 (join is to opposite sh 2 ring) close.
Repeat for same number of rings, repeat chain to end
I'm thinking if I did it again, I'd start with a little chain of 3-3-3 and
then end with the same chain, tie the ends together and add a
tassel to hide them. I did 9 repeats in my experiment, which is
pretty stubby for a bookmark.
Jenny in Sydney, Australia writes:
"I made a picot gauge from a plastic coated paperclip (inside circ) and I make 5 picots on the outer ring separated by 2 ds (total count is still 12ds). The gauge is probably 6mm. I makes it look so lacy even in size 20 thread. The inner picots I measure by eye. I put a tassel on the 12 ringed bookmark, and to have one long enough, 20 rings without a tassel. I have been doing split rings for 3 weeks now..learnt how to tat 2 months ago. I'd never heard of tatting before that."
She's already made five of this bookmark plus about 20 others! Way to go, Jenny!
Adapted and tatted by Emma Crew, April, 2001
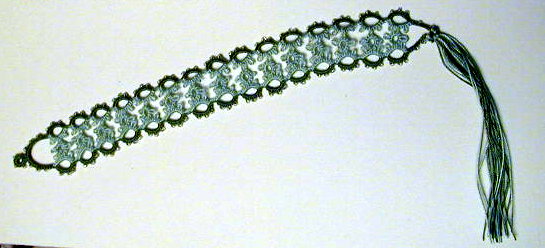
I made a variant of this bookmark in June 2001 for the bookmark exchange. It used beads instead of the outside picots, and I redid the ends a little bit (largely because my beads were grouped in threes along my shuttle thread). The thread is Coats Opera size 20, and the beads are Mill Hill petite glass beads. Here's a photo of the completed bookmark:
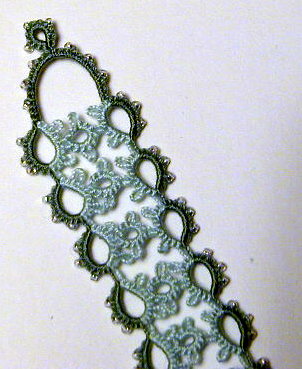
And a closeup of the end:
© Emma Crew, 2001
emmacrew@yahoo.com
Back to tatting
Home