Newborns in Need Simple Baby Bonnet
A Pattern by Merry Higby
IMPORTANT! Use size 10 thread or the bonnet will not be big enough. This bonnet was designed to work up quickly to encourage more people to tat a bonnet to be used for Newborns In Need. One major thing that makes this work up quickly is using size 10 thread. In the pictures with the 3-D view, the bonnet is on a regulation sized soft ball, which is about the size of a grapefruit. That's about the size of a normal baby's head, proably between 6-7 lbs. or so, or a preemie who has had complications and caused swelling in the head.
Abbreviations:
R(s) Ring(s)
LR(s) Large Ring(s)
SR(s) Small Ring(s)
BegR Beginning Ring
Ch(s) Chain(s)
P(s) Picot(s)
CR Close Ring
DS(s) Double Stitch(s)
RW Reverse Work
Prev Previous
- Picot
-- Long Picot
+ Join
Numerals indicate the number of double stitches
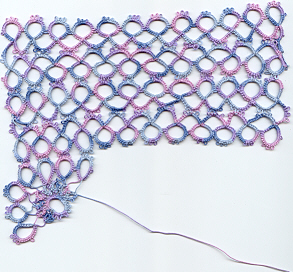
SIDES AND TOP OF BONNET:
(This consists of chains and rings.)
FIRST ROW:
Begin the 1st "strip" with a Ch.
Ch: 4-2-2-4. DO NOT RW. Also, keep the Ps point outward on this chain.
LR: 6-6-2-2-6-6. CR. RW.
Ch: 4-2-2-4. RW.
LR: 6 + (to last P of Prev R) 6-2-2-6-6. CR. RW.
Ch: same as Prev Ch.
Continue in this manner until the "strip" has 12 Chs & 12 LR. DO NOT RW.
Ch: 4-2-2-4. DO NOT RW. The Ps on this end chain should be pointing outward.
ROW TWO:
(heading back the other way)
LR: 6-6-2-2-6-6. CR. RW.
(You should now be heading back in the reverse direction so you can join the Chs in this row to the Chs in the 1st row.
Ch: 4-2 + (to center P of Ch between the last 2 LR of 1st row) 2-4. RW.
LR: 6+ (to last P of Prev LR in row 2) 6-2-2-6-6. CR. RW.
Continue in this manner joining center P of Chs to center P of corresponding Ch from the Prev row and joining the 1st P of the LR to the last P of the Prev LR.
**NOTE: If you know how to do Split rings, make the last LR of Row 2 a Split Ring, and the first LR of Row 3 a split ring, making the Ps in the proper places. This will avoid having to cut and work in ends at the end of Row 2.
ROWS THREE AND FOUR:
Make next row of Rs & Chs as you did in the first row, except this time join the center P at the top of the LR to the center P of corresponding LR in last row.
After "turning" the row at the end of Row 3 with the "turning" chain, continue as you did in the 2nd row. Finish off with a Ch after the last LR, joining it to the base of the 1st LR in row three of the "strip."
FOR MEDALLION WHICH IS THE BACK OF THE BONNET:
BegR: 1DS, 15 P separated by 2 DS) 1DS. CR. Leave 3/8 inch spacer thread. Do NOT cut thread.
Next round:
SR: 2-2+ (to 1st P on Prev round of medallion) 2-2. Leave 3/8 inch spacer thread.
LR: 6-6-2-2-6-6. CR. Leave 3/8 inch spacer thread. RW.
SR: 2+ (to last P of 1st SR) 2+ (to next free P on BegR of medallion) 2-2. CR. Leave 3/8 inch spacer thread. RW.
LR: 6+ (to last P of 1st LR in second round of medallion) 6-2-2-6-6. Leave 3/8 inch spacer thread. CR. RW.
Continue in this manner until you get to the 4th LR of medallion.
4th LR: 6+ (to last P on Prev LR in second round of medallion) 6-2+ (to center P of 1st LR on last row of Rs & Chs, which is the sides & top of bonnet.) 2-6-6. CR. Leave 3/8 spacer thread. RW.
Continue around making & joining the SRs & LRs in the medallion in the same manner, being sure to join the center P of the LRs of medallion to the center P of the LRs of the "strip of Rs & Chs" until you get to the LAST (15th) SR & LRs. Be sure to join them to the corresponding SR & LR at the beginning of the medallion. (You should have one LR of medallion from LR #4 thru #15, connected to each LR of the "strip of Rs & Chs section of the bonnet.)

Bonnet in progress: how the medallion joins to the strip
Some of these directions may seem too wordy for the experienced tatter, but I tried to write this so even a beginner would be able to follow it.
I would like to thank very much the lovely people who are sharing their web-site space with me for this. Someday I hope to have my own web-site. I hope you all enjoy the simplicity of this pattern and enjoy making them. I ask only that you please make at least one bonnet for NIN -- or as many as you'd like for them (any chapter or division) because NIN was my inspiration for
designing it. I would love to hear from any of you who make it and hear how you liked it. My email is merryh3@qwest.net.
© Merry Higby, 7/28/2001. Permission is given to freely copy and share this pattern, providing this notice is retained and you tat a bonnet for charity!
For more information on NIN (Newborns In Need) please check out their web-site at www.newbornsinneed.org.
Back to Emma's tatting page
Home


